
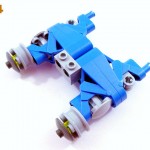
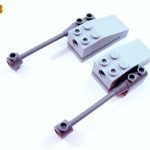
Offline Instructions
Powerpoint File with Parts List
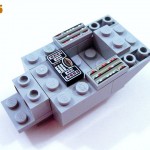
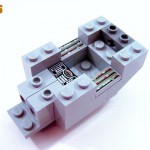
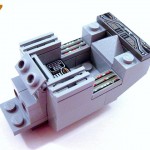
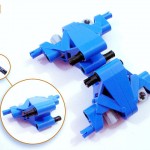
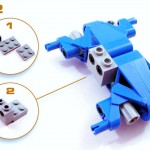
Parts List
The Bionicle elements listed in Dark Orange come in matching pairs in 7 other colors: Black, White, Red, Blue, Green, Dark Turquoise, and Brown.
– 2 Dark Gray Bar 1 x 8 with Brick 1 x 2 Curved Top End (Axle Holder Inside Small End)
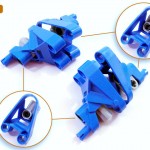
– 2 Dark Orange Bionicle Mask Kakama
– 4 Dark Oange Bionicle Tohunga Foot
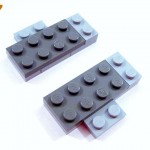
– 6 Light Gray Brick 1 x 2
– 2 Light Gray Brick 1 x 3
– 1 Light Gray Brick 2 x 2
– 1 Light Gray Brick, Round 2 x 2
– 1 Light Gray Brick, Round 4 x 4 with Holes
– 2 Dark Gray Dish 2 x 2 Inverted (Radar)
– 1 Trans-Neon Green Dish 2 x 2 Inverted (Radar)
– 1 Light Gray Dish 4 x 4 Inverted (Radar)
– 1 Light Gray Hinge Brick 1 x 2 Base
– 1 Light Gray Hinge Brick 1 x 2 Top Plate Thin
– 9 Light Gray Plate 1 x 2
– 4 Light Gray Plate 2 x 2
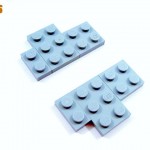
– 4 Light Gray Plate 2 x 3
– 3 Dark Gray Plate 2 x 4
– 2 Light Gray Plate, Modified 1 x 2 with 1 Stud (Jumper)
– 1 Dark Gray Plate, Modified 1 x 2 with 4 x 4 disk at 90 degrees
– 3 Trans-Neon Green Plate, Round 1 x 1
– 2 Light Gray Plate, Round 2 x 2 with Rounded Bottom (Boat Stud)
– 2 Light Gray Slope 18 4 x 2
– 1 Light Gray Slope 45 2 x 1 Triple
– 2 Light Gray Slope, Inverted 33 3 x 1
– 1 Light Gray Slope, Inverted 33 3 x 2 with Connections between Studs
– 1 Light Gray Slope, Inverted 45 4 x 4 Double
– 1 Black Technic, Axle 3
– 2 Light Gray Technic, Axle and Pin Connector Angled #1
– 2 Light Gray Technic, Axle and Pin Connector Perpendicular
– 1 Dark Gray Technic, Brick 1 x 2 with Axle hole
– 2 Light Gray Technic, Brick 1 x 2 with Hole
– 2 Light Gray Technic, Brick 1 x 2 with Holes
– 4 Black Technic, Pin Long with Friction Ridges Lengthwise
– 4 Black Technic, Pin with Friction Ridges Lengthwise
– 1 Black Tile 1 x 2 with Avionics SW Copper, Red & Silver Pattern
– 2 Light Gray Tile 1 x 2 with SW Computer Pattern
– 1 Dark Gray Tile 1 x 4 with Black, Silver, Copper Circuitry Pattern
– 2 Light Gray Tile, Modified 1 x 2 Grille with Bottom Groove / Lip
– 2 Trans-Neon Green Tile, Modified 1 x 2 Grille with Bottom Groove / Lip
– 1 Light Gray Wedge 4 x 4 Triple Inverted
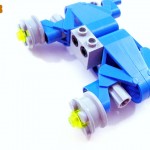
– 2 Light Gray Wheel Freestyle with Technic Pin Hole
– 1 Trans-Black Windscreen 6 x 4 x 2 Wedge Curved
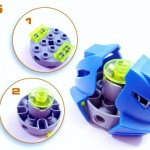
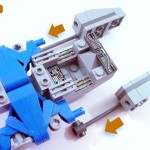
Instructions


Version 2.0 Upgrade
Every part list in light and dark gray is also available in light bluish gray and dark bluish gray with a few exceptions which the instructions below take into account.
Step 7a: Replace 1 Dark Gray Tile 1 x 4 with Black, Silver, Copper Circuitry Pattern and 1 Light Gray Slope 45 2 x 1 Triple with:
– 1 Dark Bluish Gray Tile 1 x 4
– 1 Light Bluish Gray Slope 30 1 x 2 x 2/3
Step 7b: Add:
– 2 Light Bluish Gray Tile 1 x 1 with Groove
To the two studs on the 1×2 Bricks that are next to the Light Bluish Gray Slope 30 1x2x2/3 and adjacent to the Dark Bluish Gray Tile 1×4
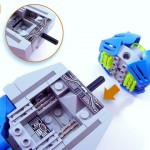
Step 11: Remove bottom 2 Black Technic, Pin Long with Friction Ridges Lengthwise. Replace with:
– 4 Black Technic, Pin with Friction Ridges Lengthwise
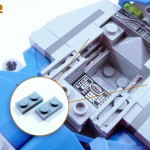
Step 12: Assemble 2×3 and 2×2 Light Gray plates. Set aside for step 23. Replace Technic Brick 1×2 with Holes with:
–1 Light Bluish Gray Technic, Liftarm 1 x 2 Thick
Step 13: Replace 2 Light Gray Wheel Freestyle with Technic Pin Hole and 2 Trans-Neon Green Plate, Round 1 x 1 with:
– 2 Light Bluish Gray Wheel 30.4 x 14 with Pin Hole, Fake Bolts and Shallow Spokes
– 2 Technic, Pin 1/2
Step 18: Replace 2 Light Gray Slope 18 4 x 2 with:
– 2 Light Bluish Gray Plate 1 x 2
– 2 Light Bluish Gray Plate 2 x 2
– 4 Light Bluish Gray Slope, Curved 4 x 1 No Studs
Step 23: Remove 1 Light Gray Brick 1×2. Replace with Light Gray Technic Brick with Holes from step 12. Attach plate assembly from step 12.
Step 24a: Before attaching Light Gray Wedge 4 x 4 Triple Inverted, add the following to the two studs on the wide end:
– 2 Light Bluish Gray Slope 30 1 x 1 x 2/3
Step 24b: Before attaching Light Gray Dish 4 x 4 Inverted (Radar), attach the following:
– Plate, Round 4 x 4 with Pin Hole
Recent Comments