
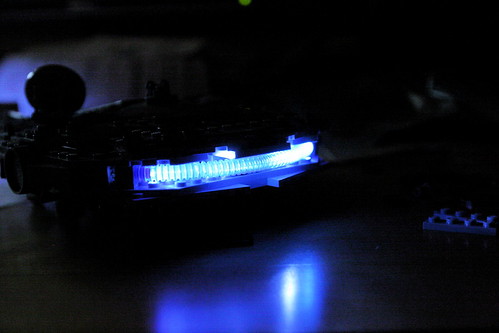
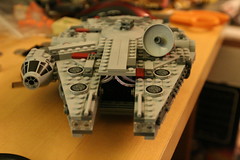
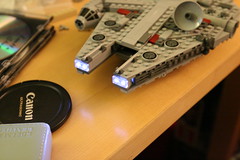
![[MOD] 7778 MIDI-scale Millennium Falcon + Lifelites eLite Jr.](https://www.fbtb.net/wp-content/uploads/2009/10/midi-falcon-lifelites-mod.jpg)
When I was building the MIDI-scale Falcon set for the review, I was noticing just how much hollow space there was all around the ship. Then I got to thinking about modding it to have working headlights and a glowing engine; all that empty space should be enough to hide some wires and a battery box or two. I turned to Lifelites to see what was possible. After consulting with Rob, I ordered two sets of eLite Jr. kits and got my kits in the mail a few days later. If you want to see how the mod is done, hit the full article link below.
This is my first How-To and while I was shooting, I was modifying steps and forgetting to take pictures along the way. Oops. It’s not rocket surgery to figure out where I moved things or replaced things, but I’ll try and be as thorough as possible. Also, the photos click through to the images on my flickr account where I may have included additional notes for clarity.
Before I begin, I would just like to thank Rob aka Brickmodder over at Lifelites. He was a great help in getting me what I needed and even reminding me to get my review done and the how-to finished. Sometimes a pain in the ass but a great help nonetheless. I’m partially kidding about the pain the ass part in case people reading this don’t realize I am joking. I’d like to also give a shout out to Matt De Lanoy for providing some of the extra parts. Anyways, onto the pictures.
Prep
For this mod, I only needed a handful of additional parts:
- 2 1×2 tan bricks
- 4 1×1 light bley Technic bricks with axle hole
- 2 1×2 trans clear tile
I also used 2 eLite Jr. kits. Each kit has 4 outputs. I used one kit for the front headlights and one for the rear engine glow. You can use just one kit and choose to either light up the front, or the back, or just go half and half if you so choose.
Step 1: Removing The Top Shell


First thing you have to do is remove the top layer of plates including the cargo bay cover and the dorsal gunner station. If you go slow enough you should be able to pry off whole chunks to save some reassembly headache later. Just make sure you keep note of all the loose bits that don’t cooperate so you can replace them later. Having the instruction manual handy couldn’t hurt either.
Step 2: Modifying the LEDs
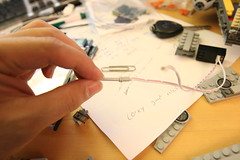
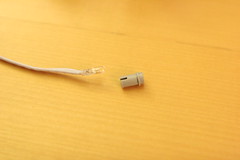
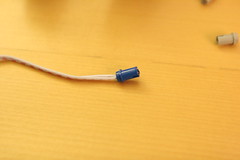
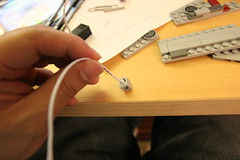
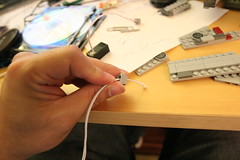
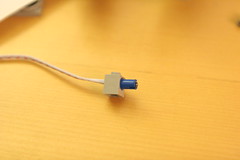
The LED cables that come with each eLite Jr. kit comes assembled with the LED lamp glued inside a Technic half-pin. You need to remove the lamp from the half-pin. Don’t pull the cable as that may just disconnect the wiring from the lamp and once you do that you’re screwed. Instead, push the lamp through using a 4L bar. Your falcon comes with two, used on the mandibles. The glue isn’t particularly strong so with little effort you should be able to push the lamp free. Repeat this process five more times, four will be used for the headlights and two for the engine glow.
Step 3: Headlights

You need to rearrange the front a bit. Remove the headlights and the 1×4 brick with groove and flip the 1×4 brick around 180 degrees. Insert the modified LEDs from step 2 into the headlight bricks and run the wiring for both lamps through the groove. In the mandibles there are 1×2 light bley bricks and 1×6 tan bricks. Remove the 1×6 tan bricks; they won’t be used for the rest of the mod. Relocate the 1×2 bricks as pictured to secure the wiring against the groove. Repeat for the other side.
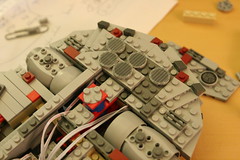
Step 4: eLite Jr. Placement
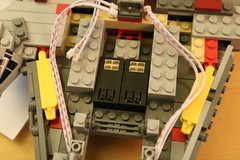
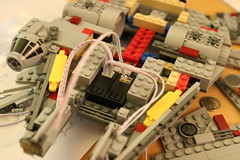
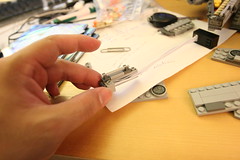
The eLite Jr is the size of a 2×4 brick fully assembled. It’s comprised of a circuit board, battery, top shell, and 2×4 bottom plate. It’s a little high for our purposes and location, so I skipped the 2×4 bottom plate and bound the shells side-by-side directly onto the cargo bay floor. Before securing the eLite Jr.’s to the plate, make sure you have the appropriate program and brightness set. Attach the other end of the LED cables from the headlights to one of the kits.
Step 5: Engine Prep
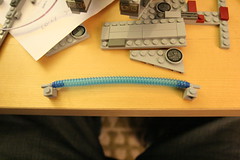

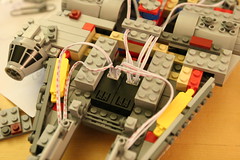
Remove the engine glow assembly from the model. Disassemble the engine glow assembly and set aside the headlight bricks and the pneumatic T-pipes. You will not be using the pneumatic T-pipes again. Remove the blue half-pins from the tubing and insert the last two LEDs you disassembled from step 2 into the half-pins as pictured. Next, you’re going to take the plug end of the LED cable, and push it through the additional 1×1 light bley Technic brick with axle hole. Push gently and it’ll give; You won’t damage either the brick or the plug so don’t worry. Slide the brick all the way and attach it to the blue half-pin with the LED cable as pictured. Next, attach the blue tubing to the blue half-pin like before. Repeat for the other side.
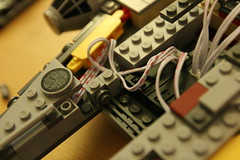
Step 6: Modifying Rear Frame


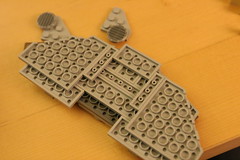
The first picture above is the original frame set up from the set’s instruction manuals. I rearranged a bunch of the tan bricks and added two of my own 1×2 tan bricks to the mix to create what you see in the second picture. The third picture shows further modifications: replaced 1×6 tan brick with a 1×4 tan brick, relocated 2 1×1 round black bricks, and relocated 1×6 dark bley plates. I also placed the engine assembly back in its original position. Take the last two LEDs and plug them into the back of 1×2 light grey Technic bricks with axle hole. The fourth picture above shows the 1×4 light grey plates from step 37 of the instruction manual to plug the gap left by relocating the 2 1×6 dark grey plates from the third picture. This was all done for structural strength. You can keep the 1xn plates in their original positions without terribly weakening the layered plates on the back.
Step 7: Rebuilding Top Shell

Before you start rebuilding the top layer of plates, plug your rear LEDs into the other battery box and test the light output. You will need to angle the two lamps not attached to the engine assembly for maximum coverage. Once you’re satisfied, start layering the plates on top and rebuilding what you took apart earlier. For the front mandibles, use the two headlight bricks taken from the previous engine assembly (that were attached to the pneumatic T-pipes) and place them in the gap created when you relocated the 1×2 light bley bricks in step 3. Once everything is put back together, you can open up the cargo bay between the mandibles just wide enough to turn the eLite Jr. kits on and off. If you managed your wires well enough, the cargo bay flaps should be able to close all the way or close enough to all the way where it is barely noticeable. Lastly, I replaced the 1×2 trans smoke tiles with 1×2 trans clear ones for maximum light output.
Step 8: Enjoy!

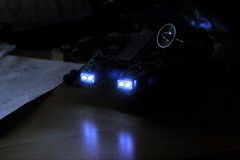

After you’re done rebuilding, turn on your eLite Jr.’s and enjoy! The LEDs have a very slight blue tint to them, magnified by the white balance setting on my camera. There’s more than one way to skin a cat, and I realize that my mods may have some room for improvement. This is merely an account of how I modded mine, you may find better solutions on your own. The modding evolved as I was building and photographing; I originally had thought about using a 20L fiber optic cable threaded through the tubing for the engine glow, but the light output from the cable wasn’t nearly as bright as direct exposure from the LED. If you can only get one kit, I would suggest using it for engine glow as the temptation to swoosh the model around is too great not to pass up.
Be sure to check out Lifelites for all your LED needs!
