


Two very different approaches. The old being very dramatic and stylized, the new simply showing you exactly what you’re in for. The actual model is shown on the back of the box for both, as well as some close ups to highlight various features. Standard fare. What’s interesting is the change in labeling: 7191 Ultimate Collector Series X-wing Fighter vs 10240 Red Five X-wing Starfighter. This new set technically isn’t part of the UCS line. At least according to the box. But then again, 10225 R2-D2 isn’t either if the boxes are your metric, while the shop at home site disagrees. So is it or isn’t it? Seems obvious that it should be, but then why not put it on the box? In truth it doesn’t really matter, it’s just one of those details that I know collectors will argue about to no end. That’s just what we do.Moving on to the builds themselves, both models are broken down into distinct sections. 10225 jumps right into the gearbox mechanism while 7191 starts with the nose, but otherwise the sub assemblies and orders are the same. We’ll start with rear section since it’s the core to both of the fighters.
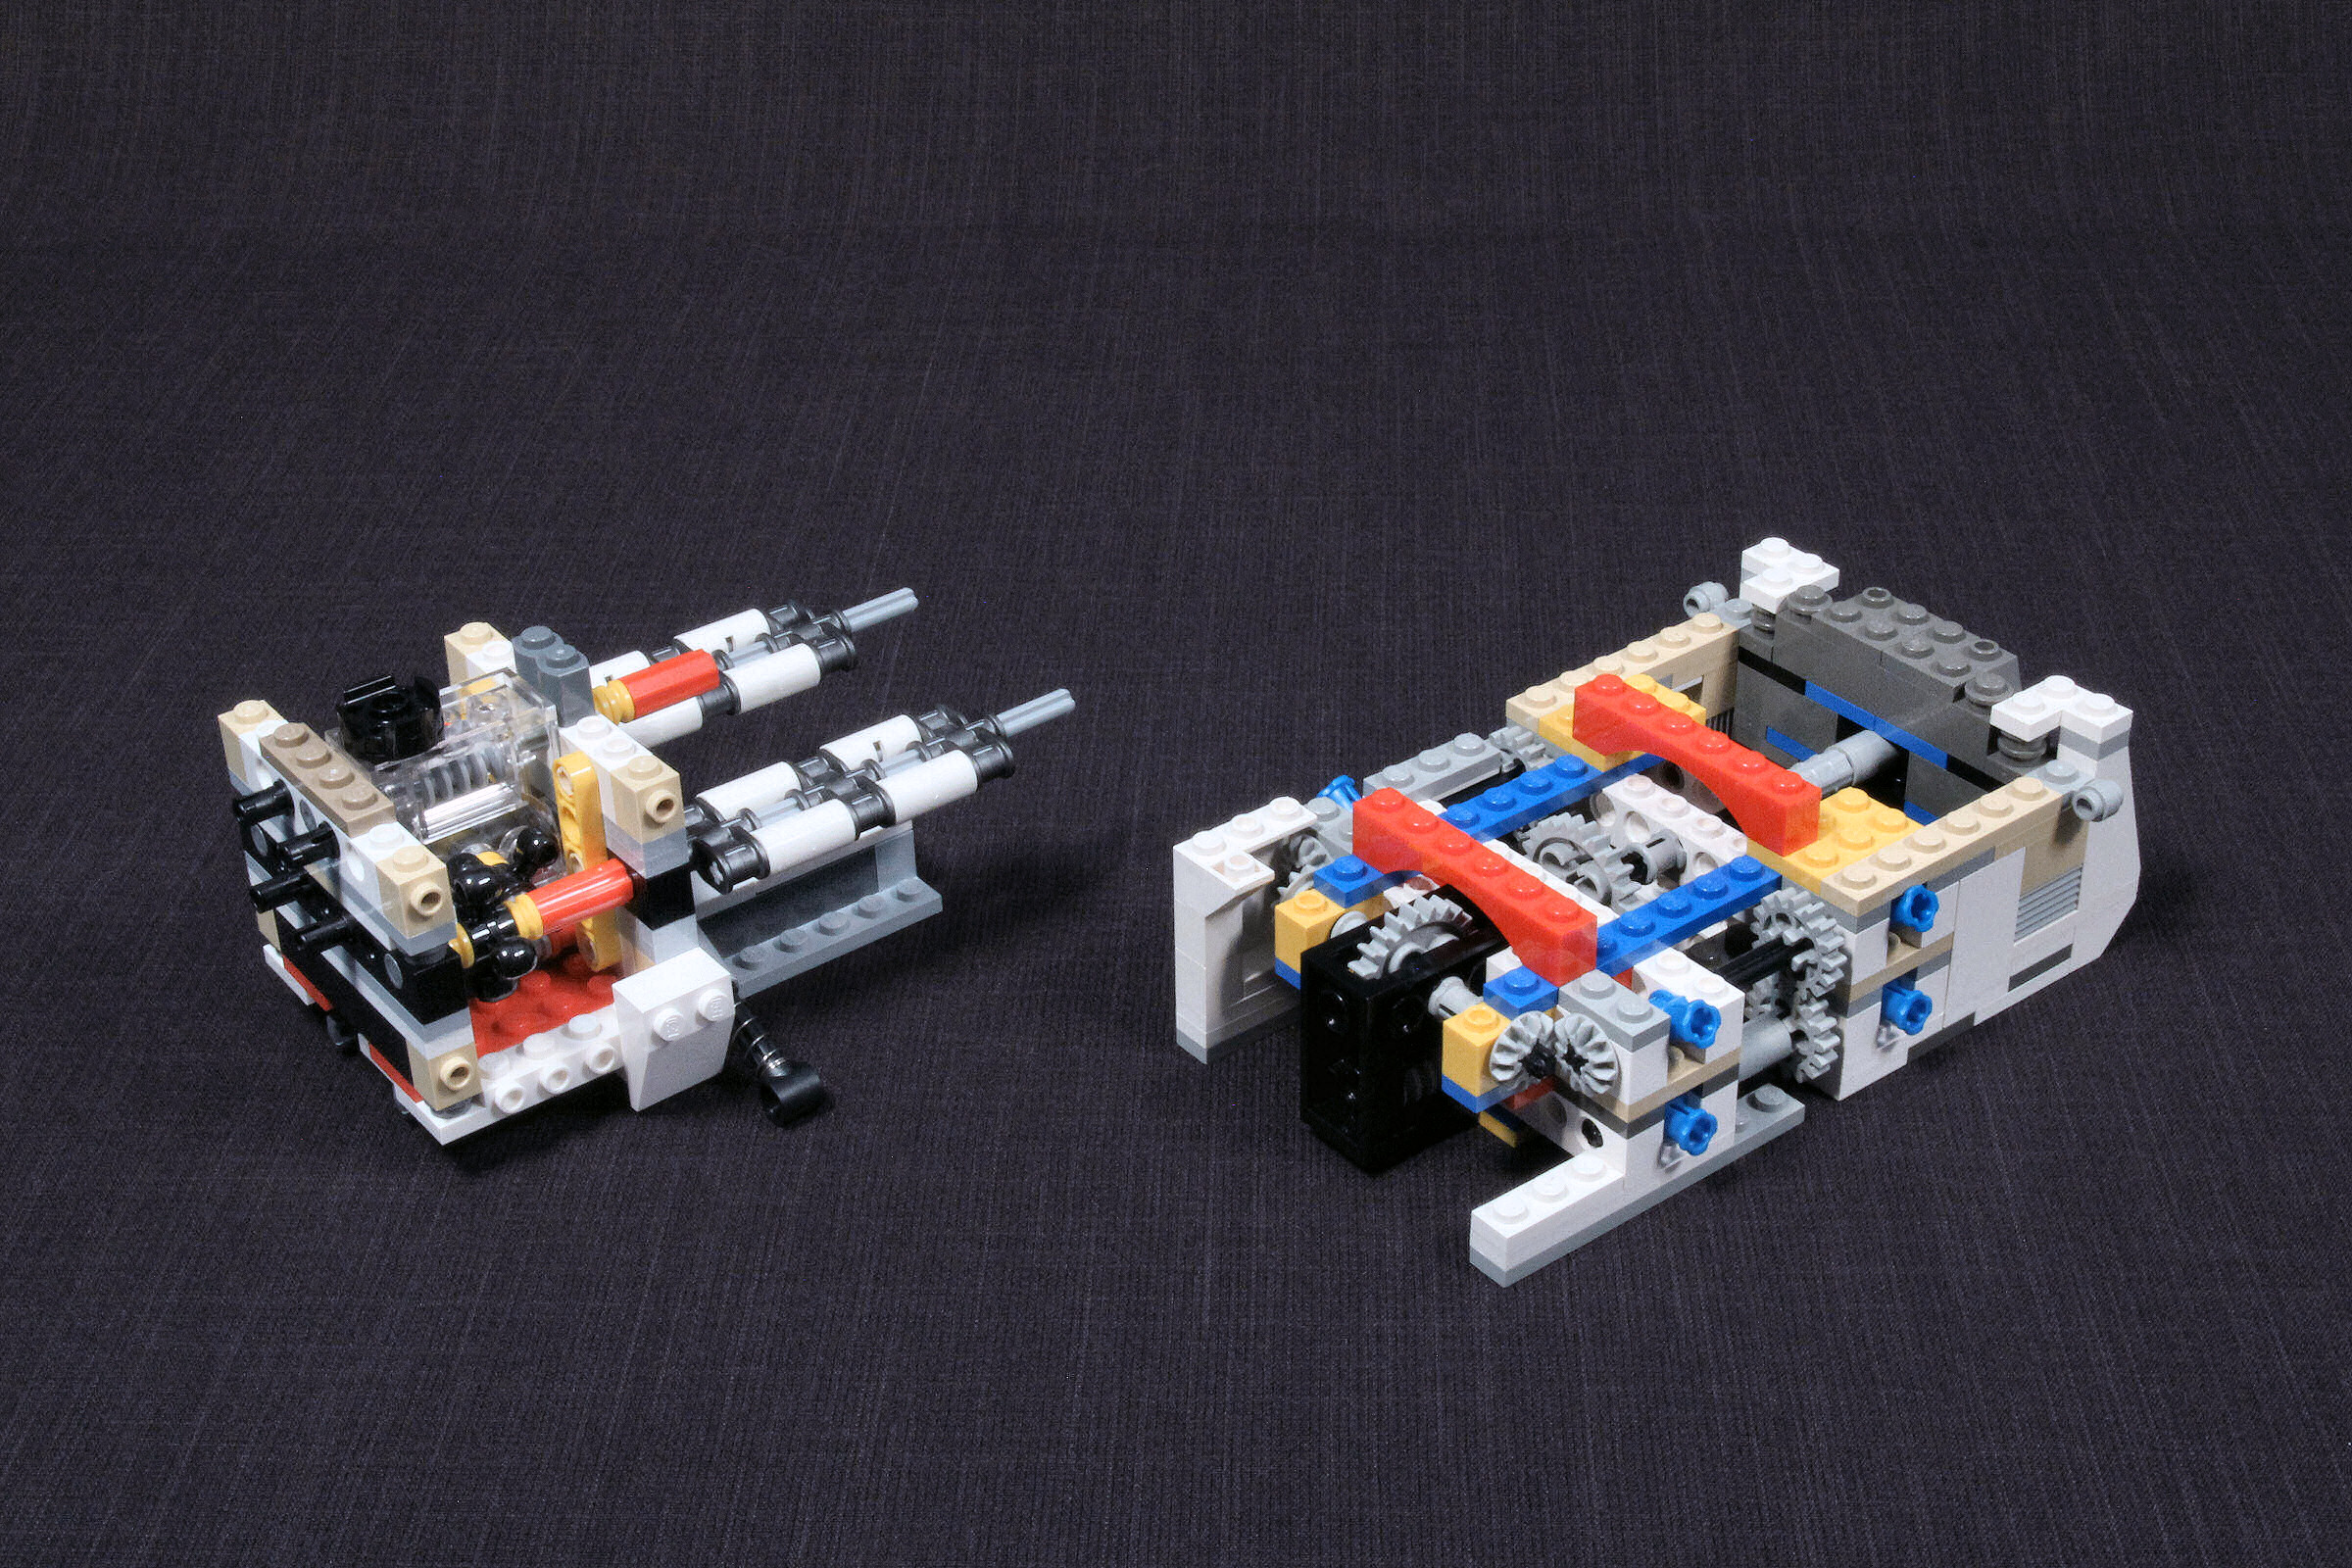
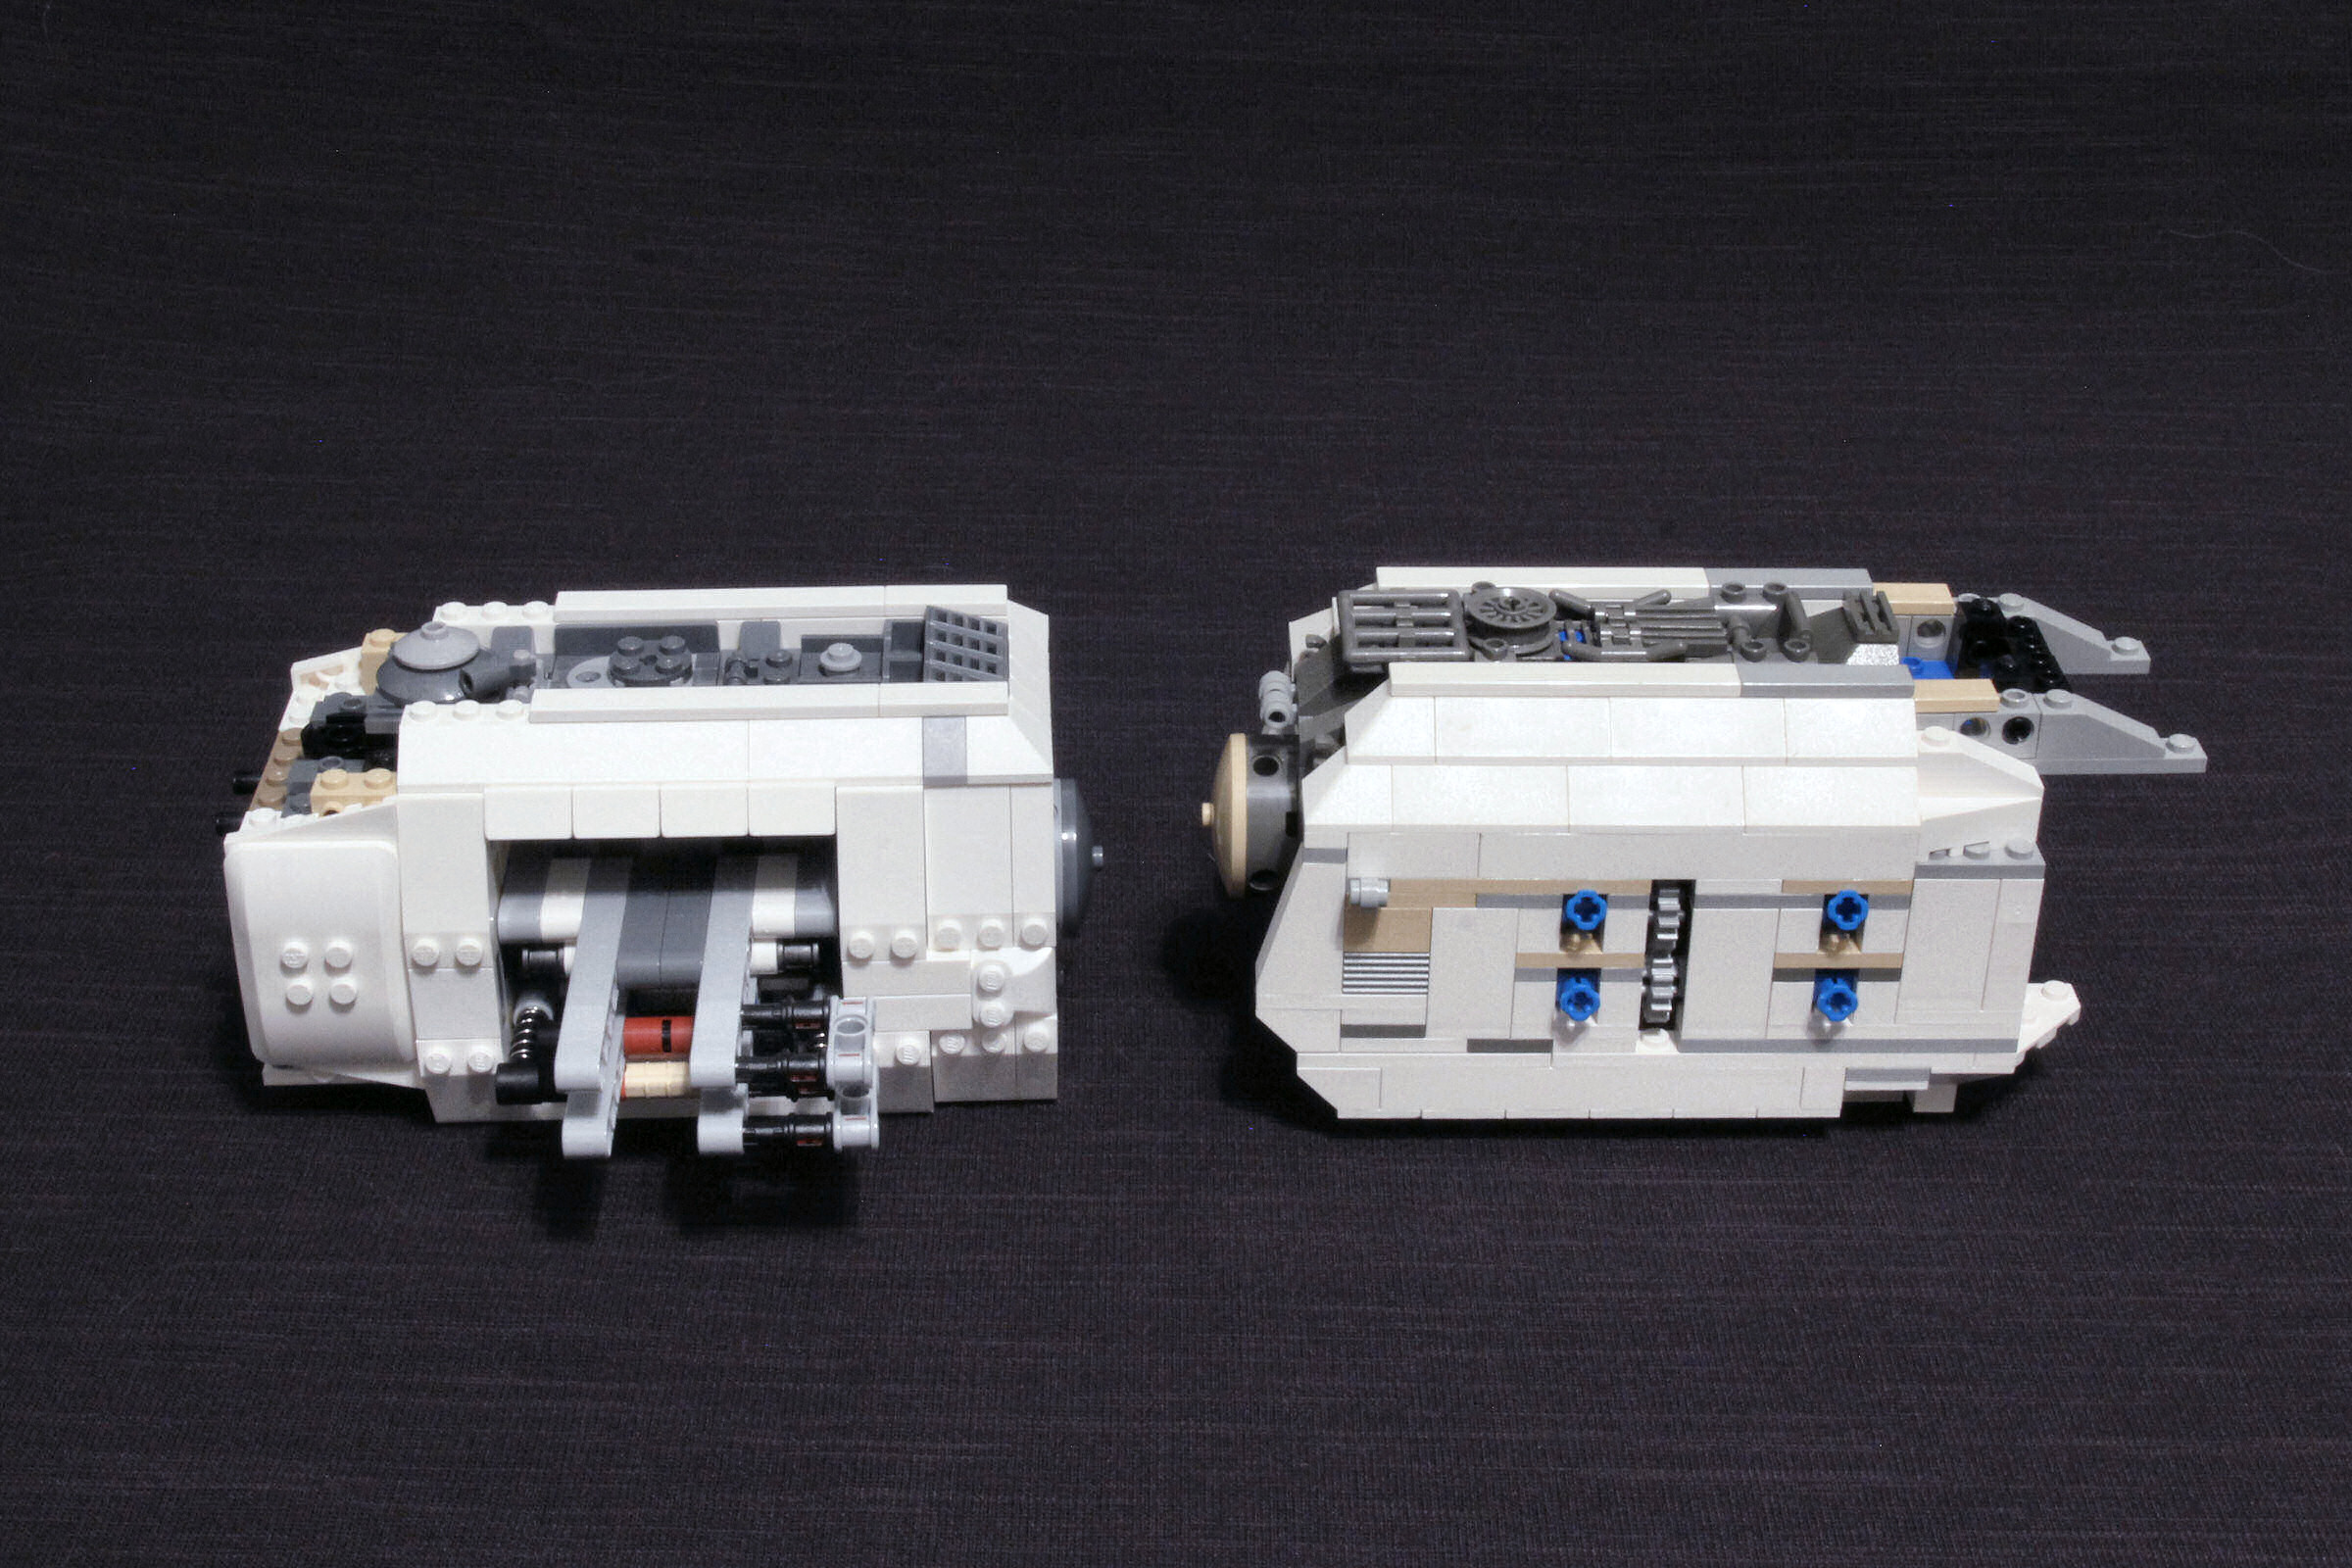
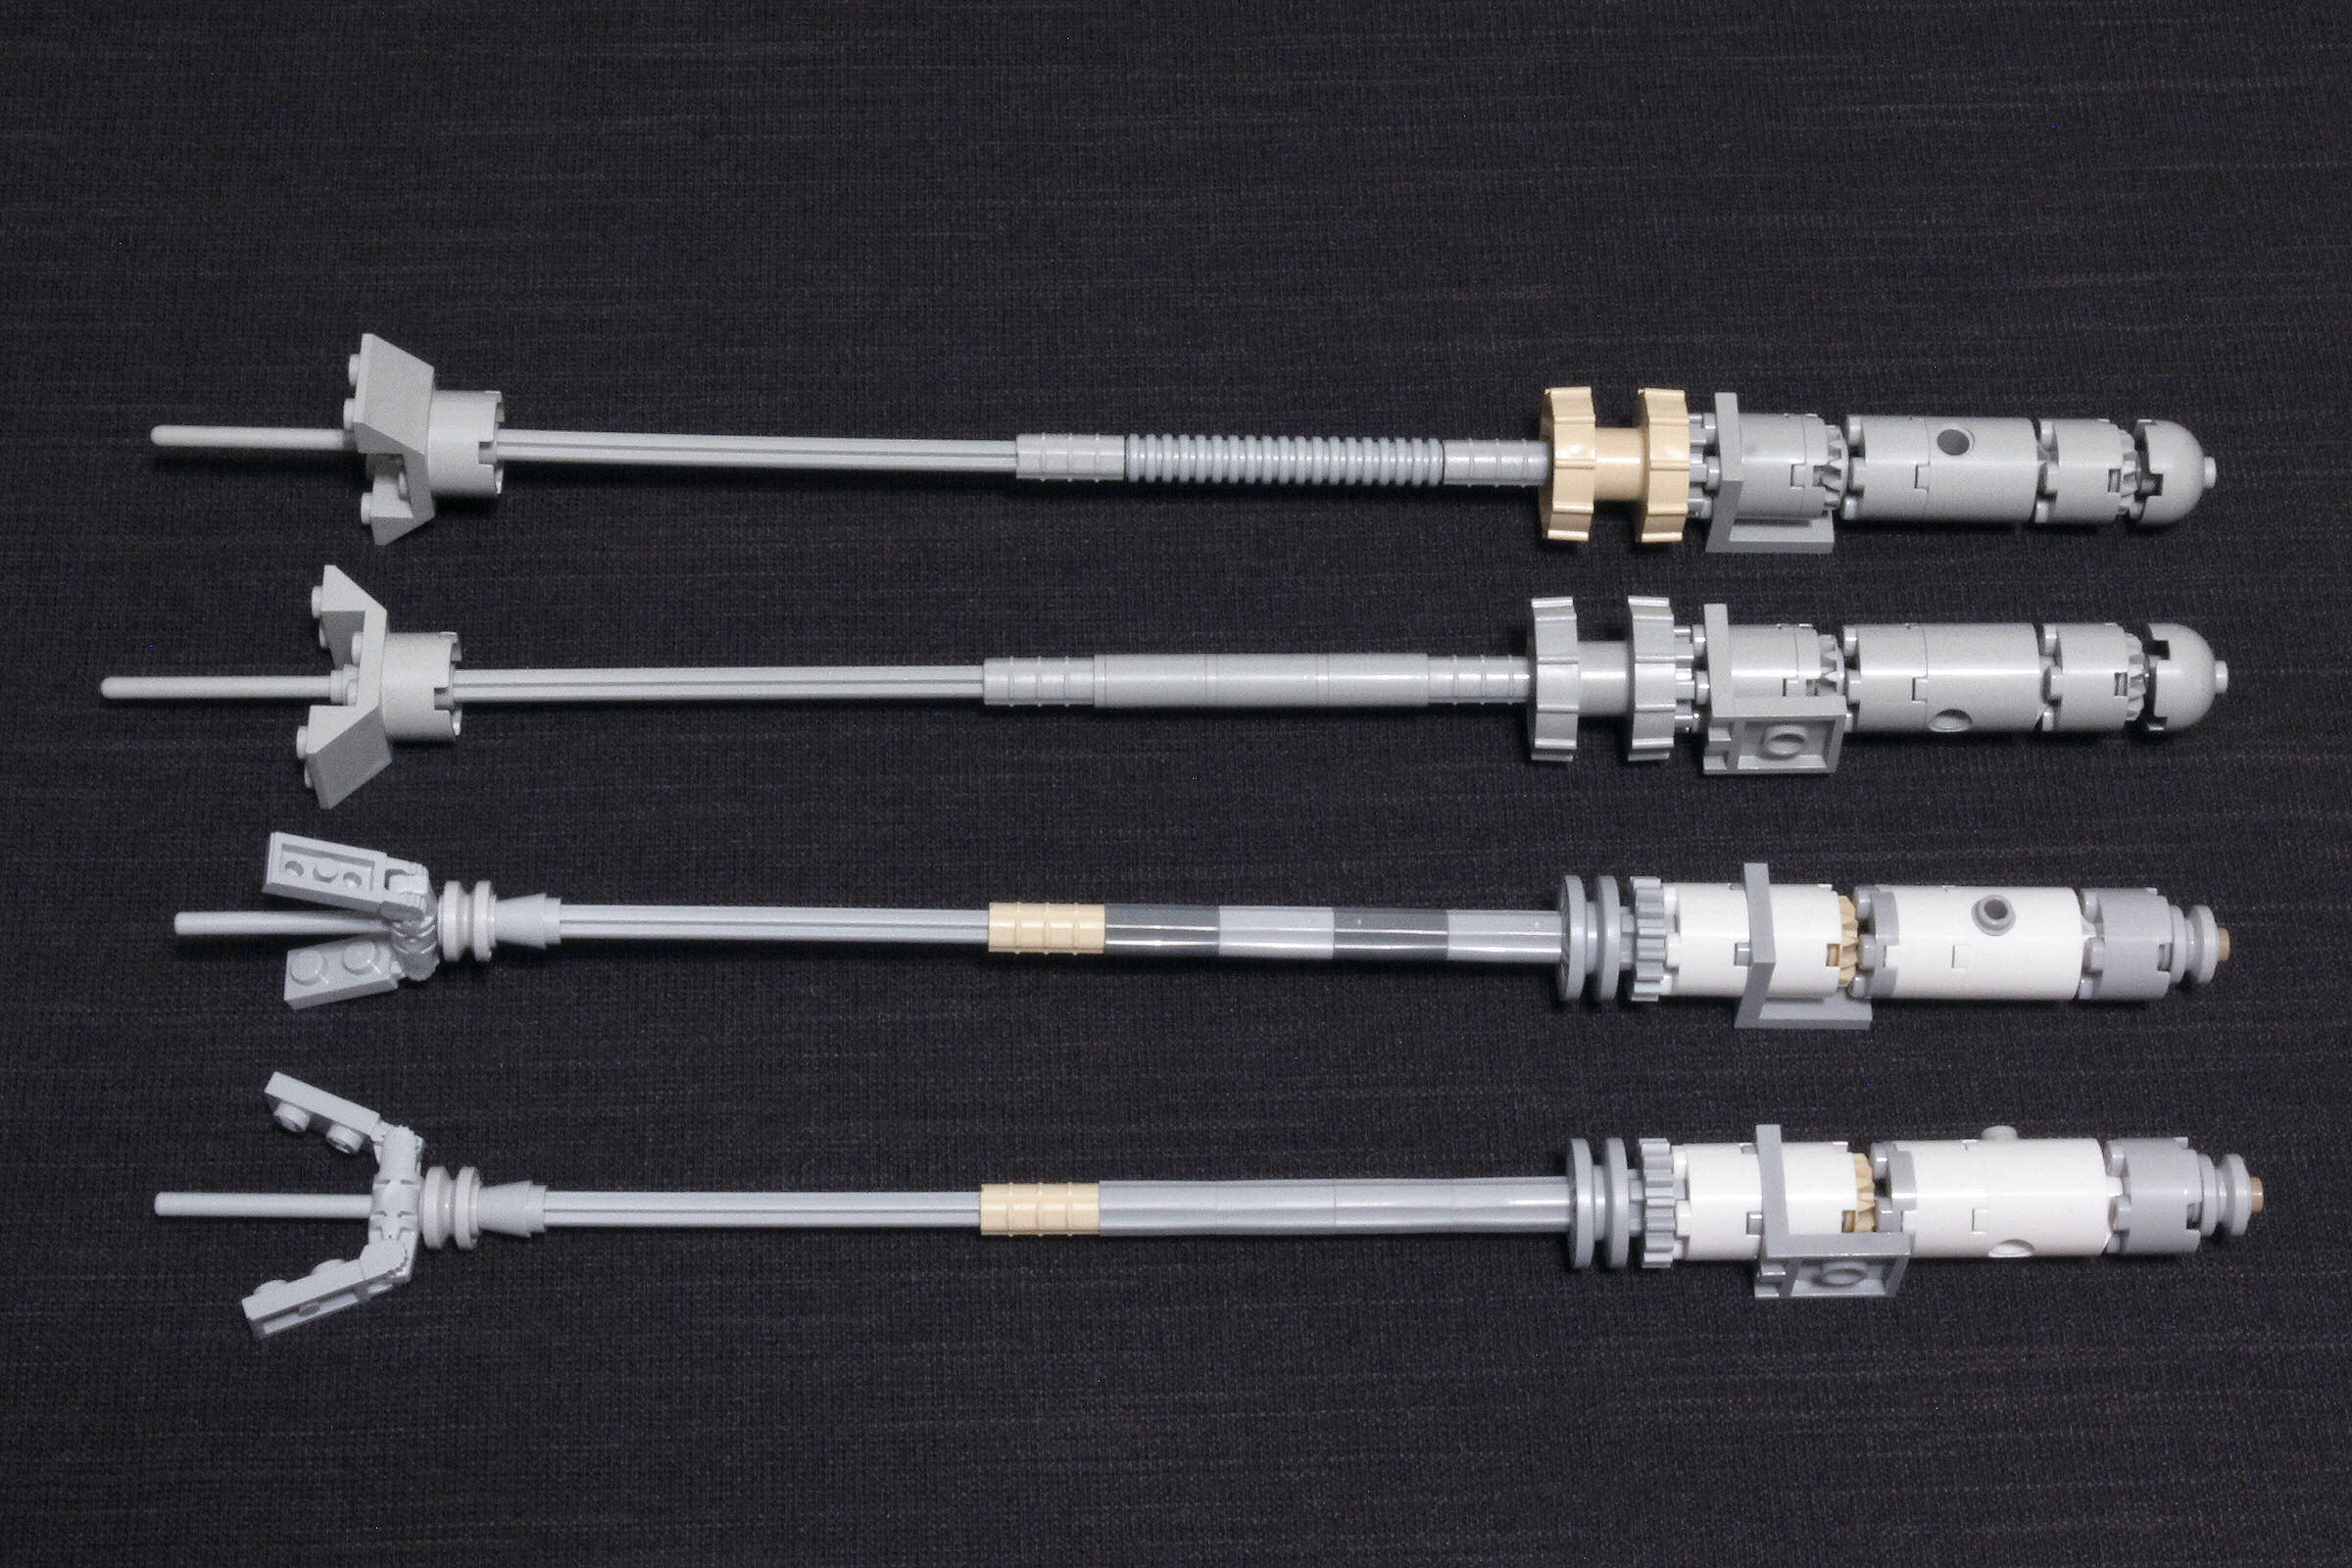
You can see right off the bat how fundamentally different the designs are. The old style relies on a series of small toothed gears to move the connection points apart, resulting in a lot of free movement because the teeth don’t mesh perfectly. Each point of contact compounds the amount of play, and when combined with the natural flexibility of plastic you’re left with a very soft range of motion. I’m sure I’m not explaining that very coherently, but the result is a floppy mess. Take a look at the blue Technic bushings jutting out from the sides. Those are supposed to support the wings. The ones on the bottom, that are facing directly sideways. When the wings are attached to those the weight simply forces them down at an angle, stressing the whole assembly. Turning the knob on the back will raise the lower wings but the entire gearbox remains under strain. It feels like it could shear off a sprocket at any moment and is altogether unpleasant. Meanwhile, the new version relies on a set of large four point ball sprockets that provide significantly better support.
The mechanism is much simpler and fairly similar to the newer system scale X-wings (if I’m remembering correctly, it’s been a while since I’ve built one but that definitely felt familiar). Instead of rubber bands to hold the wings together as on the smaller versions you have two pairs of Technic shock absorbers, so you don’t have to worry about it deteriorating and going limp. The wings mount to a single pivoting assembly of lift-arms that counterbalance each other, lessening the strain on the system.
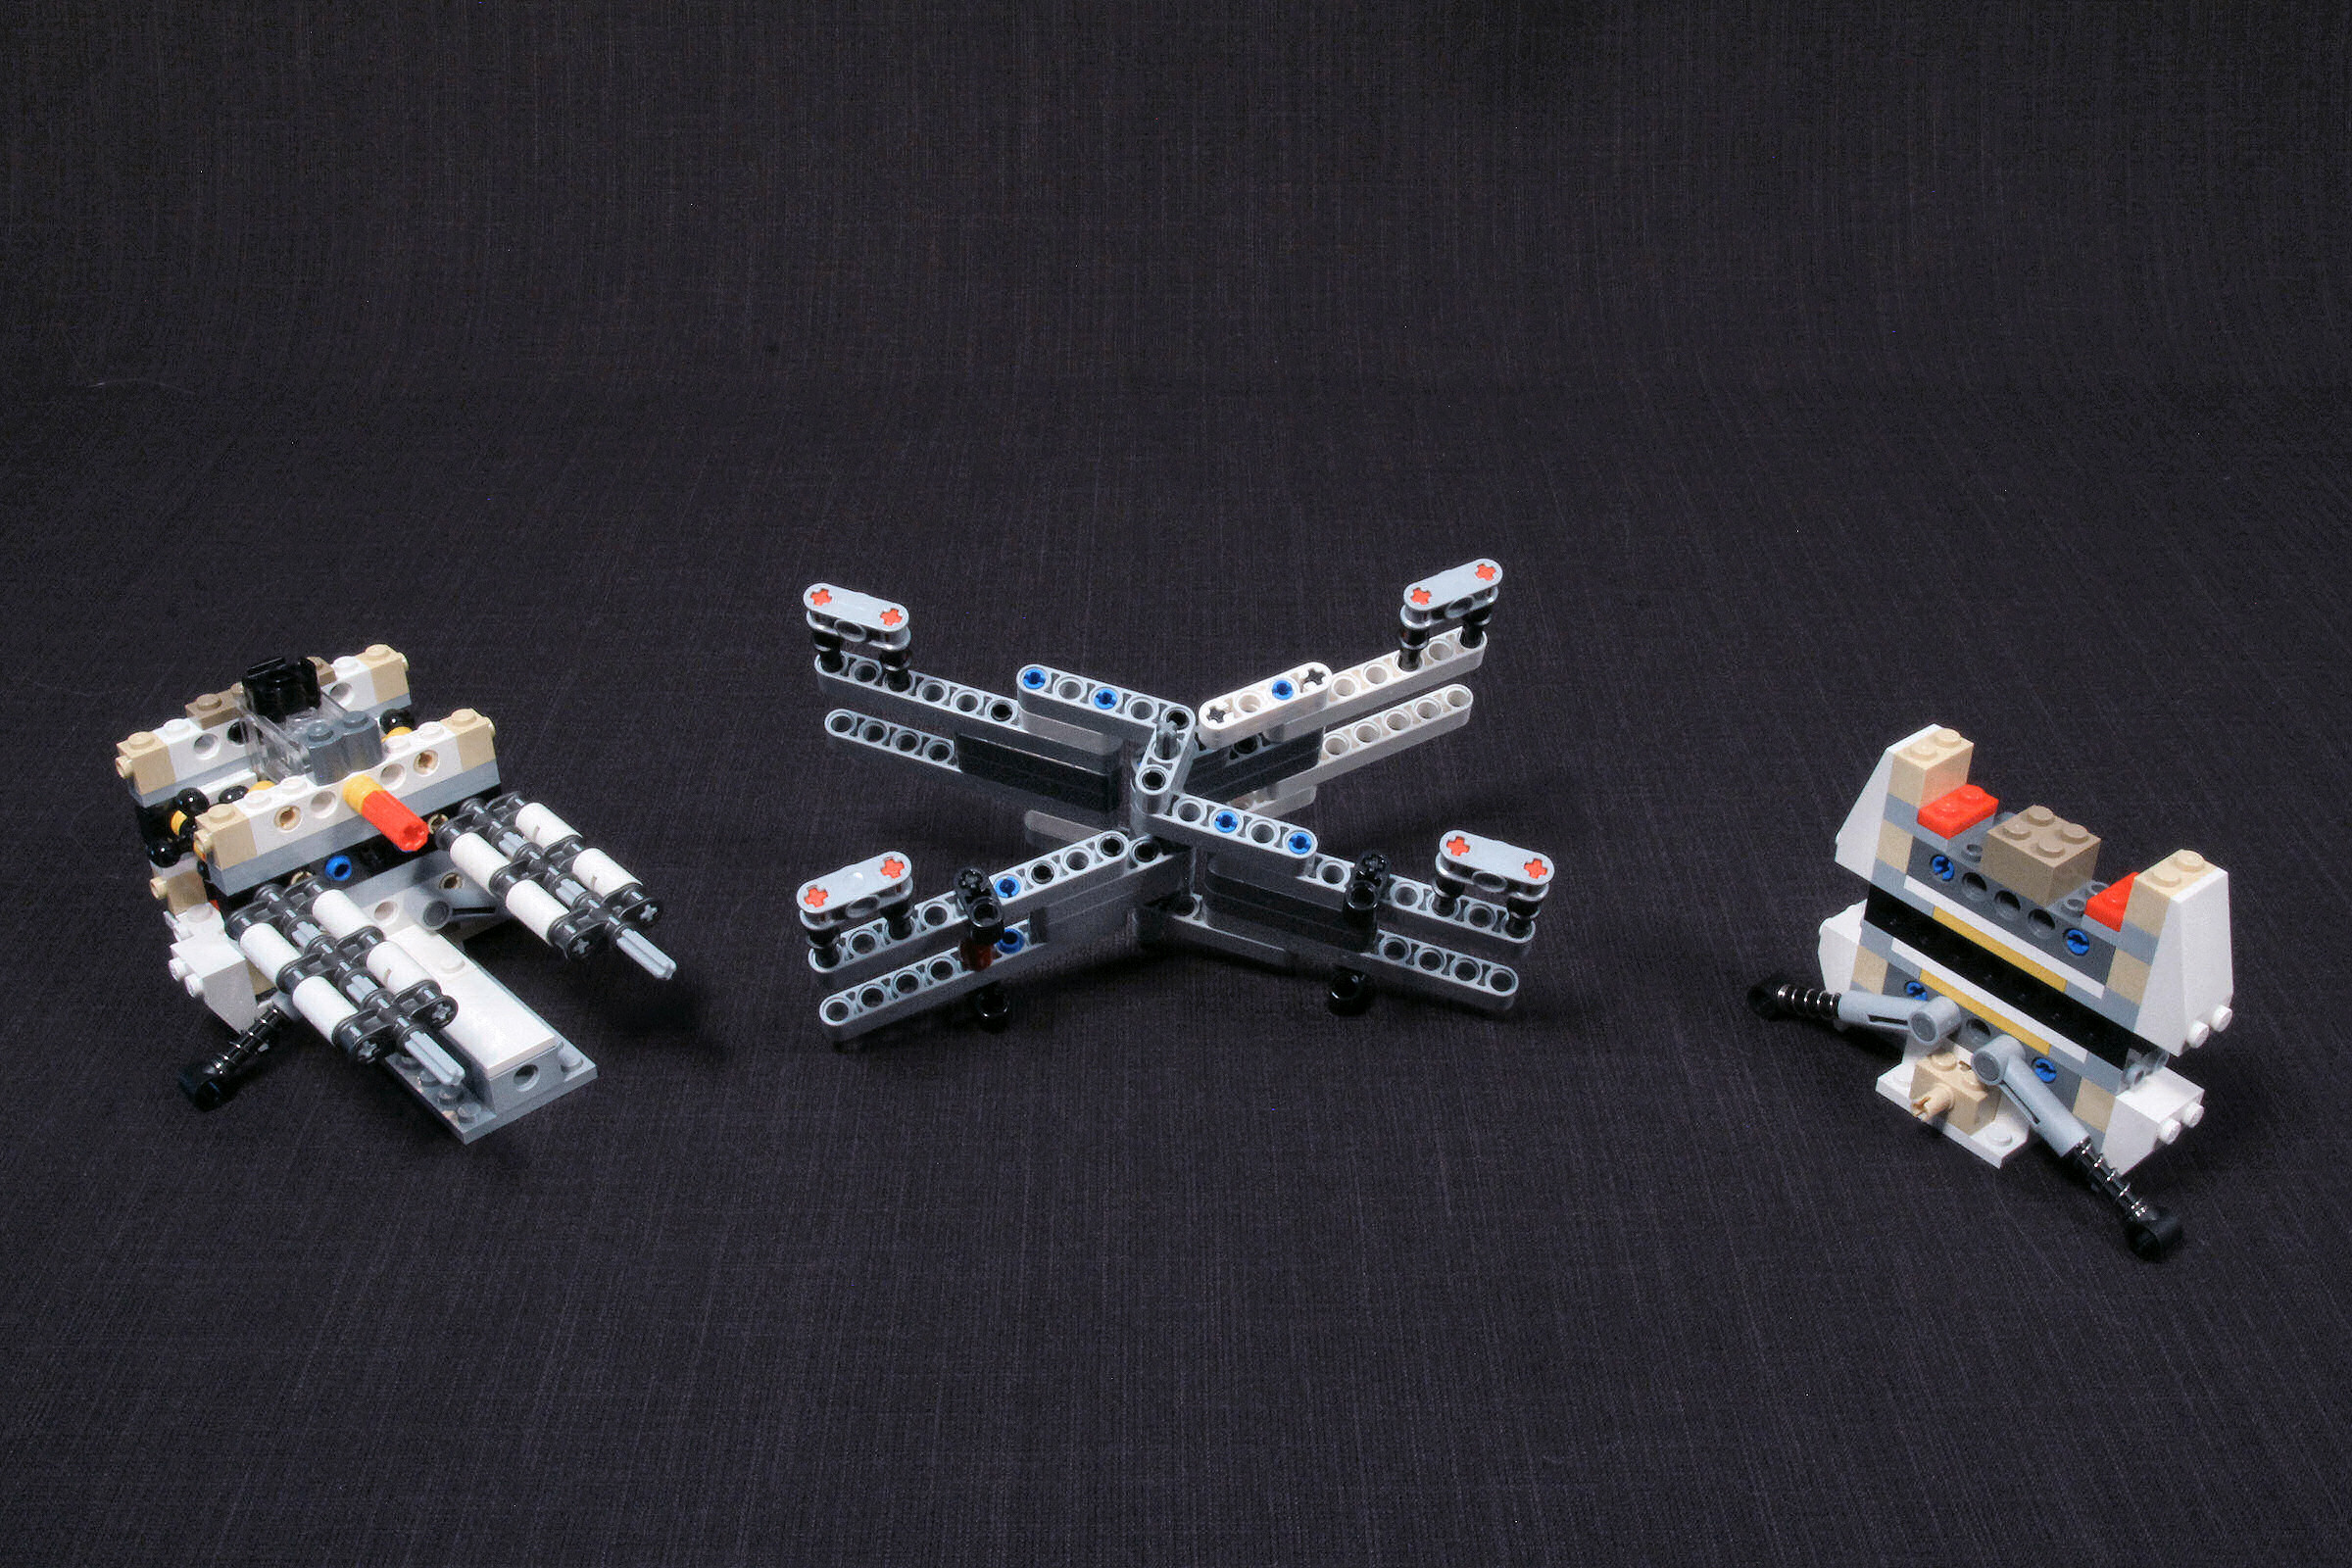
 What you’re left with is a smaller and more effective core. The knob on the back does not have a start and end point like with the old model. If you spin it too far you just start the open/close cycle again. This completely eliminates the risk of damaging the sprockets by over-tightening. You can set the wings at any angle between full open and closed and they will stay balanced with ease. The old model is very finicky about when it will actually raise or lower each wing. Sometimes it will hold the bottom horizontal until the last second and drop it completely, sometimes one side will separate before the other. It’s a mess. Just based on this section alone I’m already very impressed with the new set. Now that we’ve got the technical bits covered, lets take a look at the completed rear fuselages.
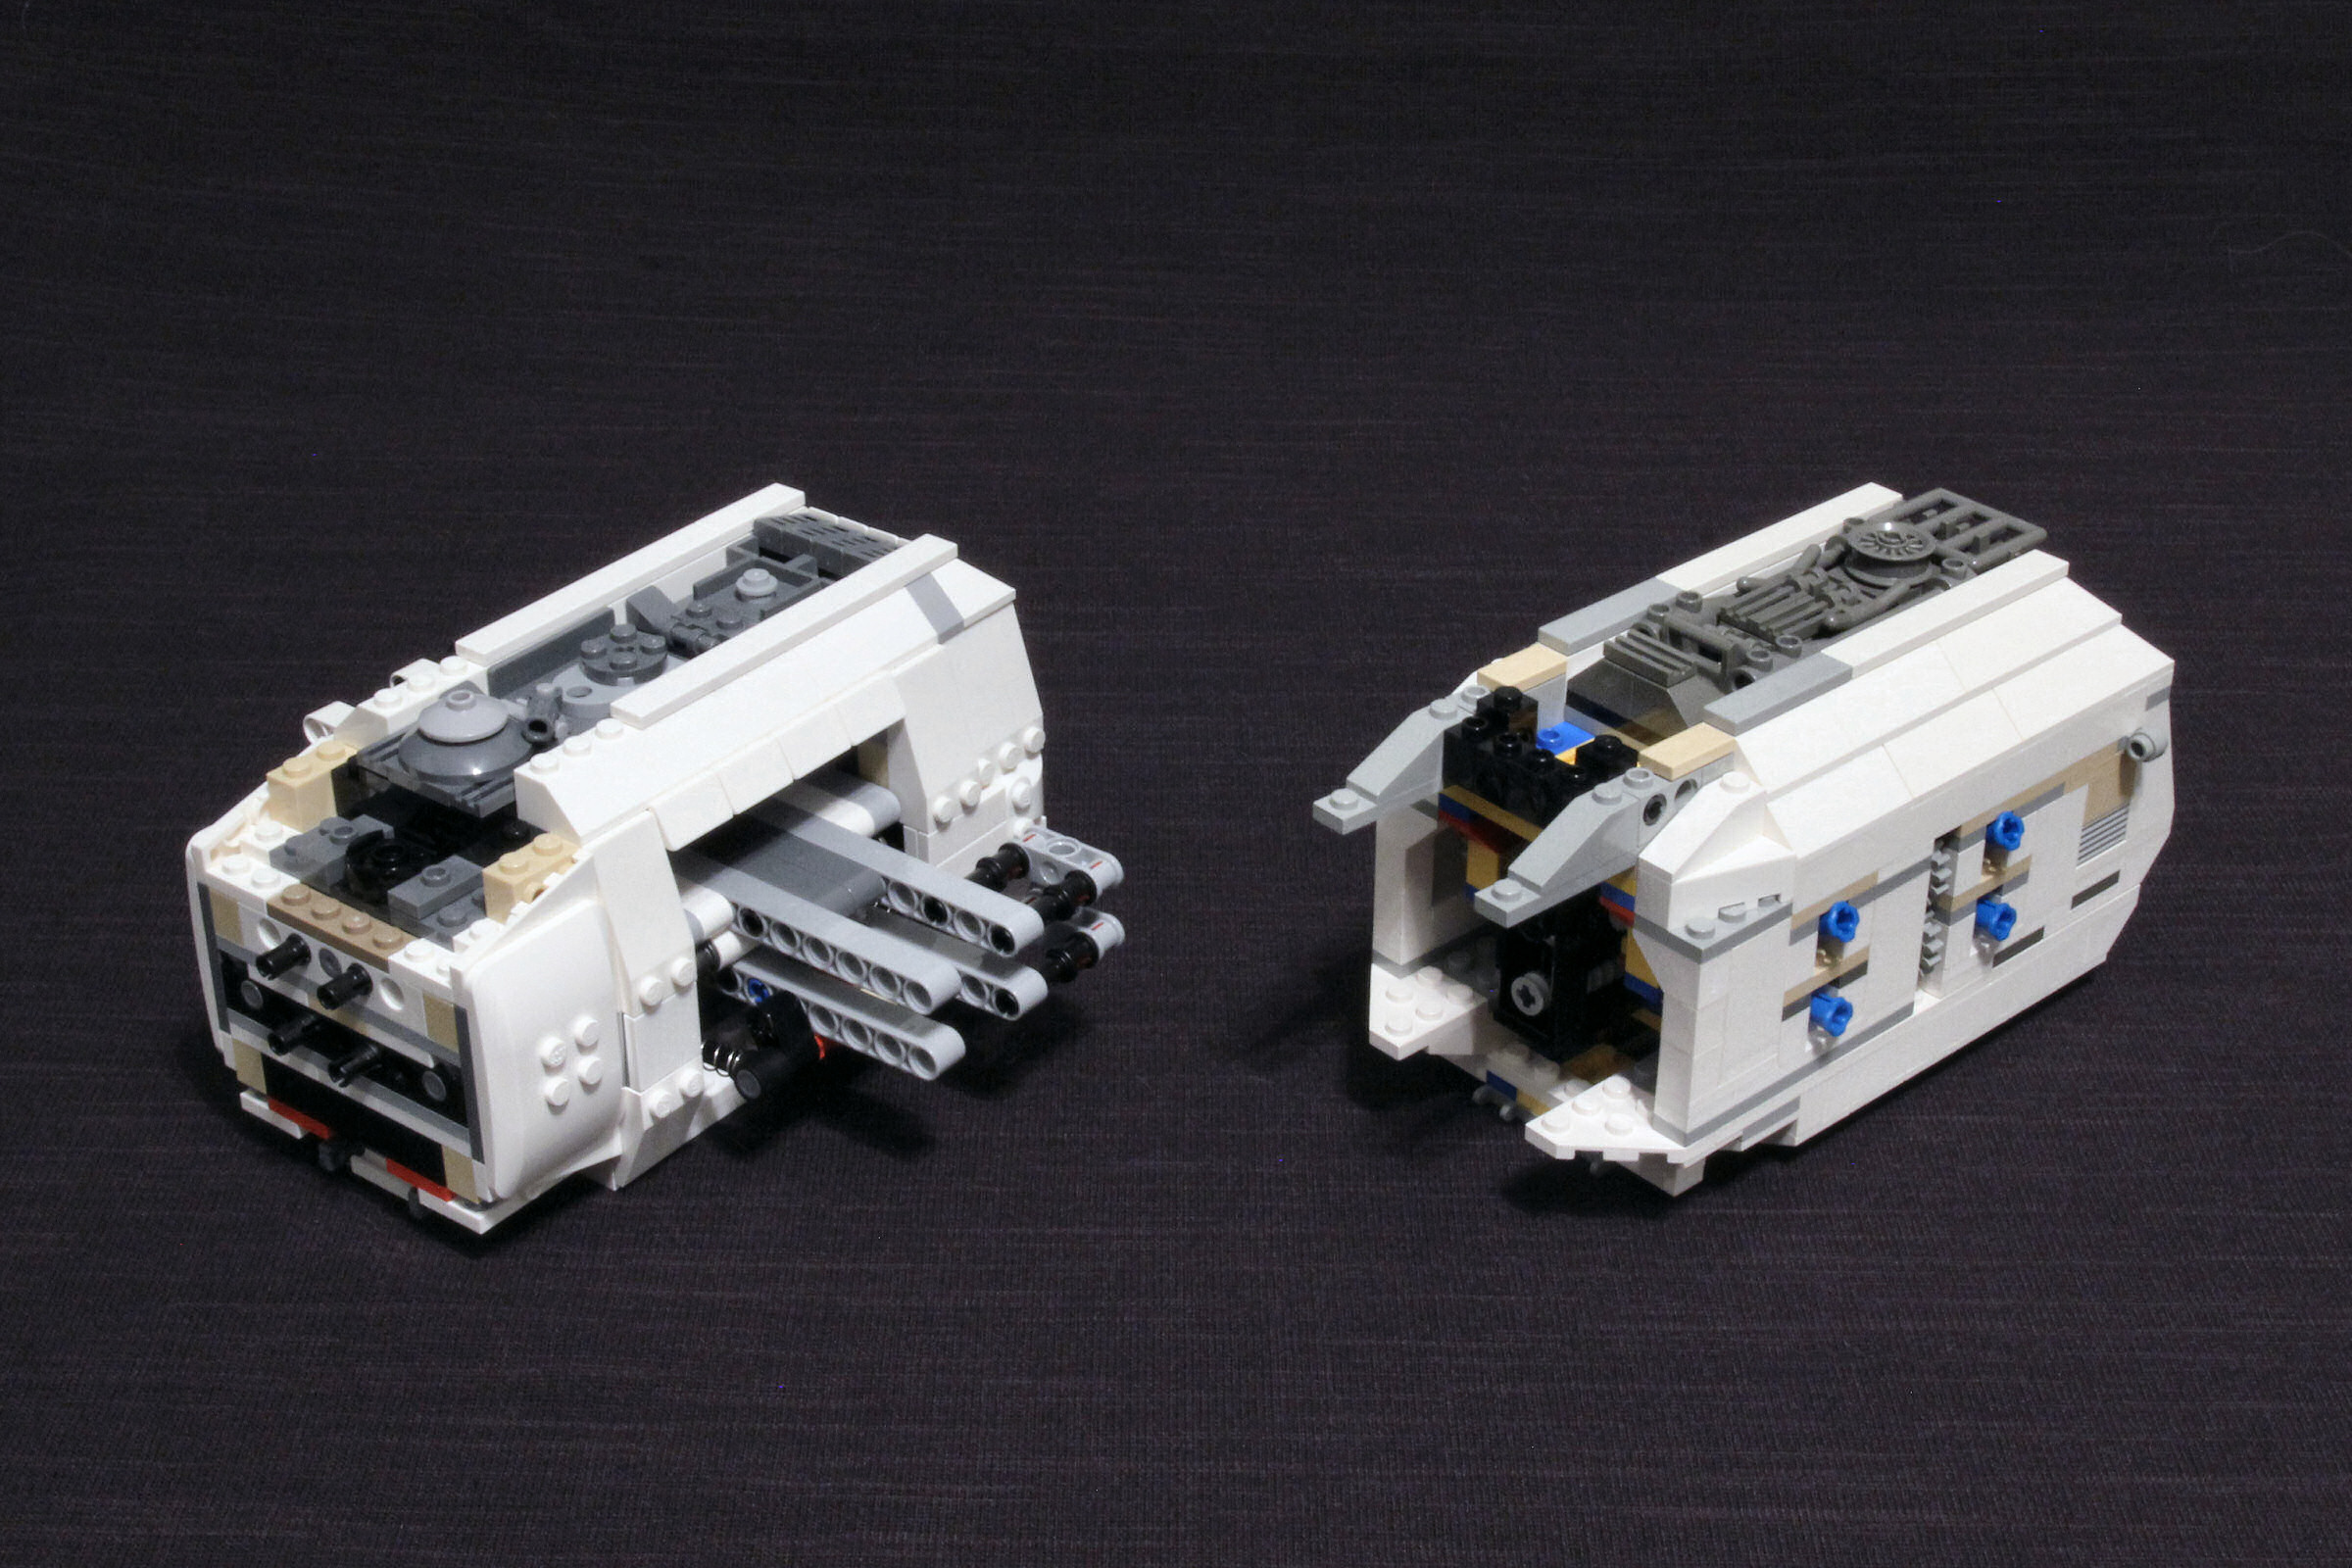
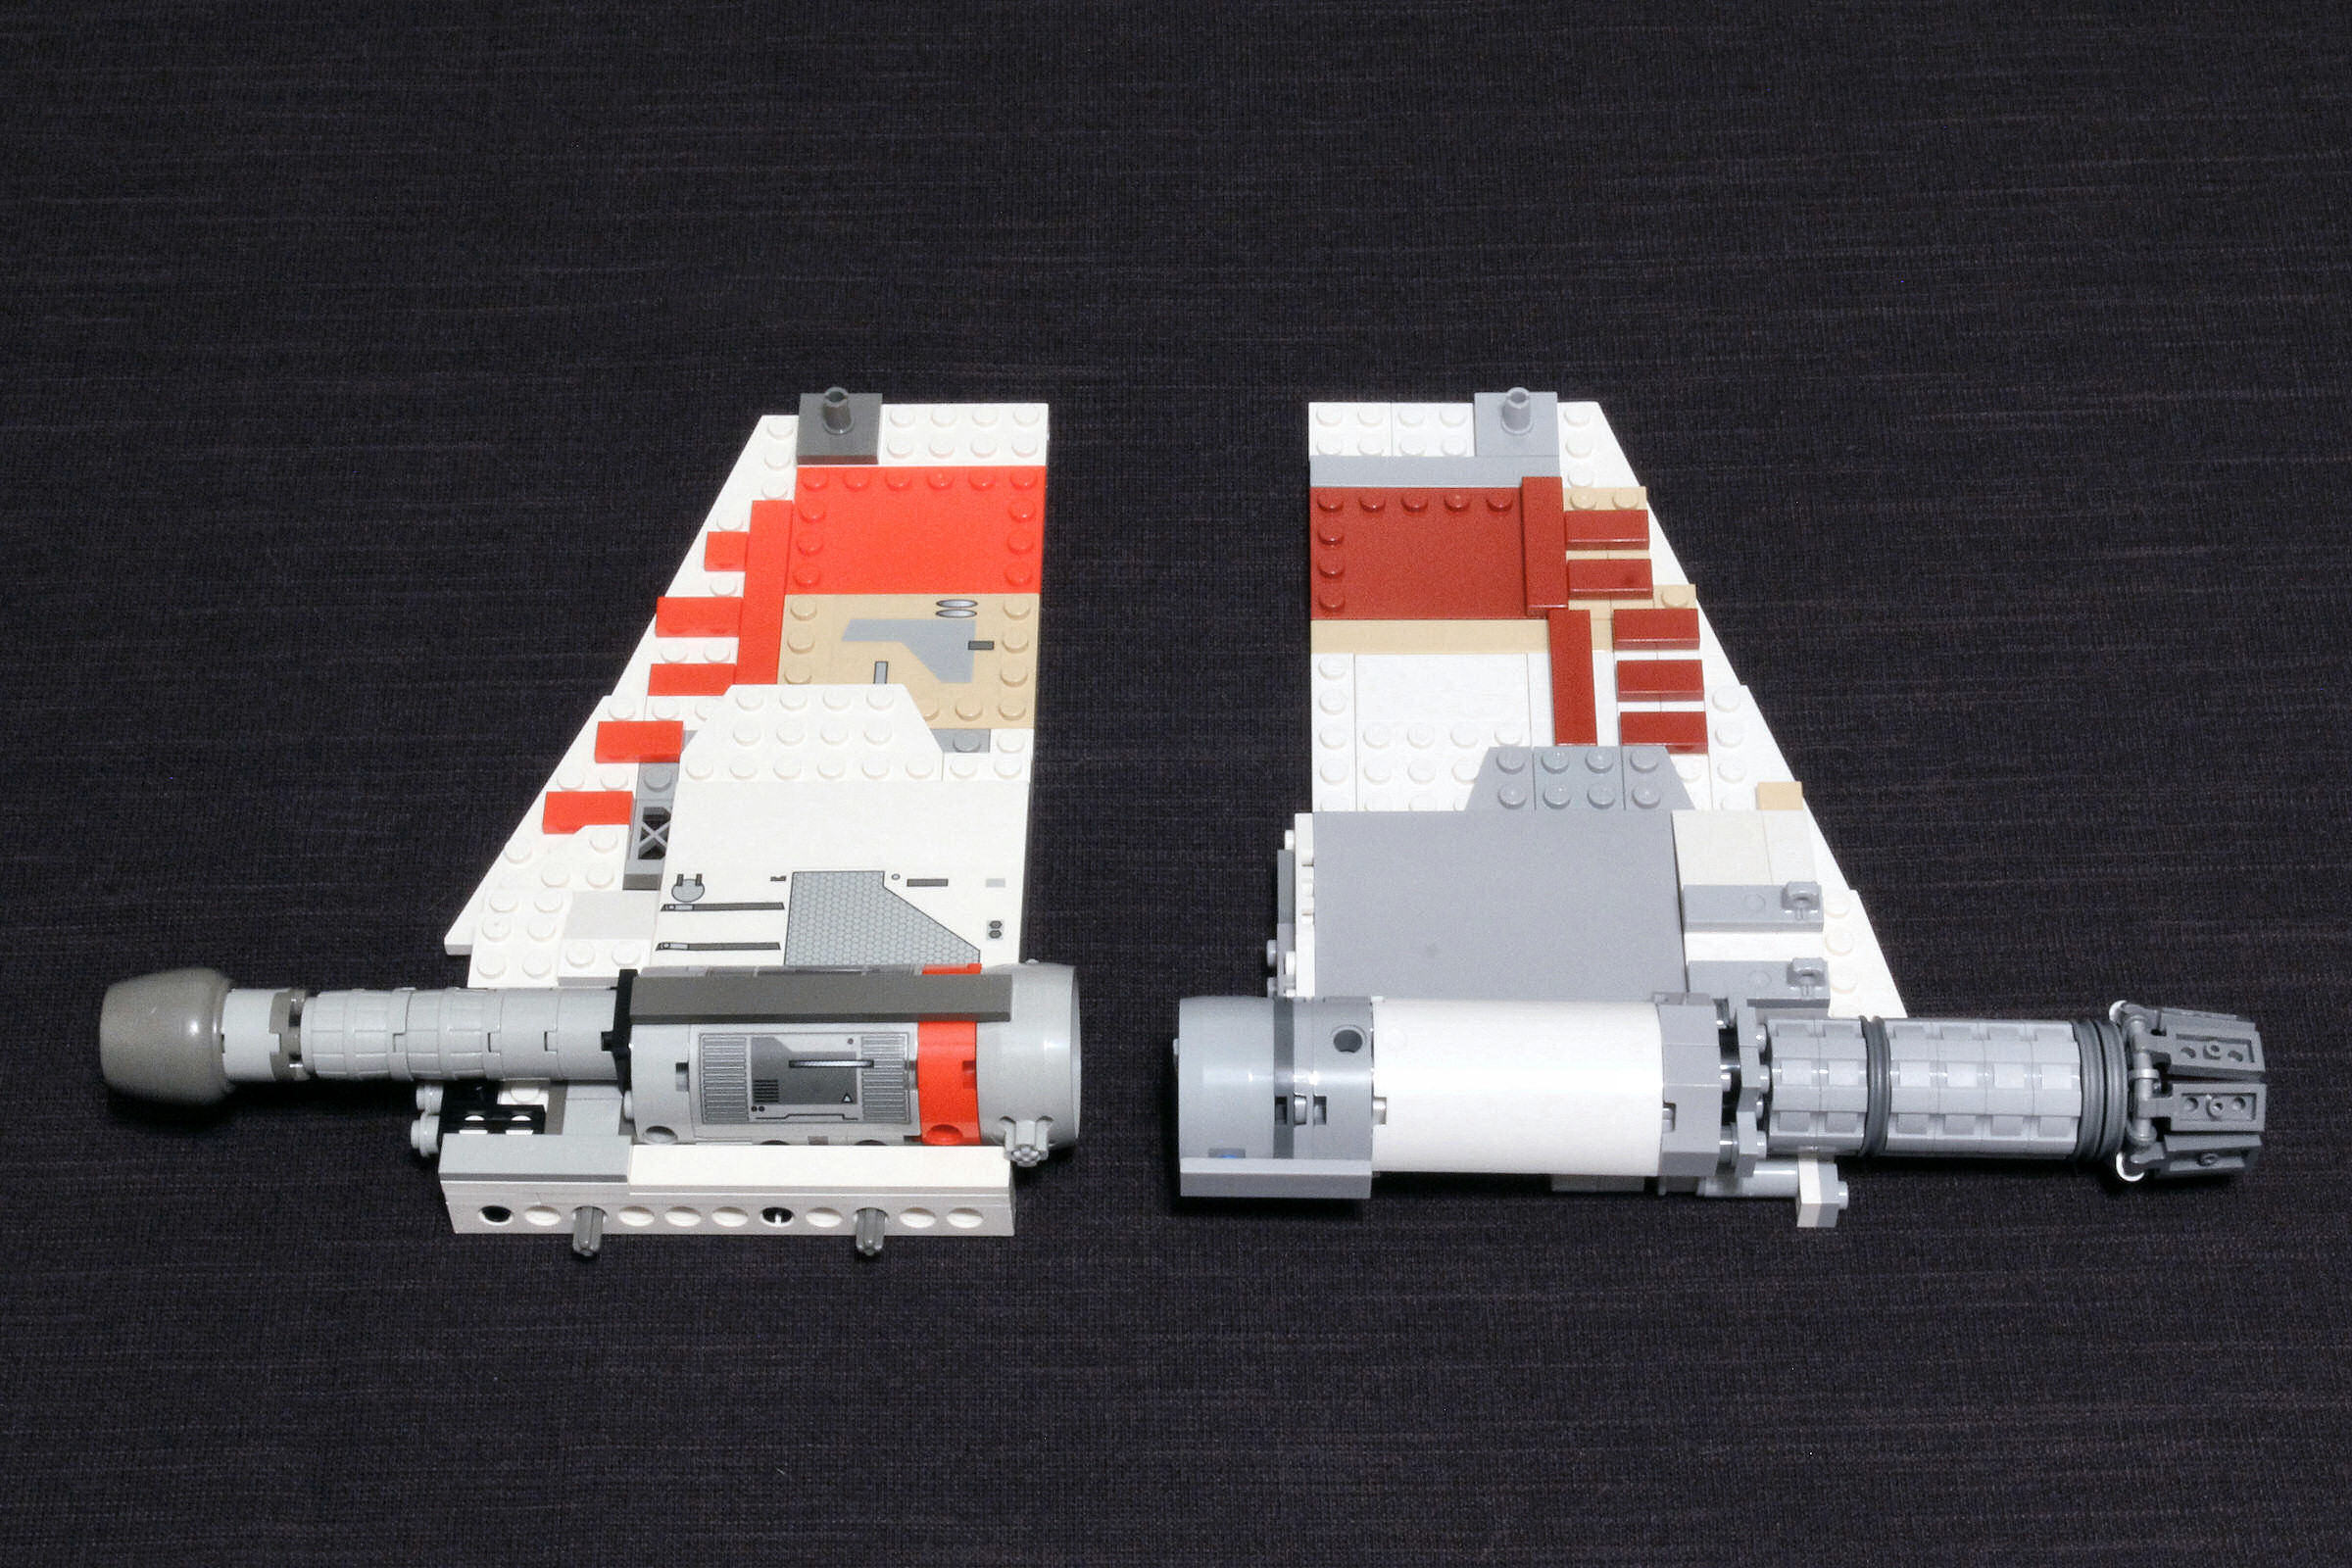
 The old school style of 99% studs up building leaves you with an awkward brick shaped module. Thirteen years of progress and some new curvy slopes with studs out lend to a much better profile that starts to resemble the actual ship design. And then when you turn them sideways…
 Something seems off. It’s definitely more accurate to have a flat backside, and they did a nice job of recessing the wing adjustment knob this time, but the older version with the added slopes looks slightly better to me. I guess that’s just a mater of preference.
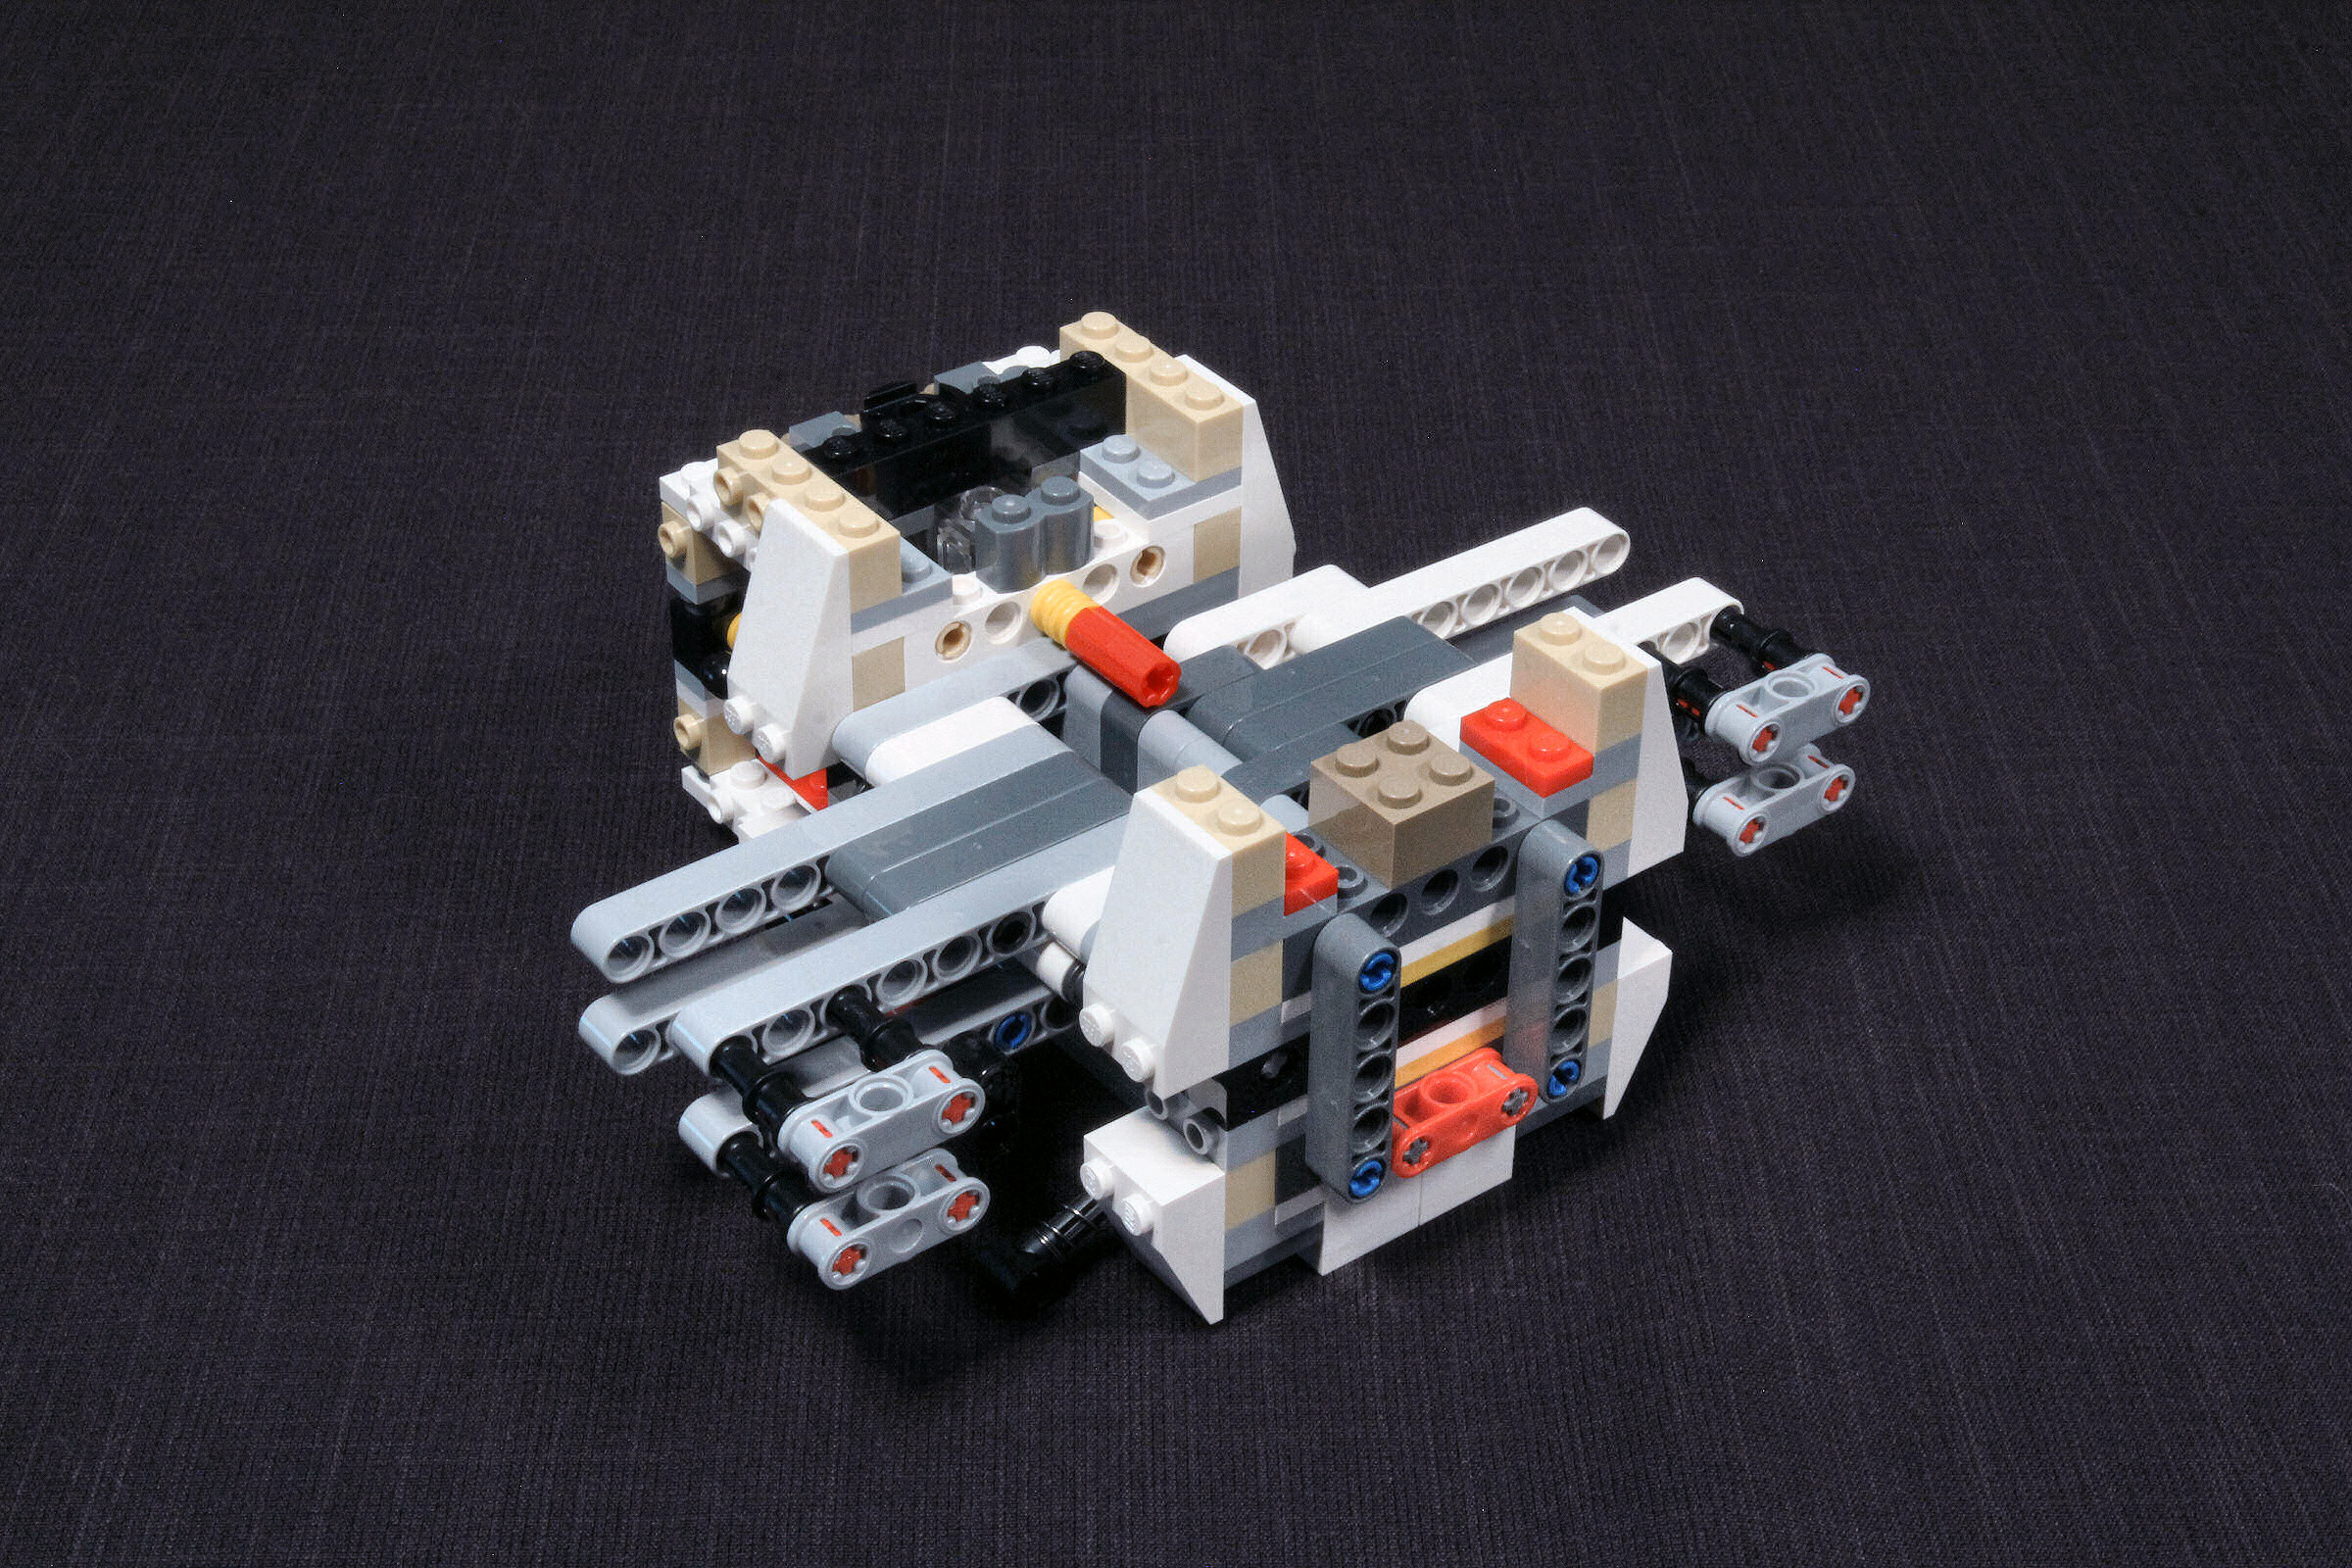
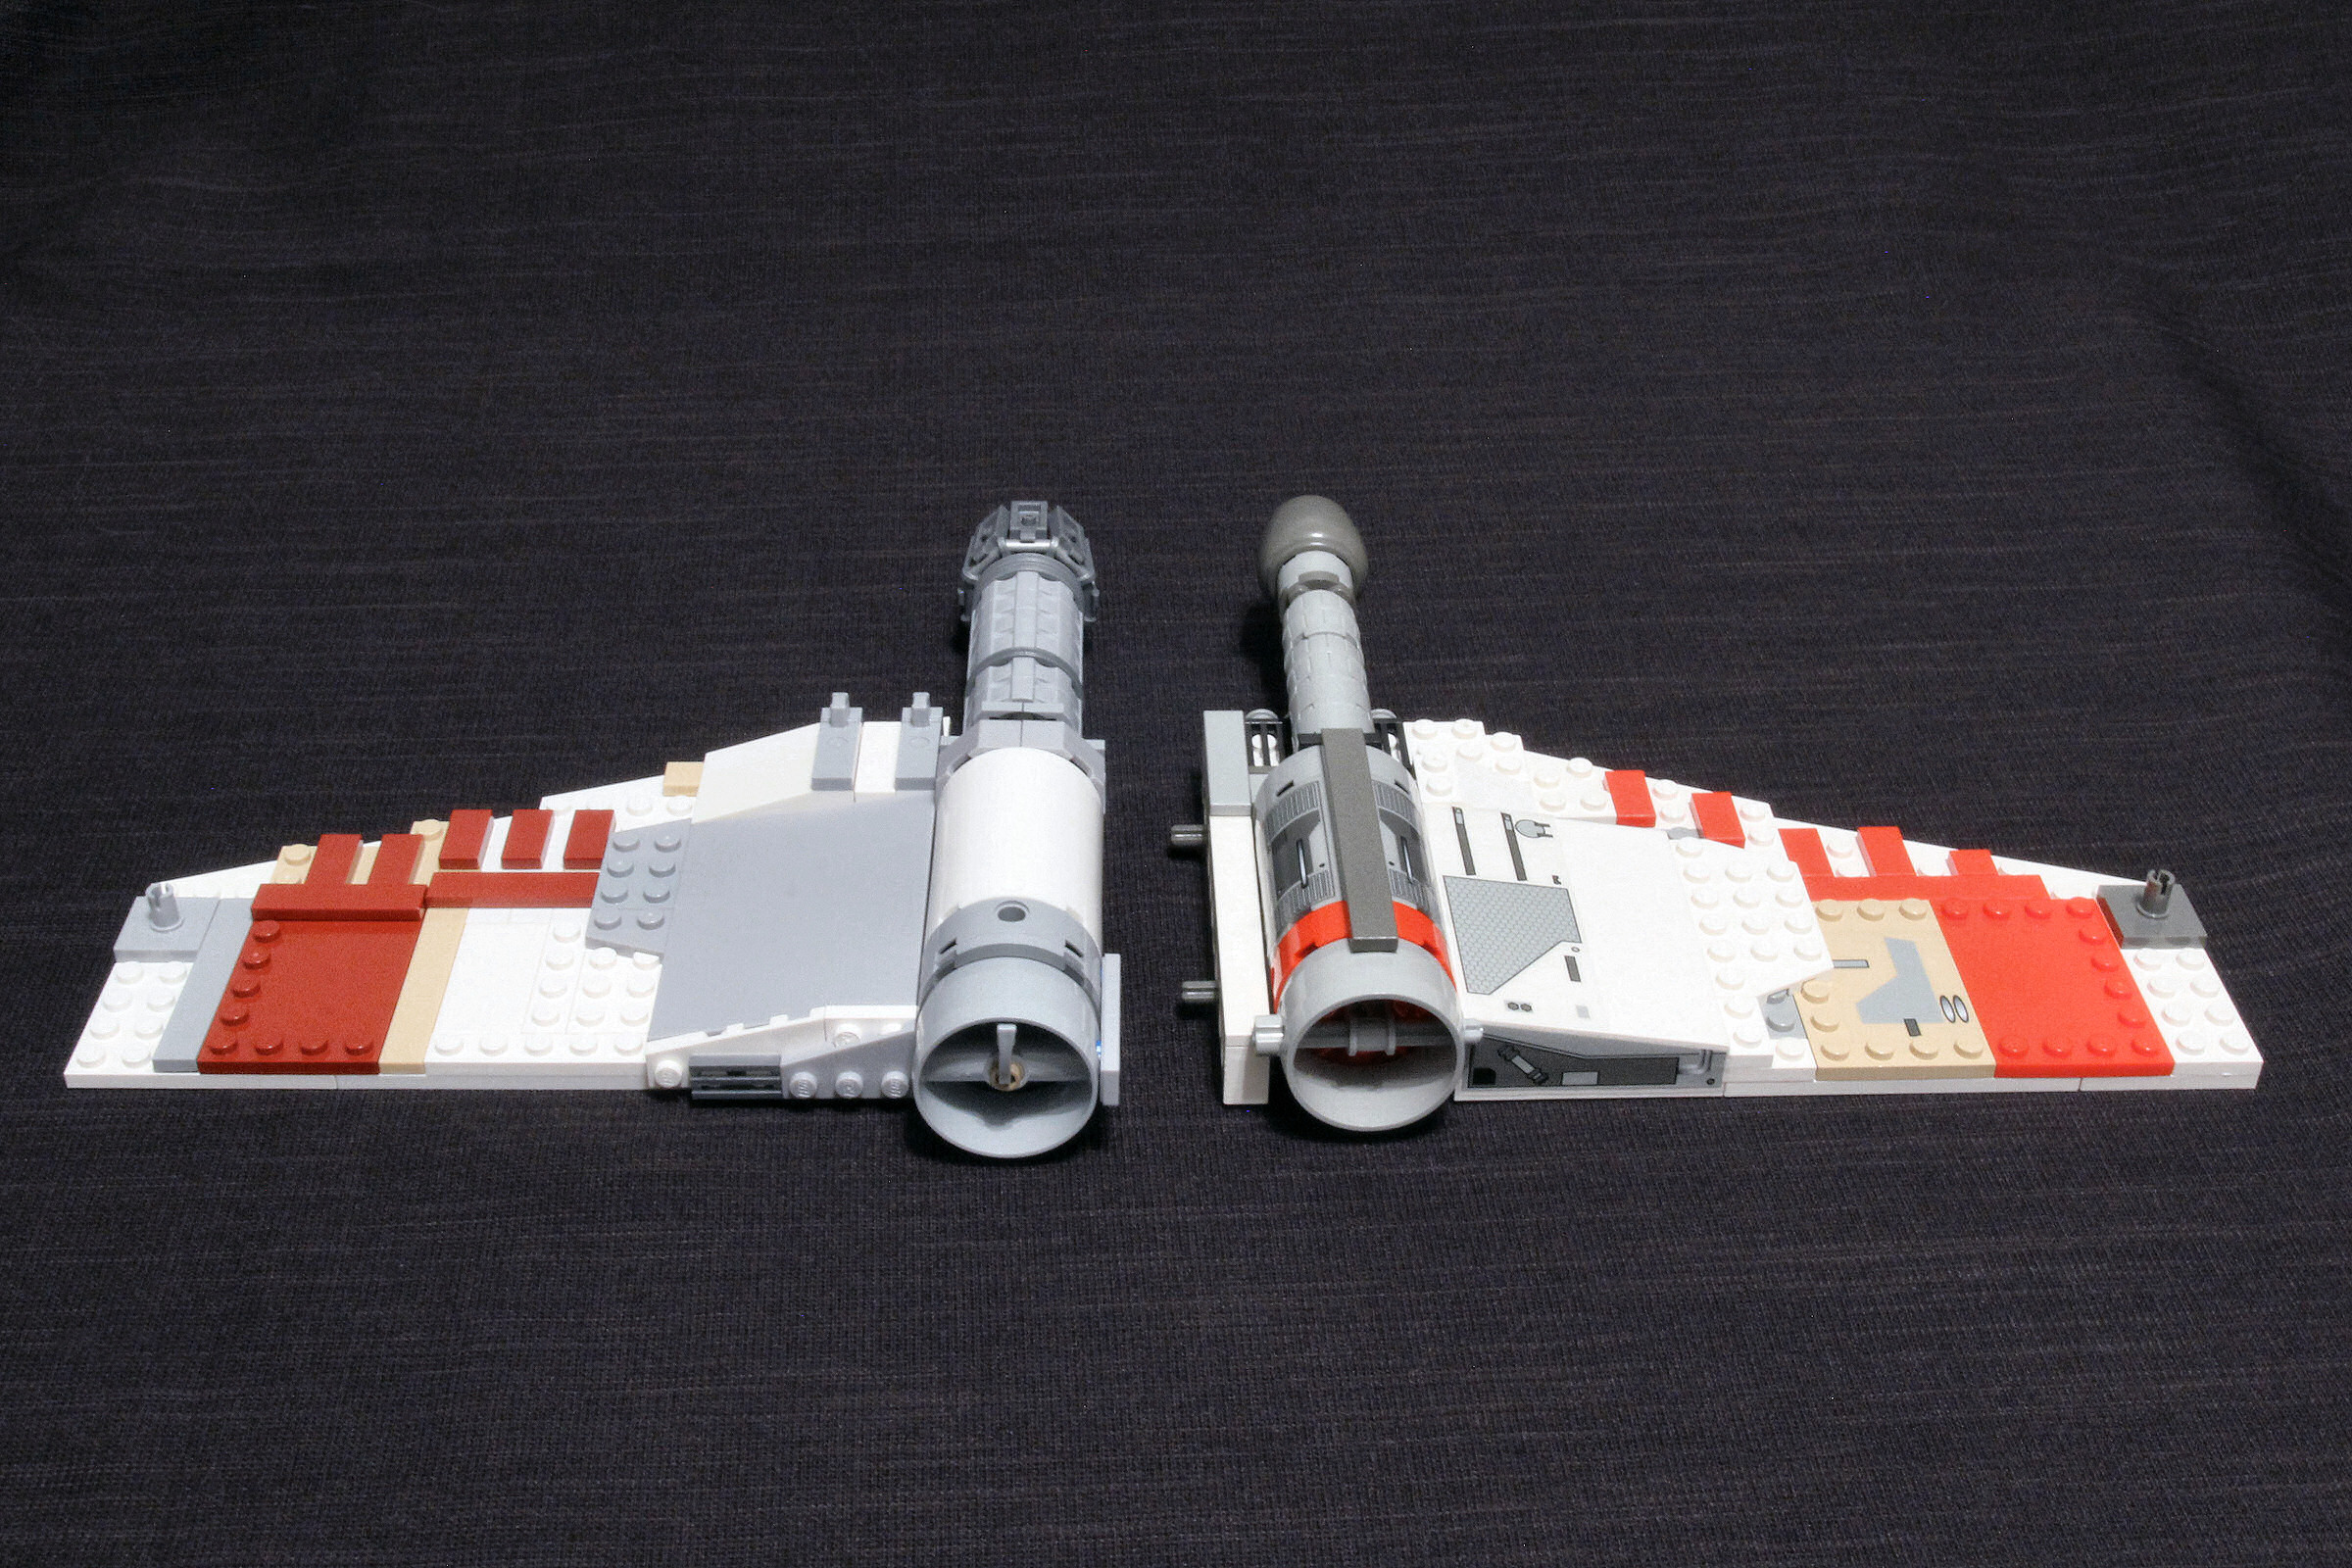
 The greeblies on top are a bit sparser now, but they don’t stick up as much as before so I think it’s a decent compromise. All together it’s a much smoother and more “starshipy” feeling construction, and this is just the boring part of the ship that you hardly get to see.
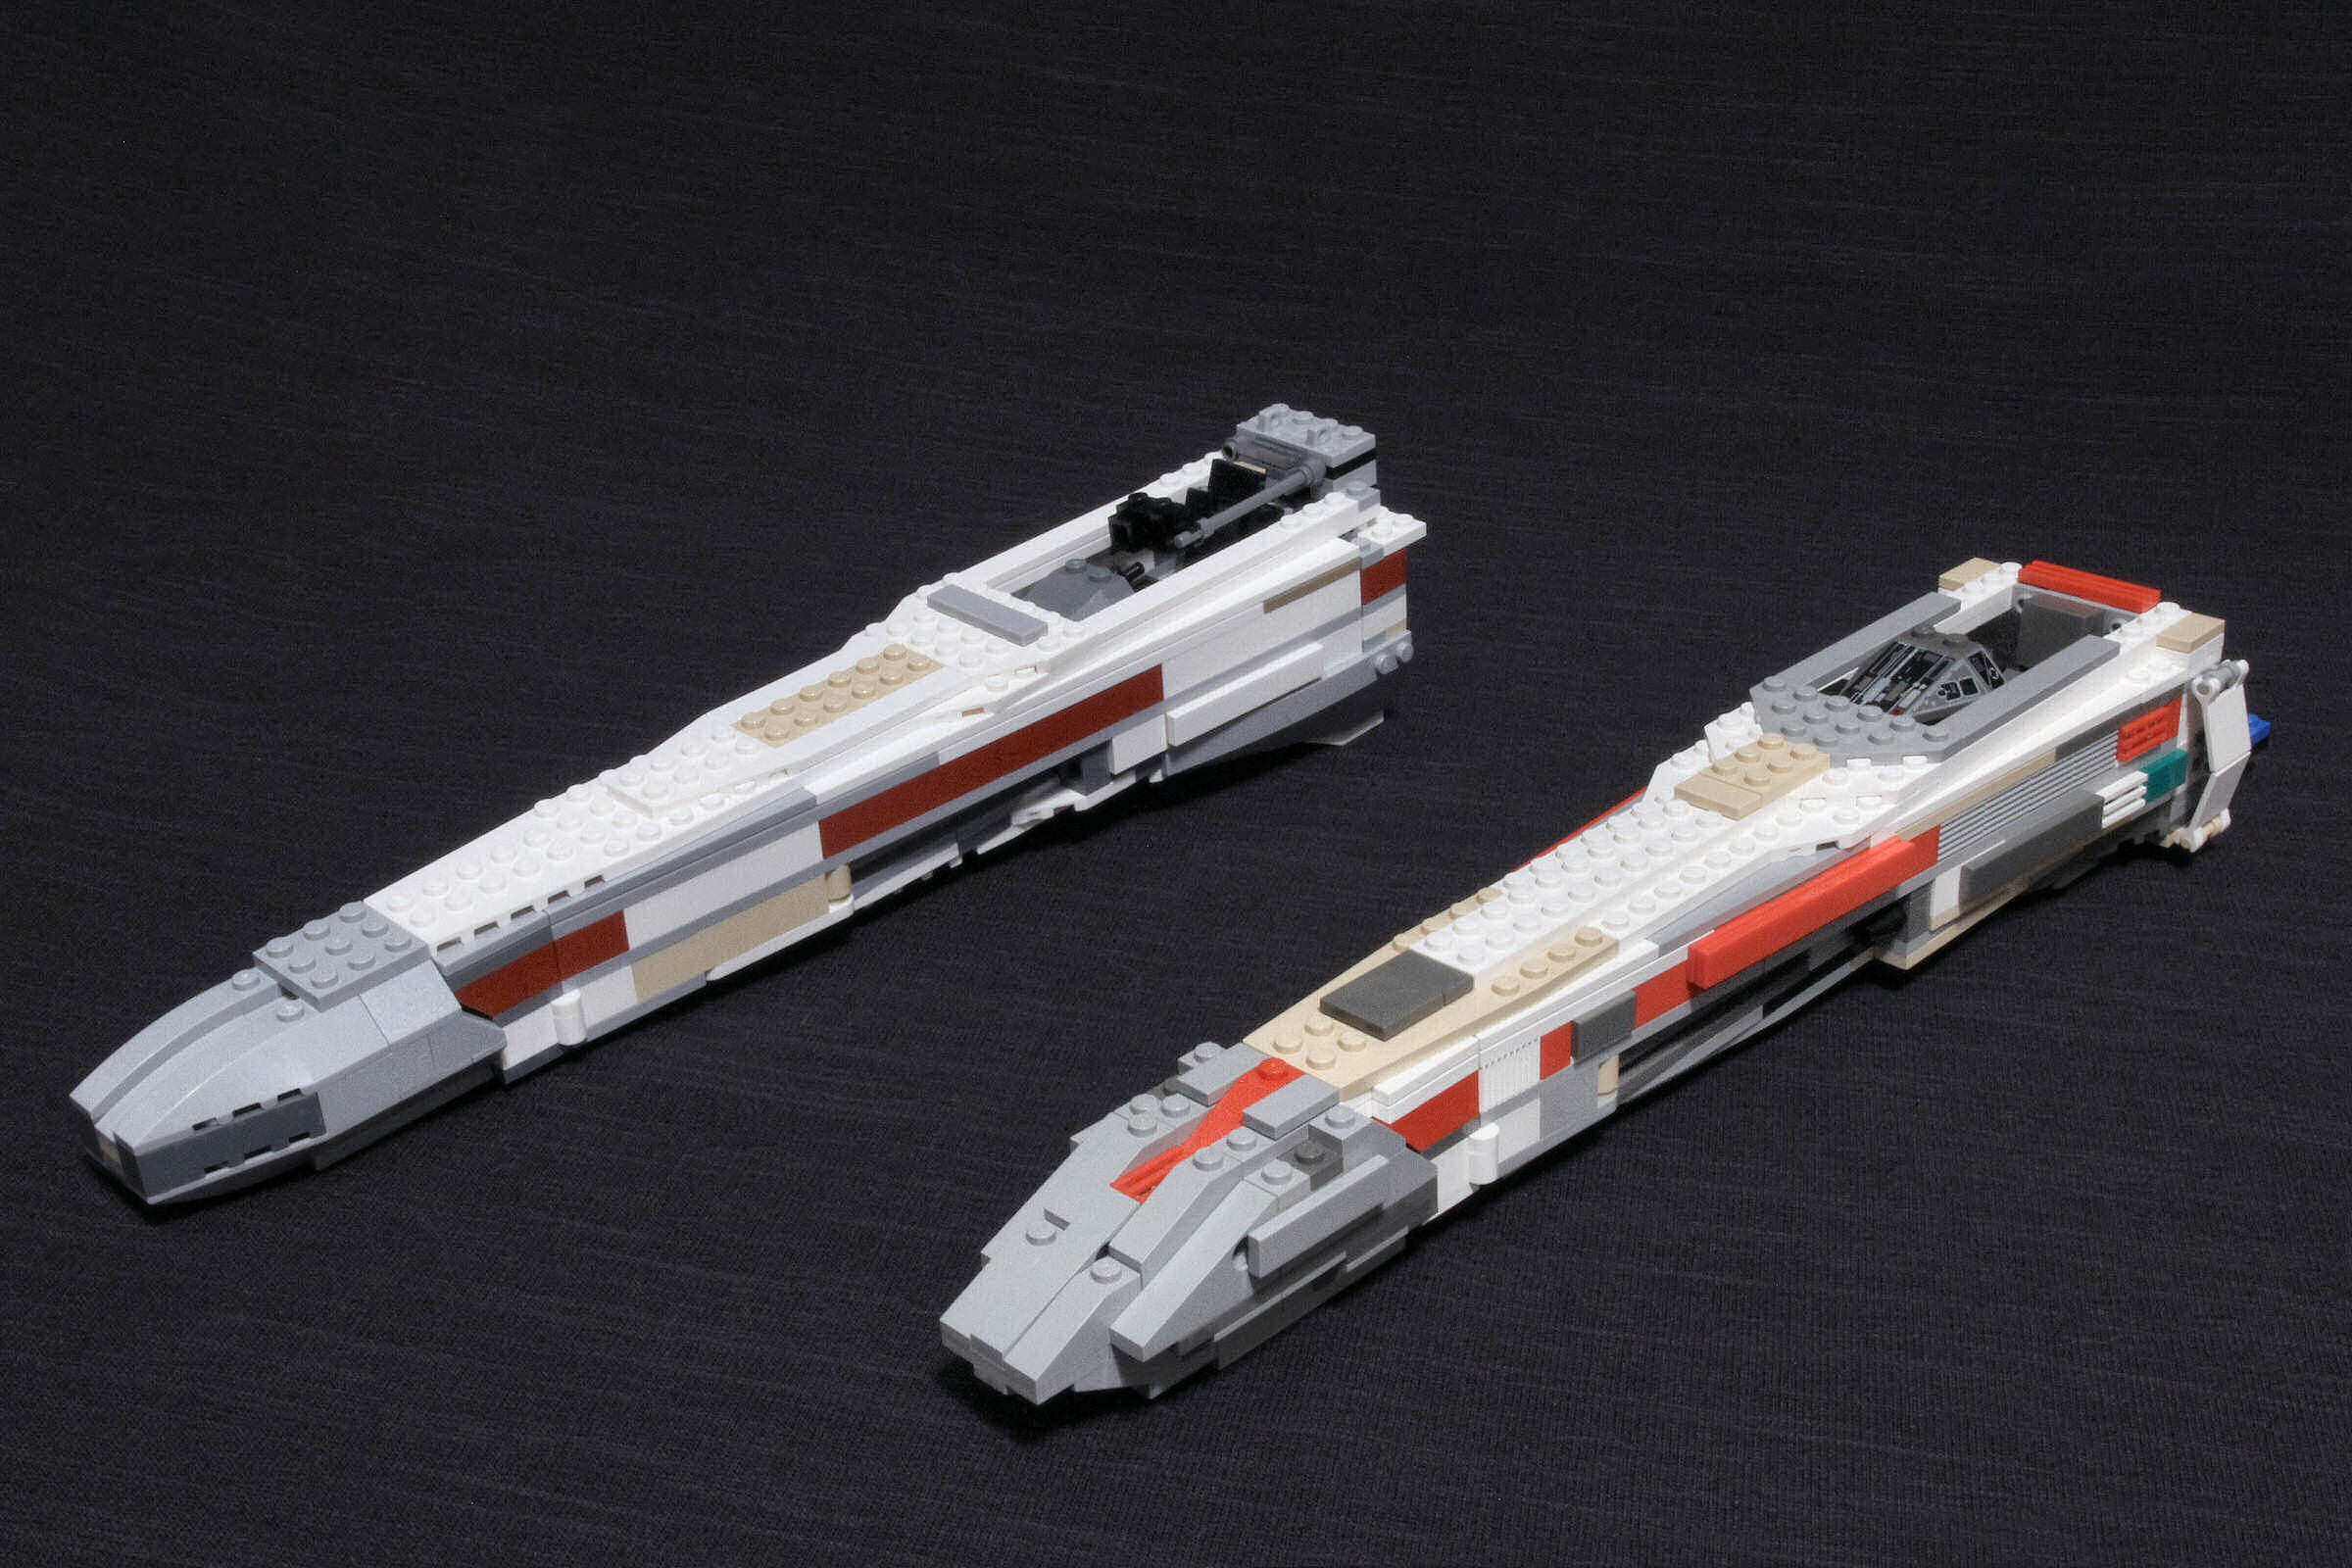 The changes to the main fuselage are just as stark. The old style seems so cubist in comparison. The color blocking doesn’t help the already rough design. The new build is so much sleeker without straying too much from the appearance of the source. We’re still stuck with a predominately rectangular cross-section, which most certainly doesn’t match up to the source, but that’s a hard shape to pull off within the constraints of official building methods and the result is close enough to satisfy me.
 You can see how the old model used a pair of flag pieces to try to mimic the hexagonal profile it should have, but just for that one spot. In reality it should carry down the length of the nose. The problem is with the required angles being so slight I can’t imagine them pulling it off without some new specialized parts or “illegal” techniques that would weaken the structure, so I’m willing to overlook that discrepancy. You might notice from the photo above that the new model is slightly narrower here due to dropping the flags. Don’t worry, that’s being handled by the rear section and will clear up once the two halves come together. Before we get to that, we need to address the nose.
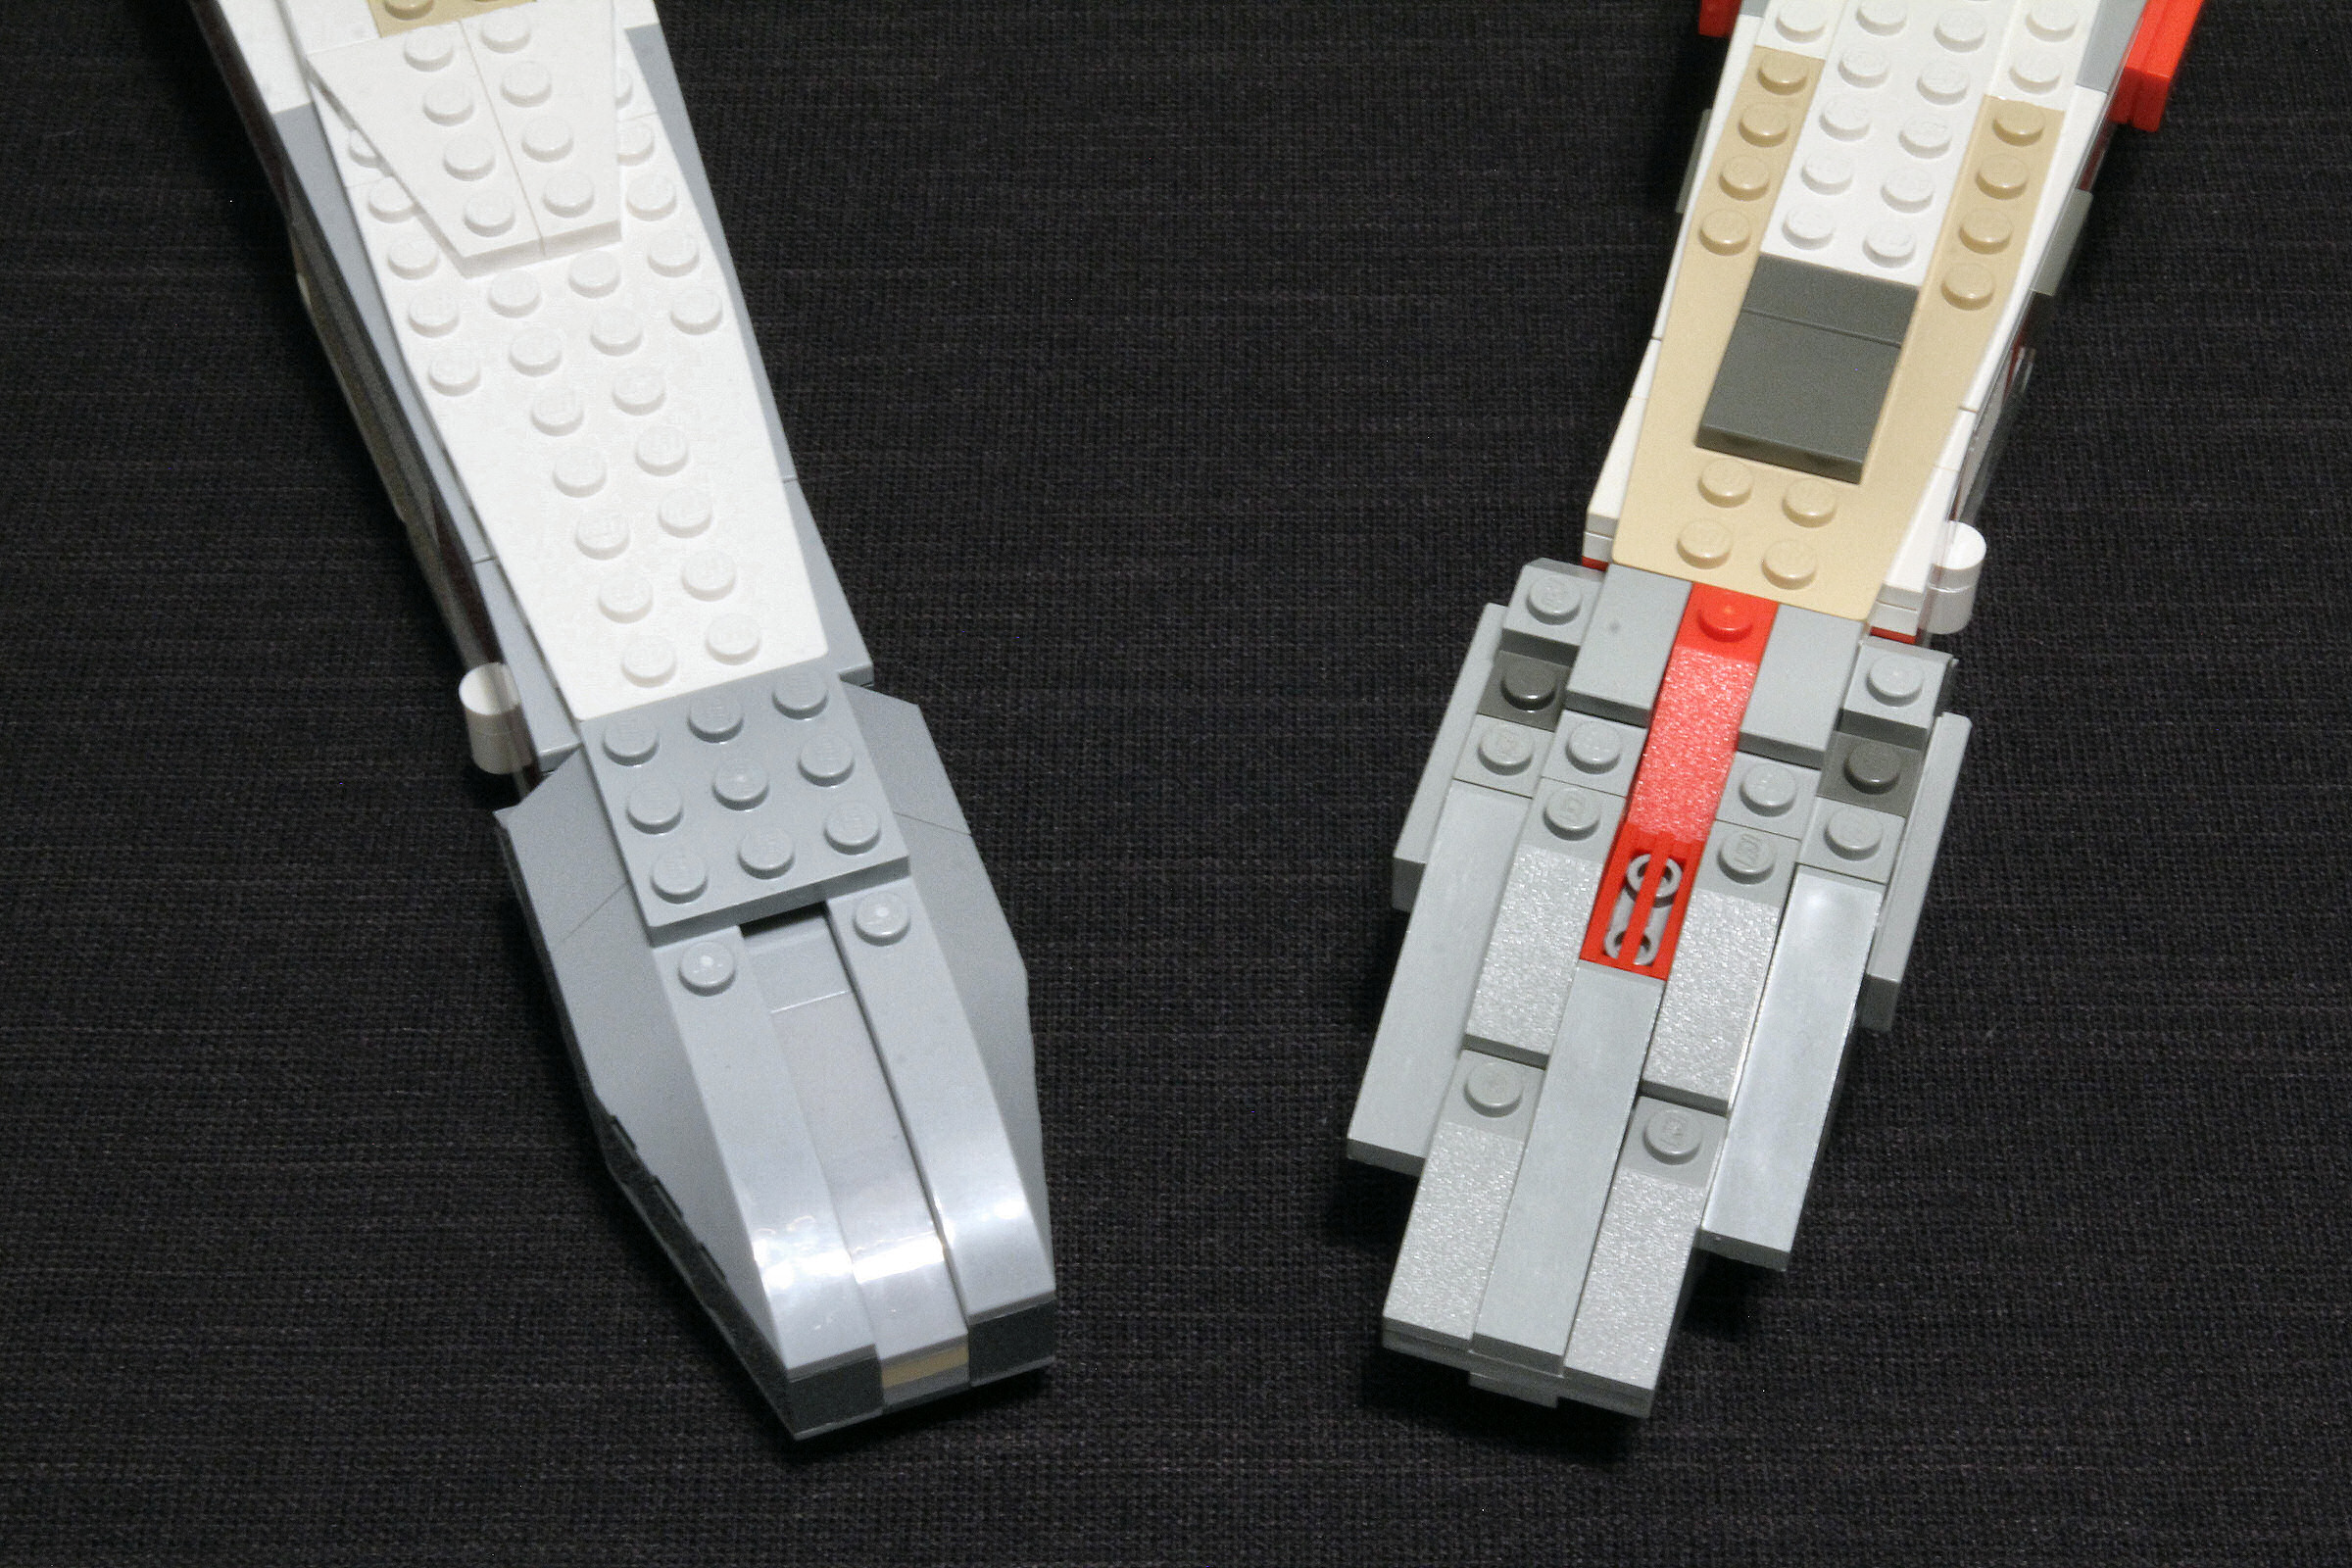 Big improvement as far as size and shape, and I like the pocket a lot more than the red indentation. But as much as it’s been improved on the new model, it still doesn’t look quite right.
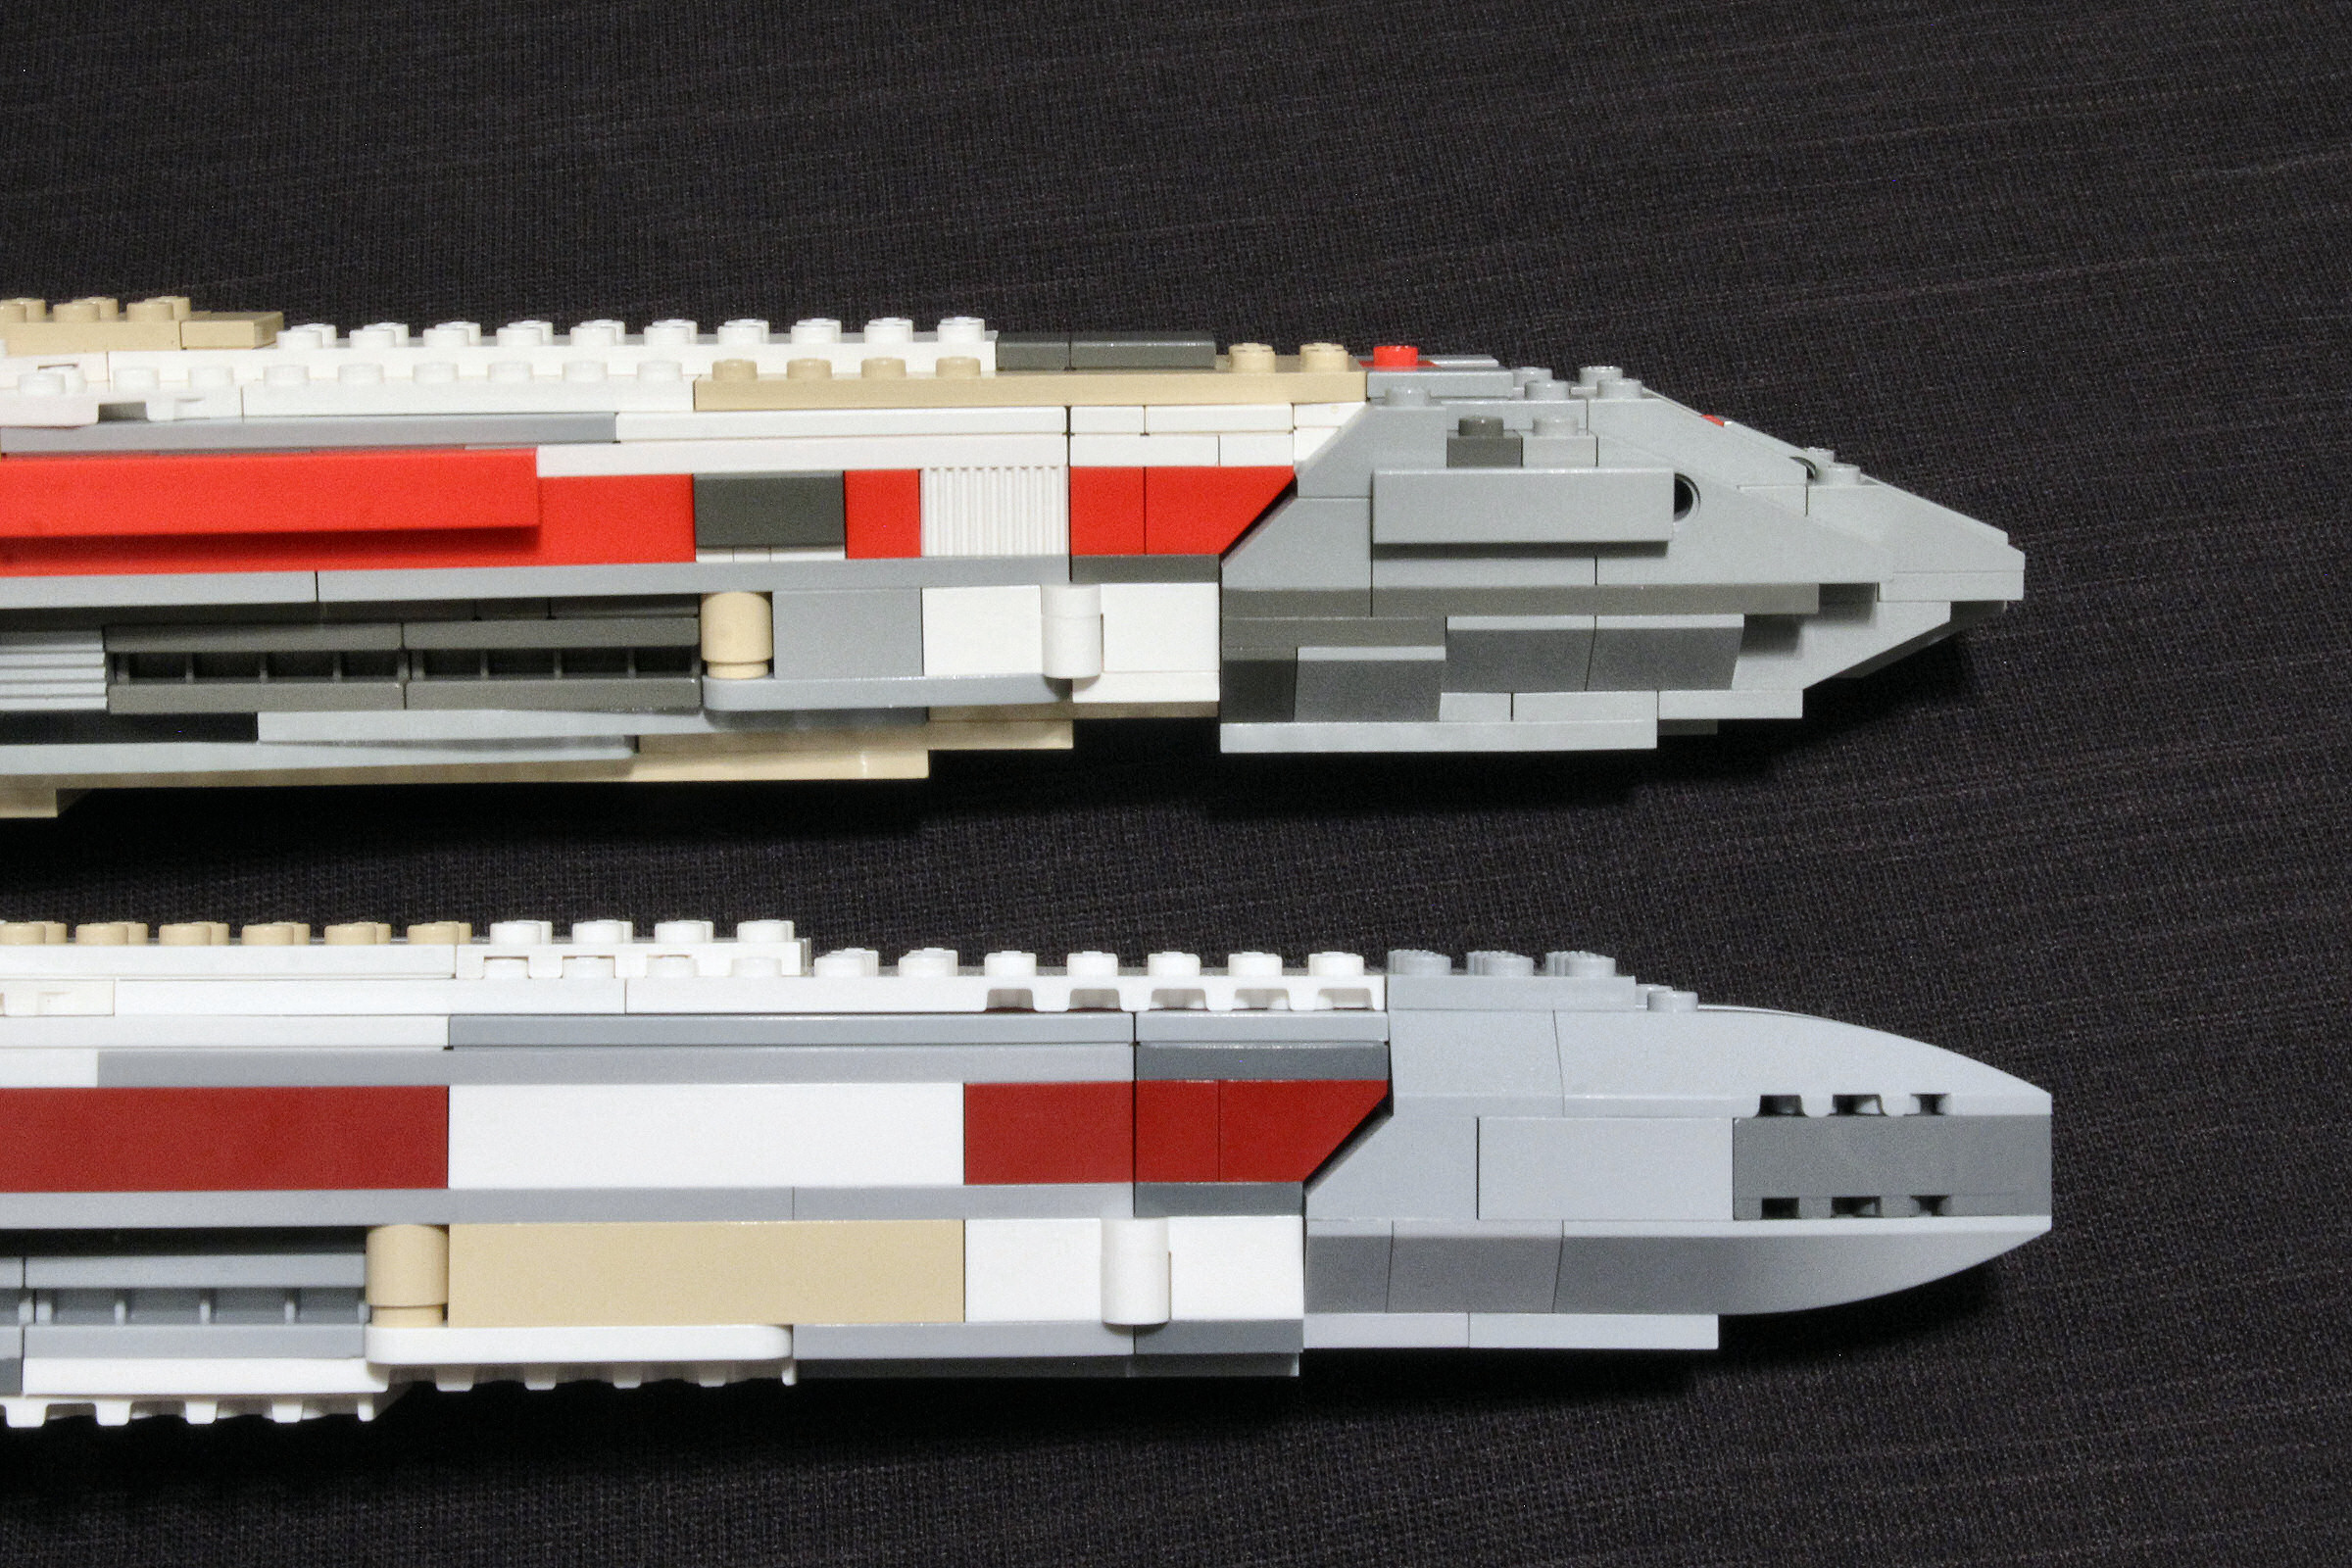
From the side you can see there is a lot of room for improvement. The flat tip, the symmetric top and bottom profile, the mixed tones for no reason… it’s all wrong. The old version does a better job with the back edge because it carries the same basic angle to the top rather than zig-zaging, and if you squint the slopes along the front look better, but the jagged edges ruin any praise it might have earned. The new style is smoother at least, but it’s hard to call it good when looking at it from this angle. When AOFLs have started redesigning the nose a month before the set even goes on sale you know that you have a problem.
With the front and back sub-assemblies connected and and it starts looking like complete fuselage, the ire subsides. The nose still needs some work but it doesn’t ruin the ship. And at least it doesn’t look like a Rancor was chewing on it like the old style.

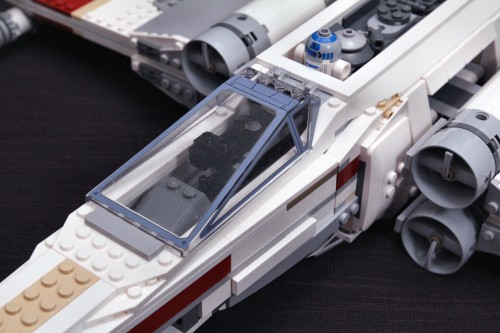
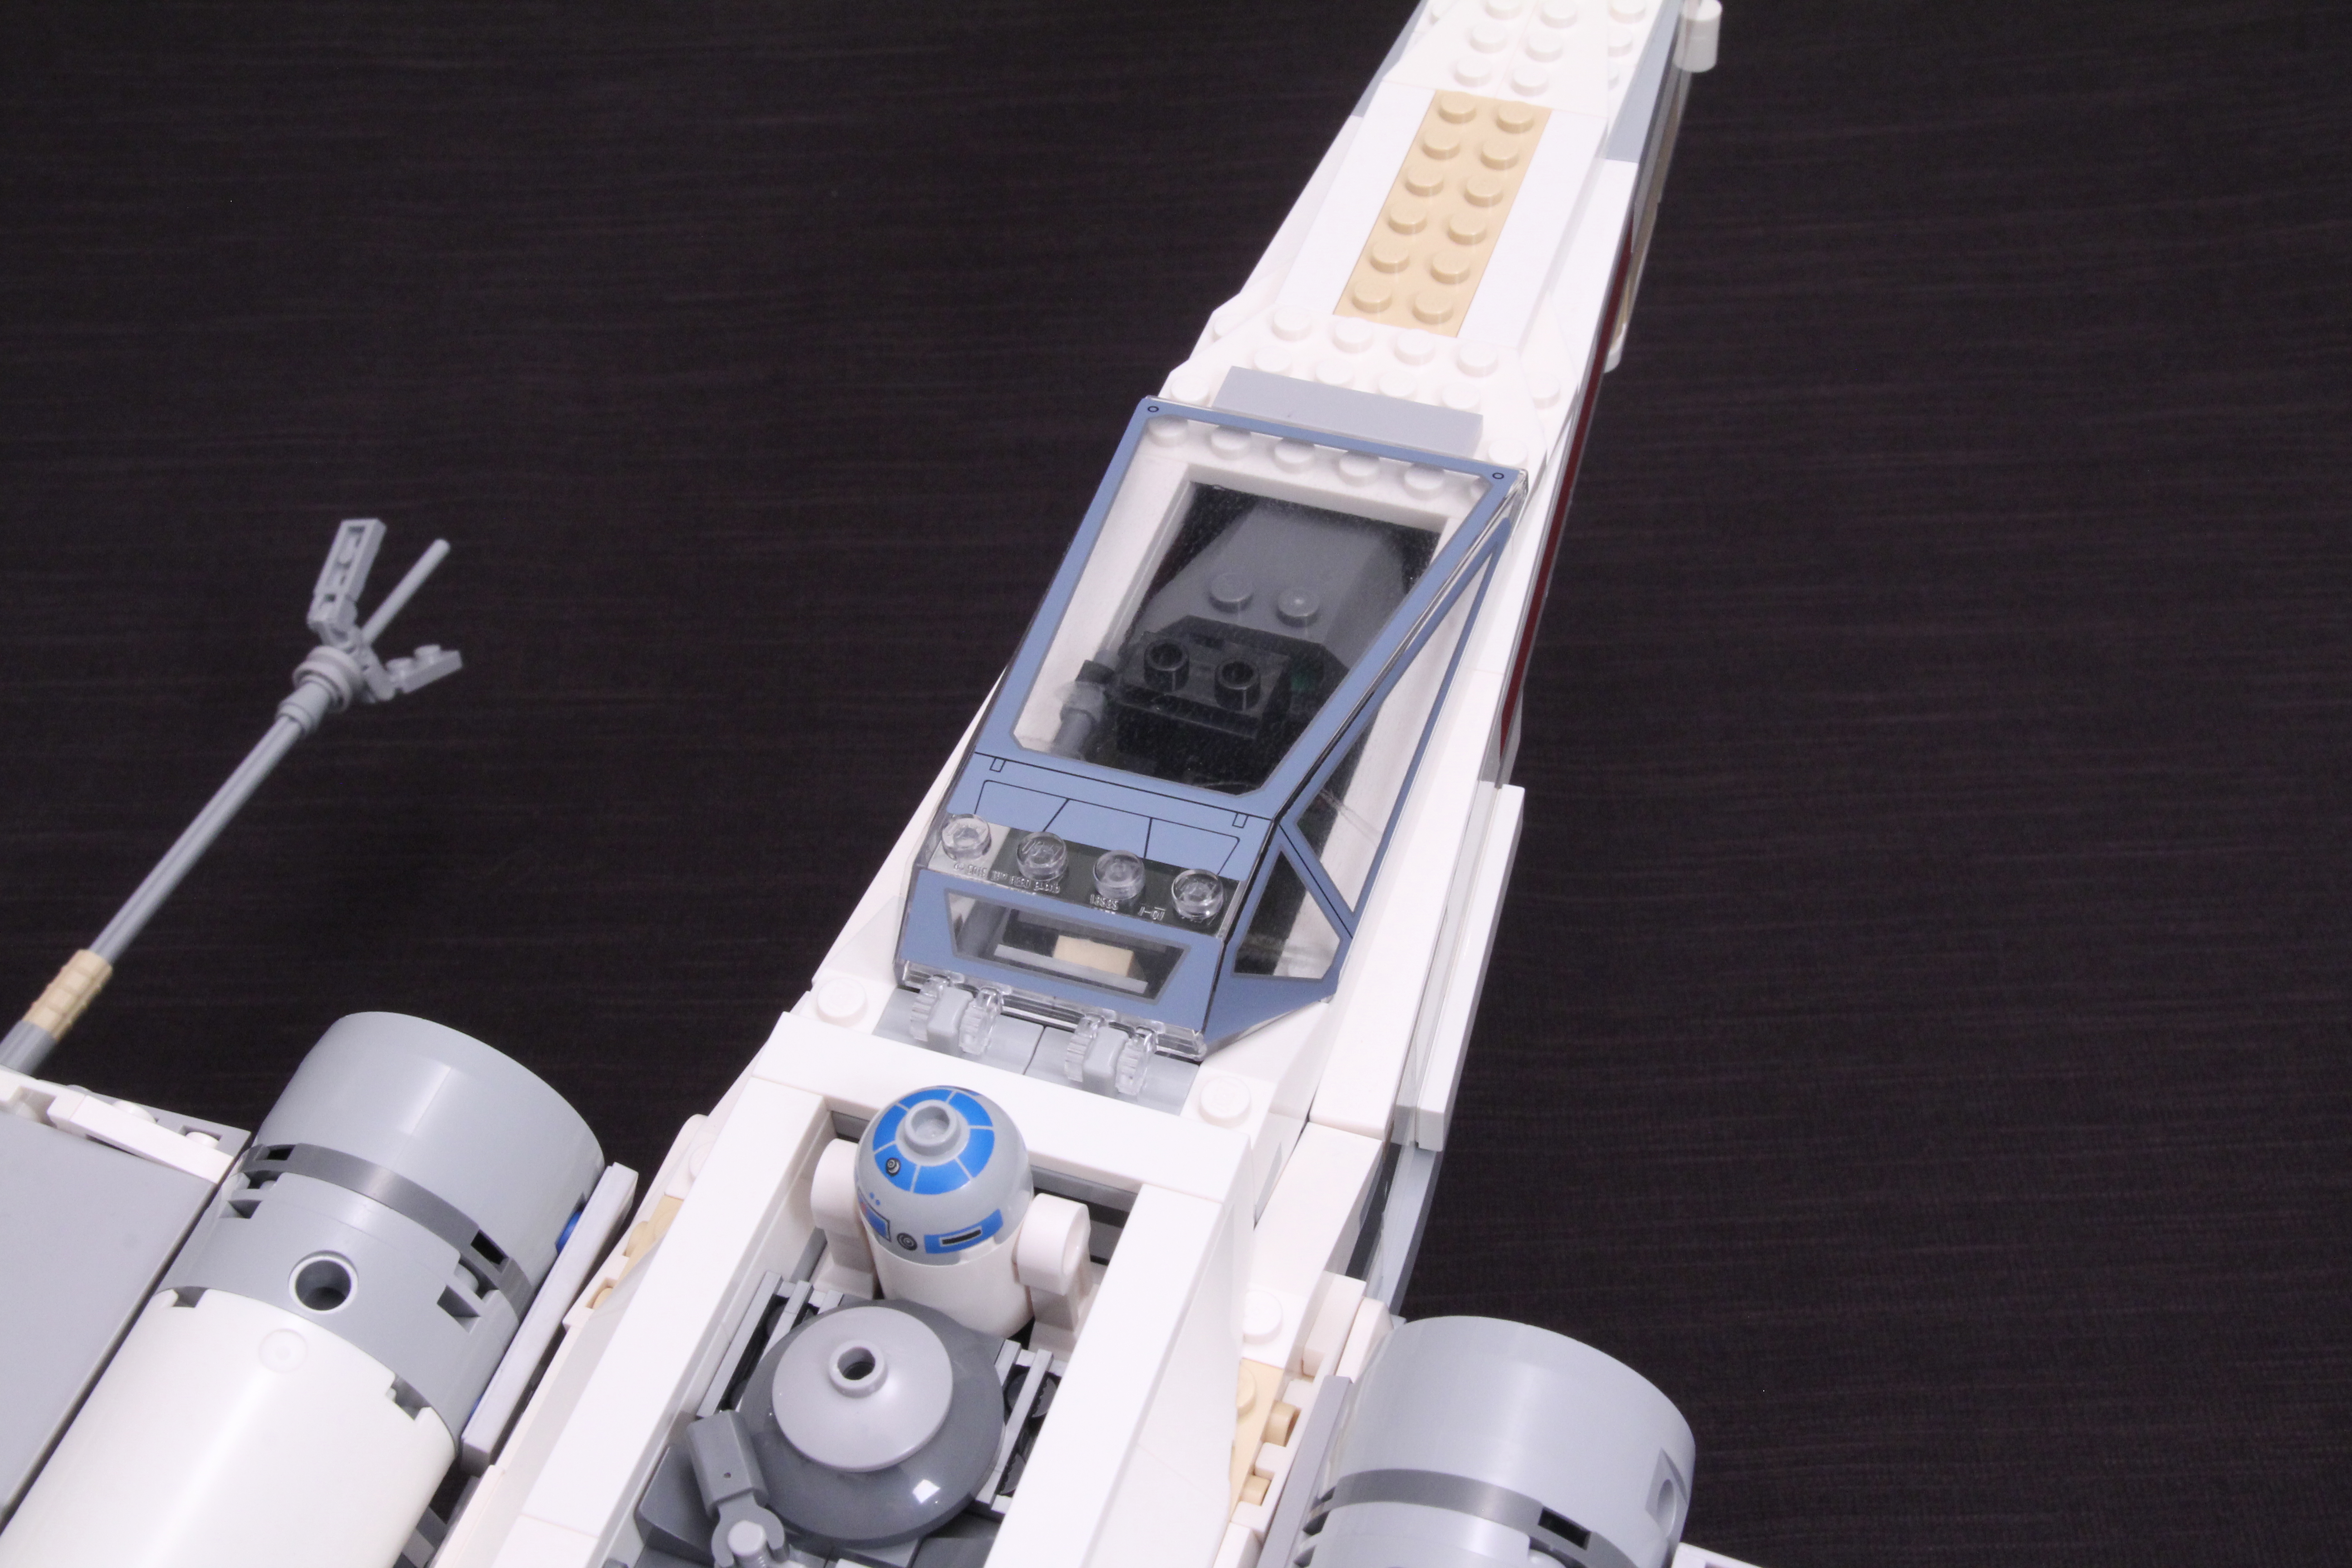
Here’s a closer look at what I mentioned above. That extra bit of shaping attained by the flags on the old model is accomplished by the large smooth sloped element on the update. The transition between the front and rear sections new feels relatively smooth. I’m sure you could sneak in a tile or two to ease the step down in width a bit more, but it doesn’t stand out as a flaw to me. The main attraction in this shot however is the canopies. The only element completely unique to either kit and unique from each other.
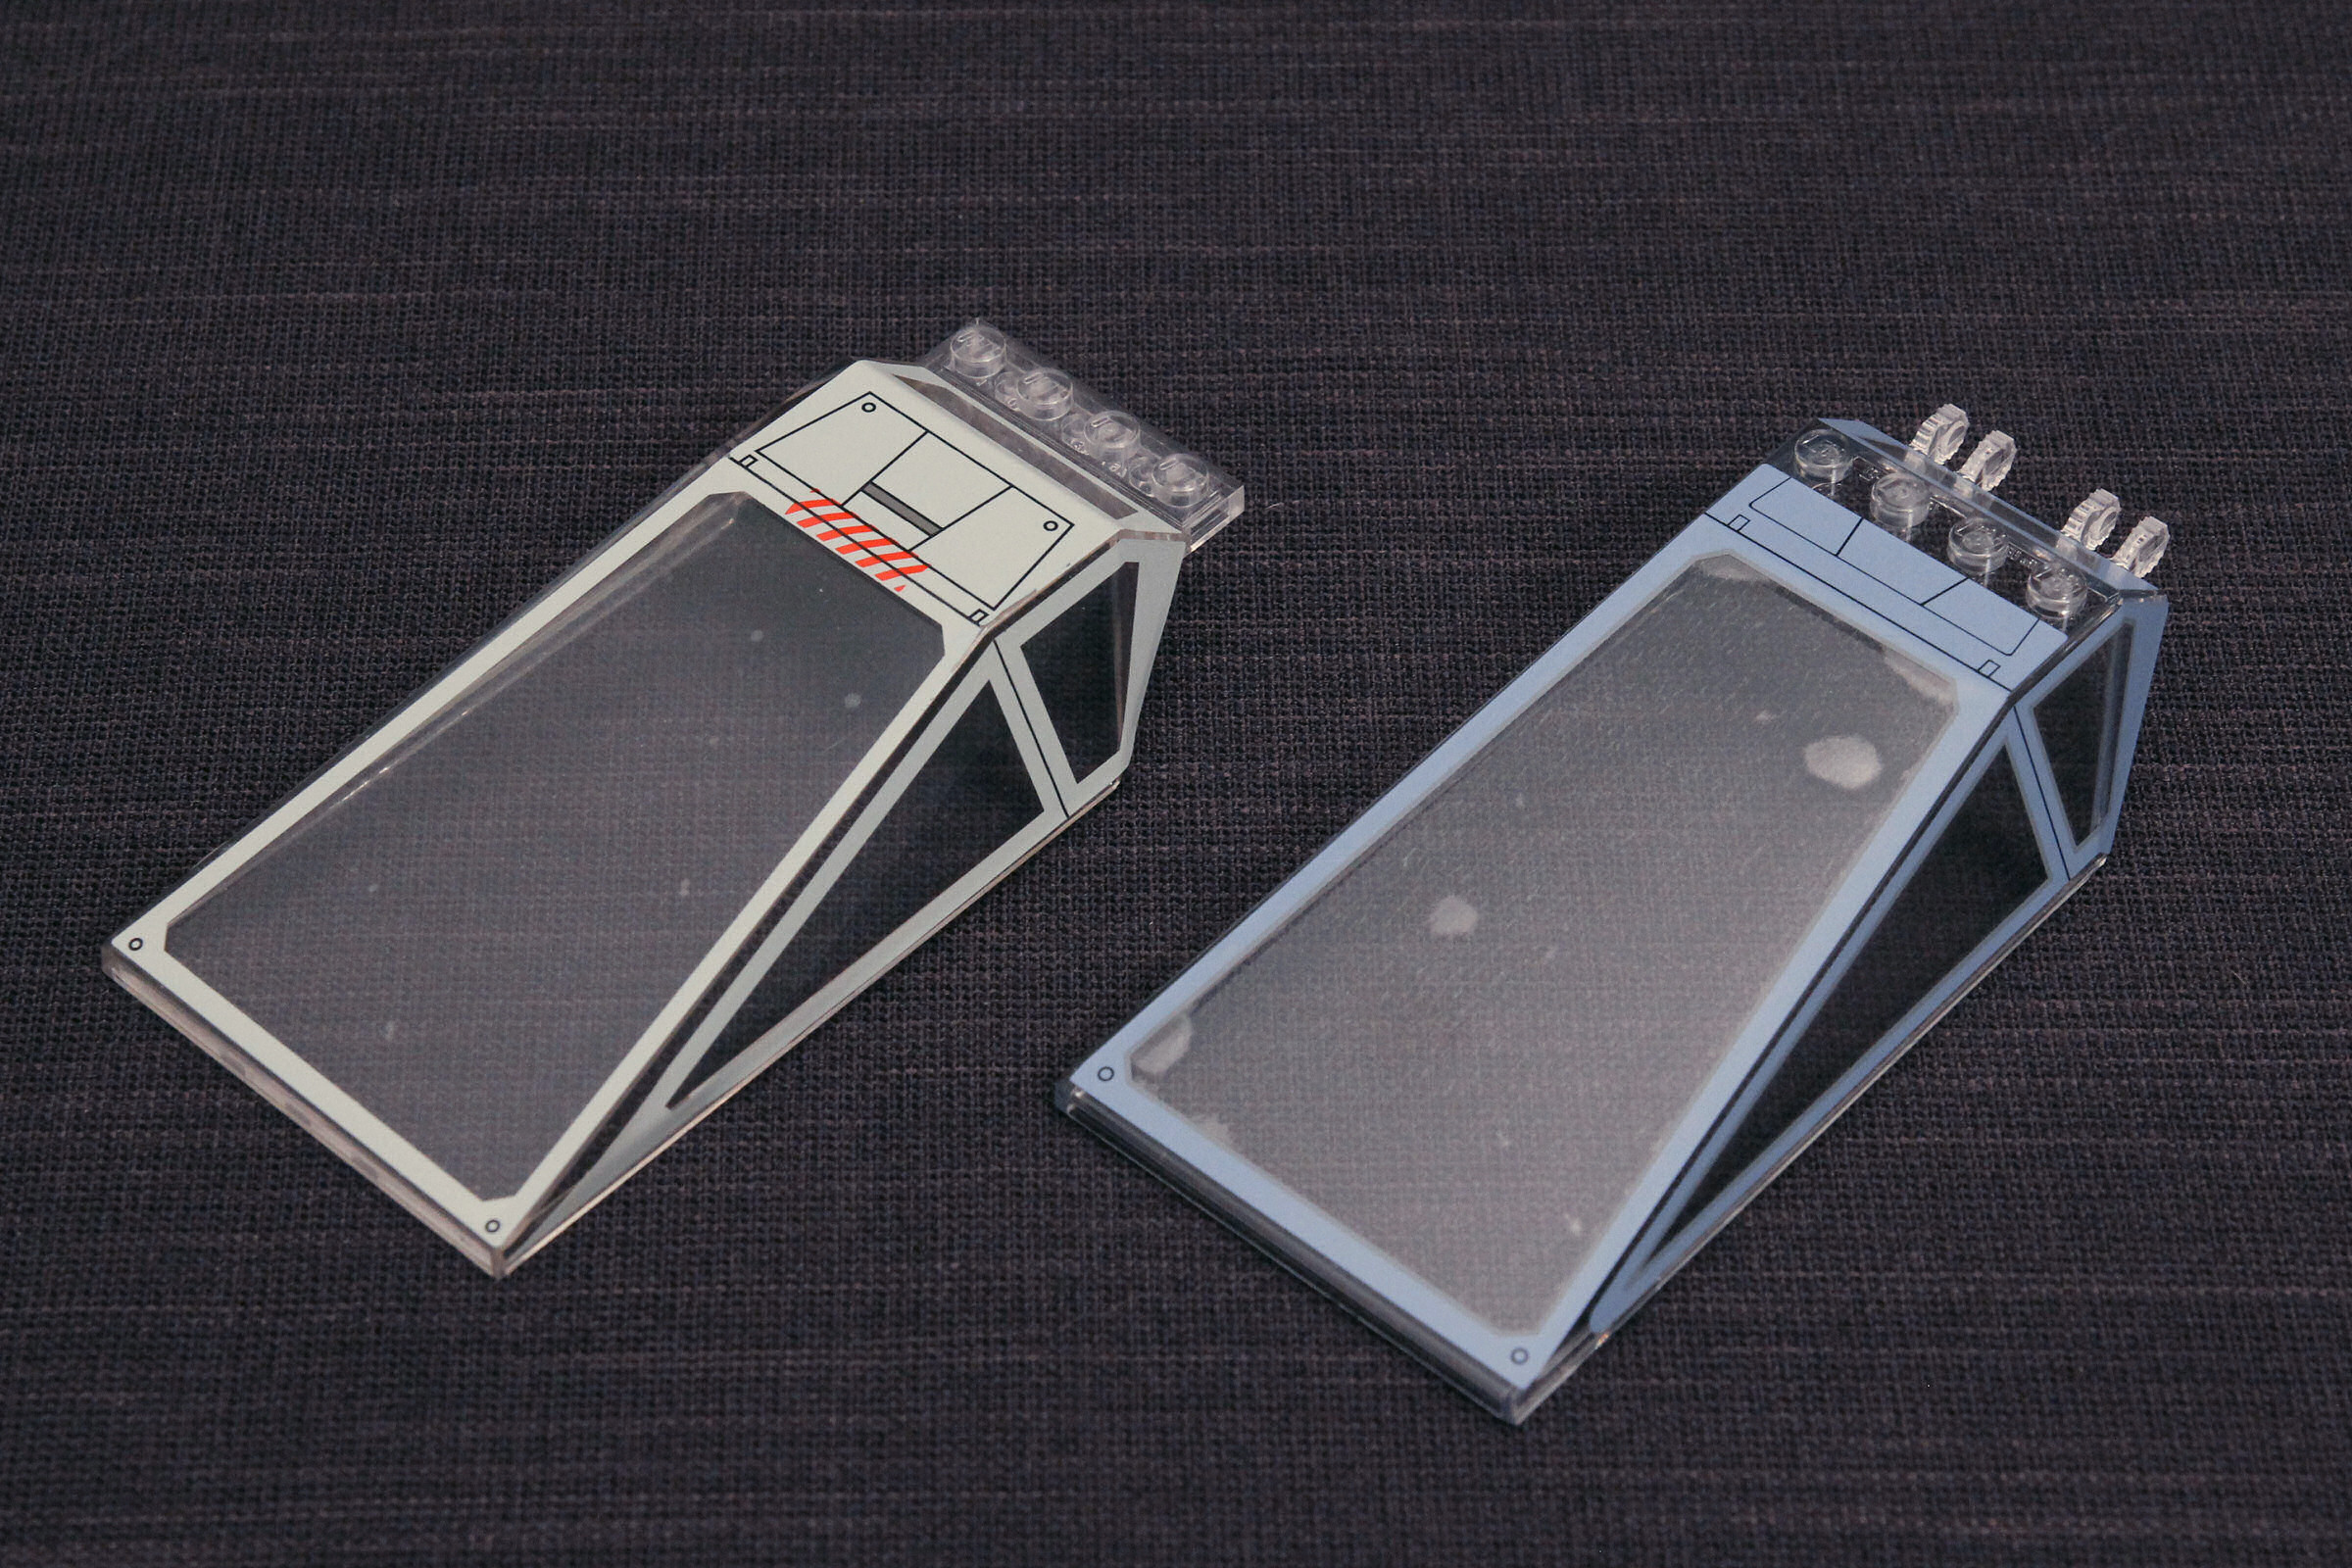
First off, and as politely as I can put it, I hate these canopy stickers with a passion. Stickers in general are a commonly contested addition to any set. I’m not against them in general. I think they’re quite nice in moderation and are really handy for builders who want to spice up custom models. I would have loved to get the rest of the stickers this set was supposed to come with. But in this specific situation, a large transparent element at the focus point of the model, I consider it unacceptable. Maybe it’s just my luck. Maybe I’m flaunting my own incompetence. But without my own anti-static clean room to apply them there is no way to get to a transparent sticker of this size properly centered on the canopy without trapping a bit of dust or an air bubble and basically ruining the appearance. I’m grateful that whoever I bought the old kit from never removed it because they did a better job than I could manage, but it’s still a far cry from factory printed. I know the excuse. This is cheaper. But honestly, for a set like this, on such a critical element, leaving it up to chance? It should be worth it.
Obligatory rant aside, the new sticker just isn’t as good as the old one. The blue doesn’t match anything on the model. The grey edging on it doesn’t have enough contrast to stand out unless you get up crazy close. I miss the bit of red caution striping at the top. Nothing about it improved. The canopy itself has several changes: it’s a full stud longer while holding the same height, making the slope even slighter than before. The top now has studs for no particular reason other than to turn the three sticker process into four. And now has click hinges built into the design, which is a nice thought considering the original hinge was a bit awkward, but somewhat disappointing considering the actual cockpits didn’t hinge from that point at all. I know making two special elements that hinge together is too much to ask, but hey, why not, they saved all that money by opting for stickers right? Alright I’ll let it go now.
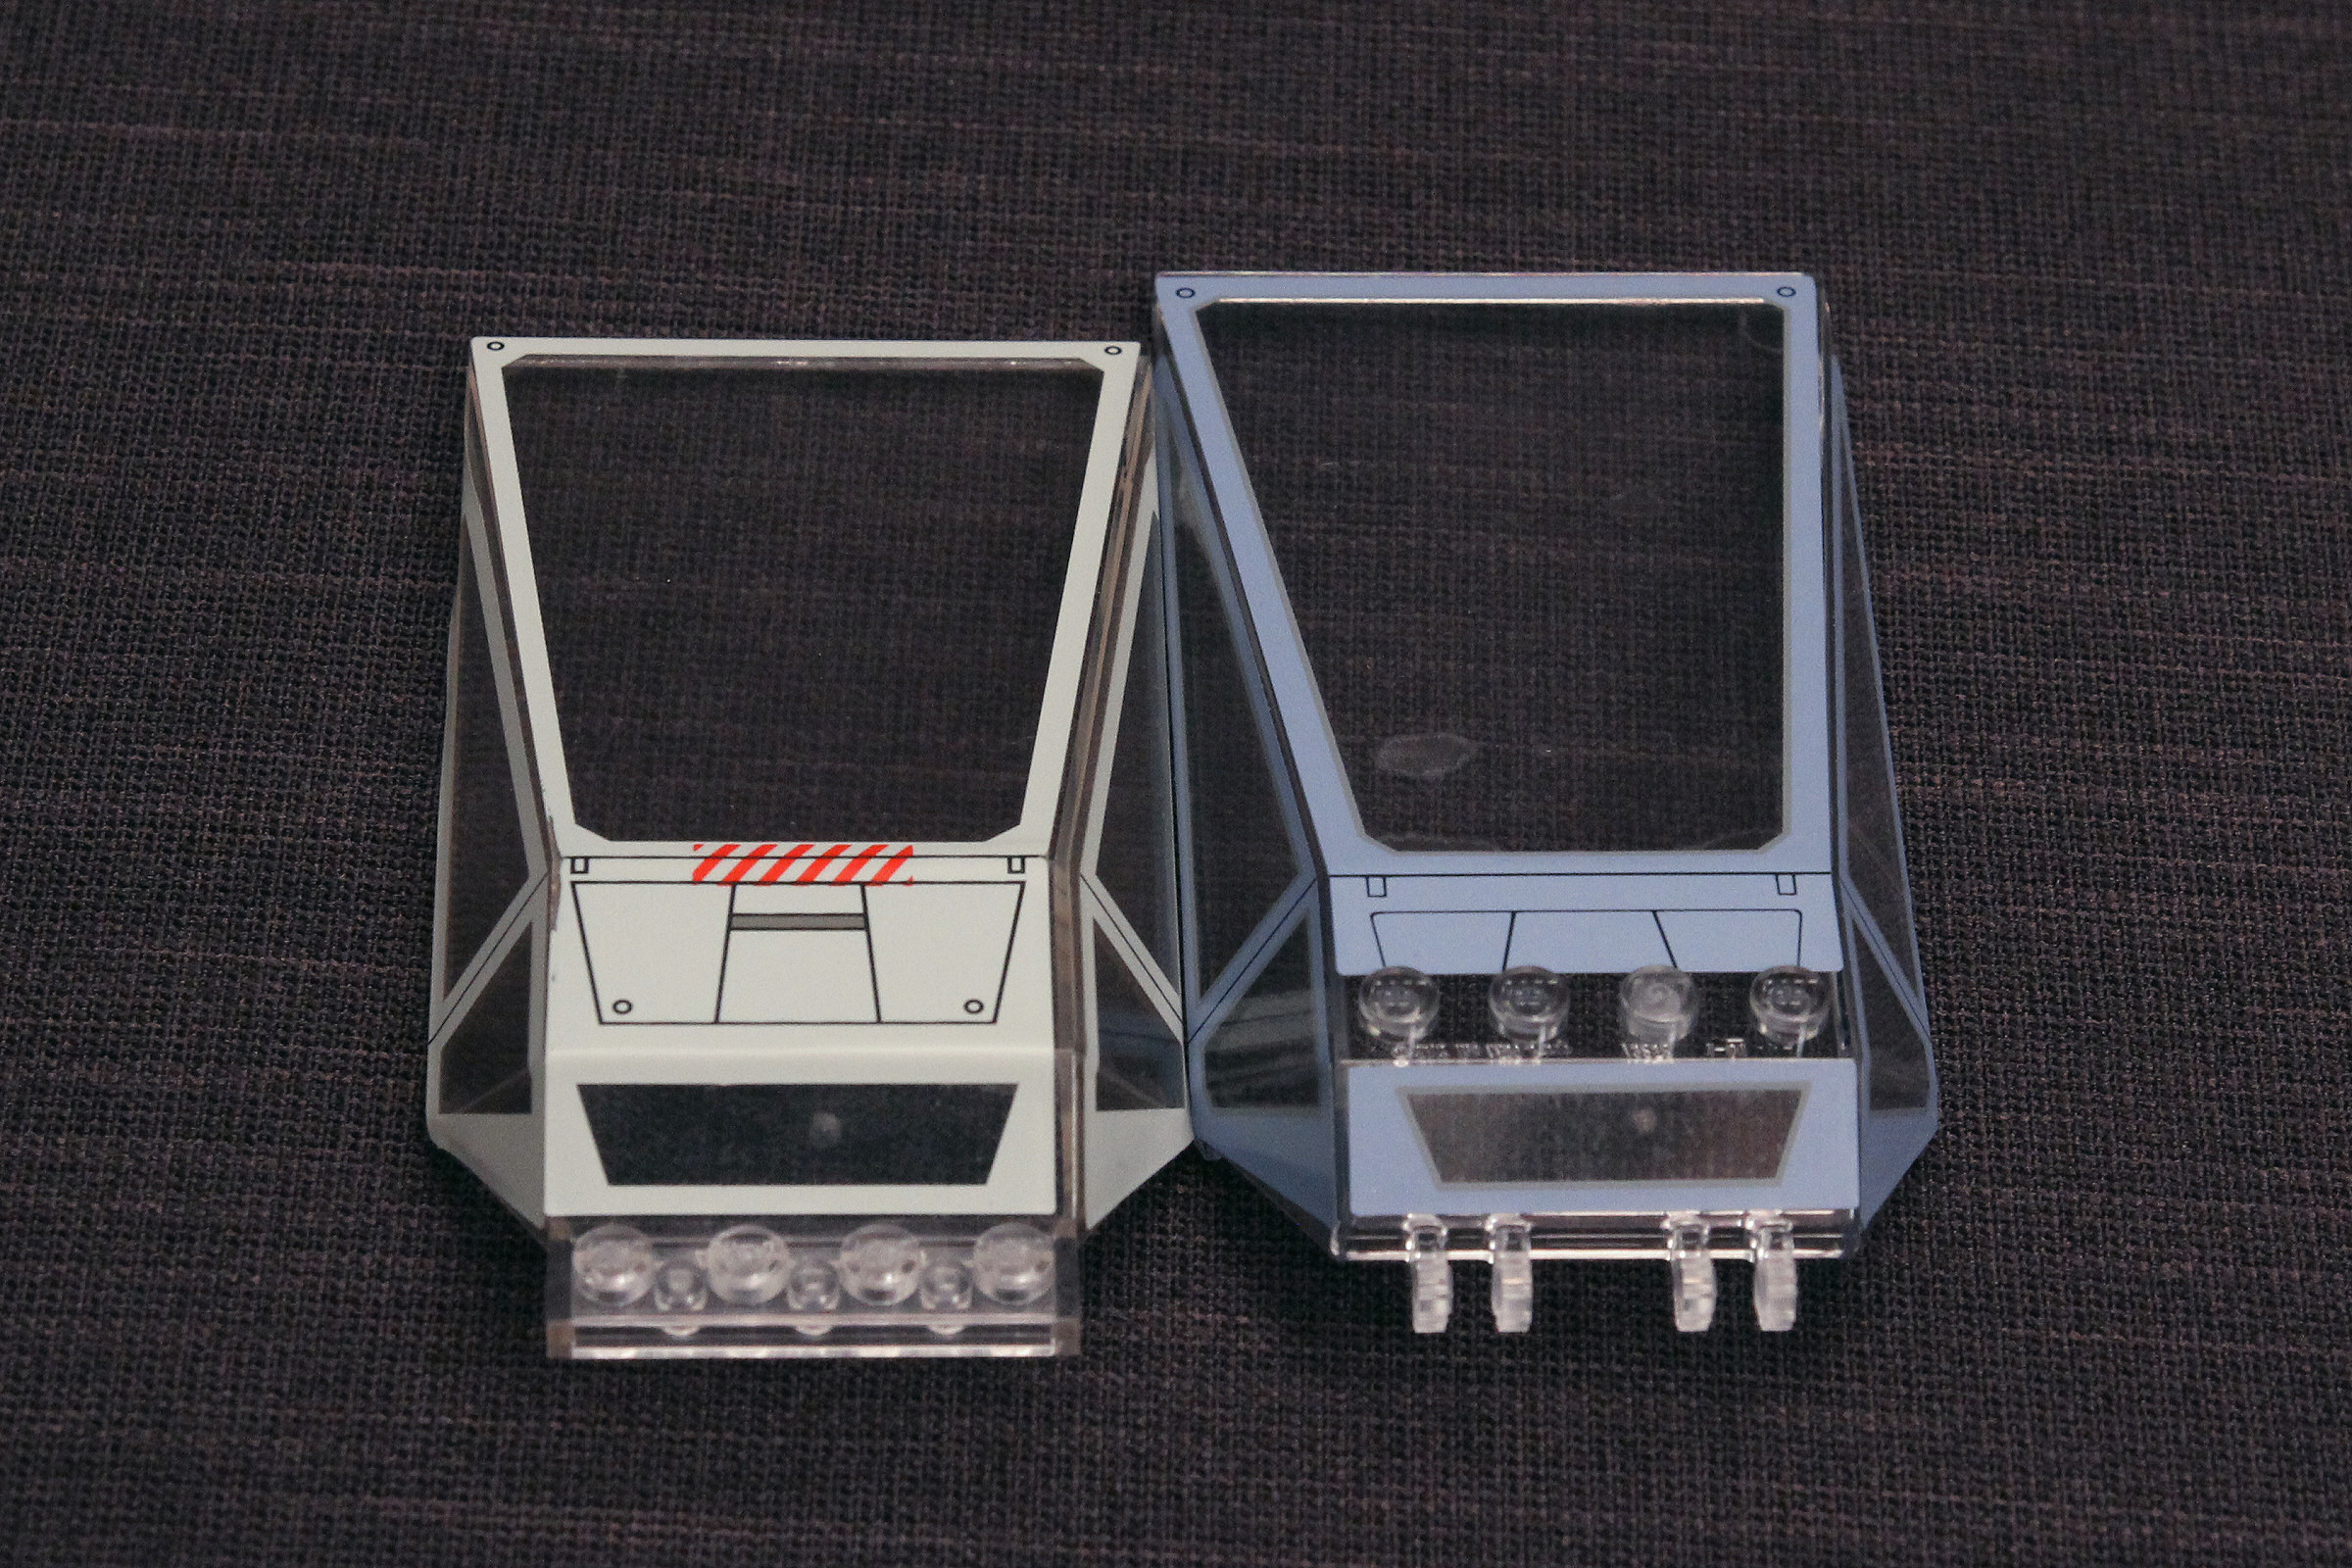
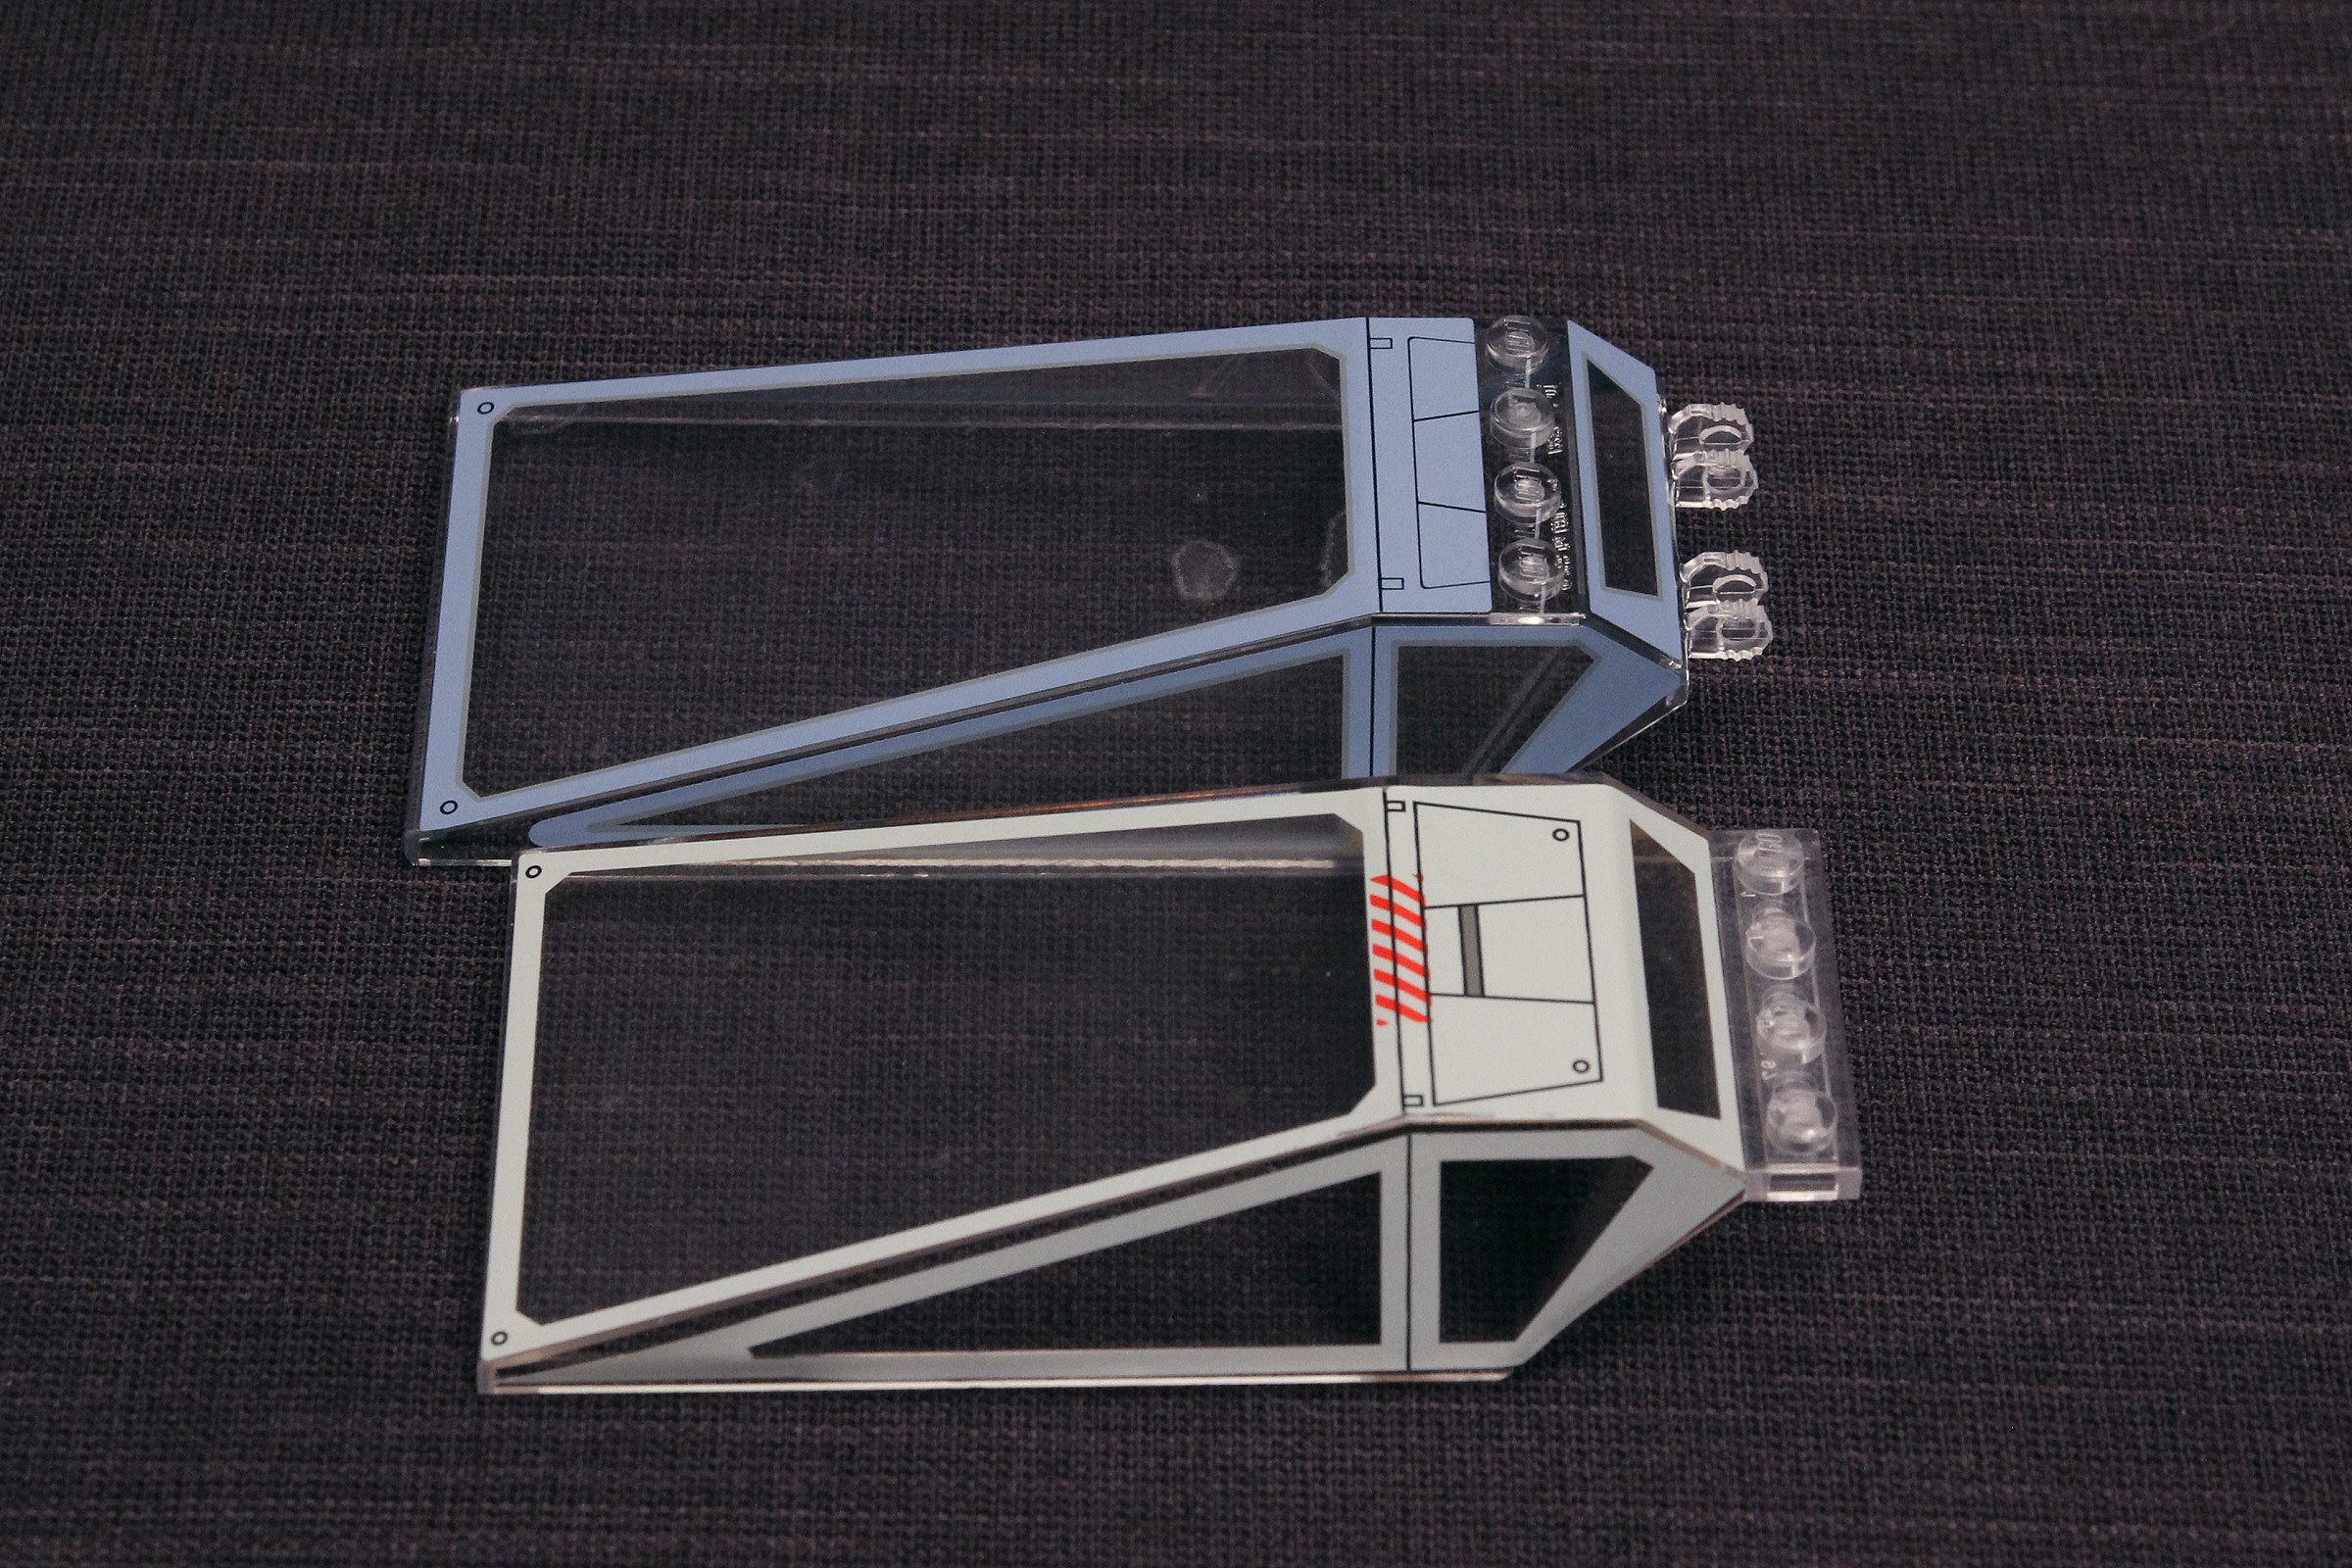
That last bit of canopy related awkwardness, which happens to bother me the least, is the proportions. If you compare the length of the leading edge at the very front to the length across the top it should taper inward, not out. This is a problem with both sets because of the rectangular cross-section I mentioned earlier. When viewed from above, the real models only had a very narrow flat strip centered on the top of the main body, and the sides taper off to form an irregular hexagon cross-section. The Lego models are a simpler shape, so the two front tips of the canopy need to align with the flat vertical sides. If they didn’t, and instead kept a truer outline from above, you’d end up with a jarring misaligned seam on either side that wouldn’t look right from any angle. So while I’m well aware that this solution is very inaccurate, I’m fine with it because it looks good on these models. That aside, I prefer the stouter old canopy without the studs on top. With that in mind, I thought I’d try something out just for fun.
The original canopy actually fits quite nicely on the new model, and the old grey doesn’t mismatch any worse than the blue, so a hybrid of the two is quite viable. But that’s skipping ahead a bit. Moving onto the next set of sub-assemblies…
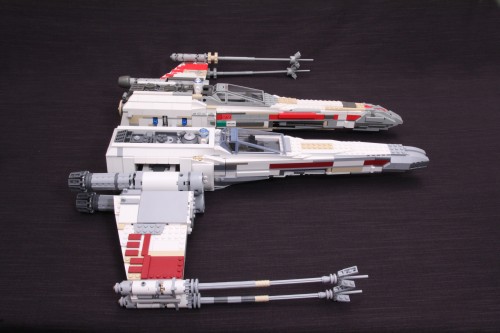
The wings are very close in size. The new ones are only slightly longer front to back thanks to an extra plate to fill in the gap by the rear nozzle better. The engines are integrated on the original model but separate on the new one, so for demonstration I’ve simply set it on top where it would wind up after assembly.
On both models the full width of each wing is 22 studs. The intakes on the new model are slightly larger, very slightly, but unfortunately they look smaller due to a couple of different factors. They’re mounted closer to the center-line of the ship. This makes the wings look bigger in proportion and they aren’t as spread out once fully assembled. The exhaust nozzles are significantly larger on the new model as well, so from all sides the proportions work against them. It’s not terrible, but noticeable.
The undersides of the wings aren’t anything special. The old version put a little bit of effort into dressing them up with some vents/screens. The new model just relied on the connecting lift-arms to break up the monotony of plate undersides. In this view it’s easy to see how much of a difference the larger exhaust nozzles make.
Both models have two styles of canons to mimic the stripped barrels on Luke’s X-wing. The old model used ribbed tube and smooth spacers on alternate wings, the new uses the same Technic connectors on each but in alternating colors. It’s closer to the prop, but not quite right. I guess even the lightest blue parts would stand out too much. Lego makes some strange color choices sometimes. Like the body of the canons switching from grey to white. If they made the whole ship grey like it should be it would be pretty bland, so instead it’s predominately white and they’re left with deciding where to drop in some highlights. Creative license I suppose. The tips are a little bit shorter now. Narrower too, but overall they look bigger. It’s a difficult detail to get right and neither model is close enough to be happy with. But they get the job done better than a 2×2 inverted dish.
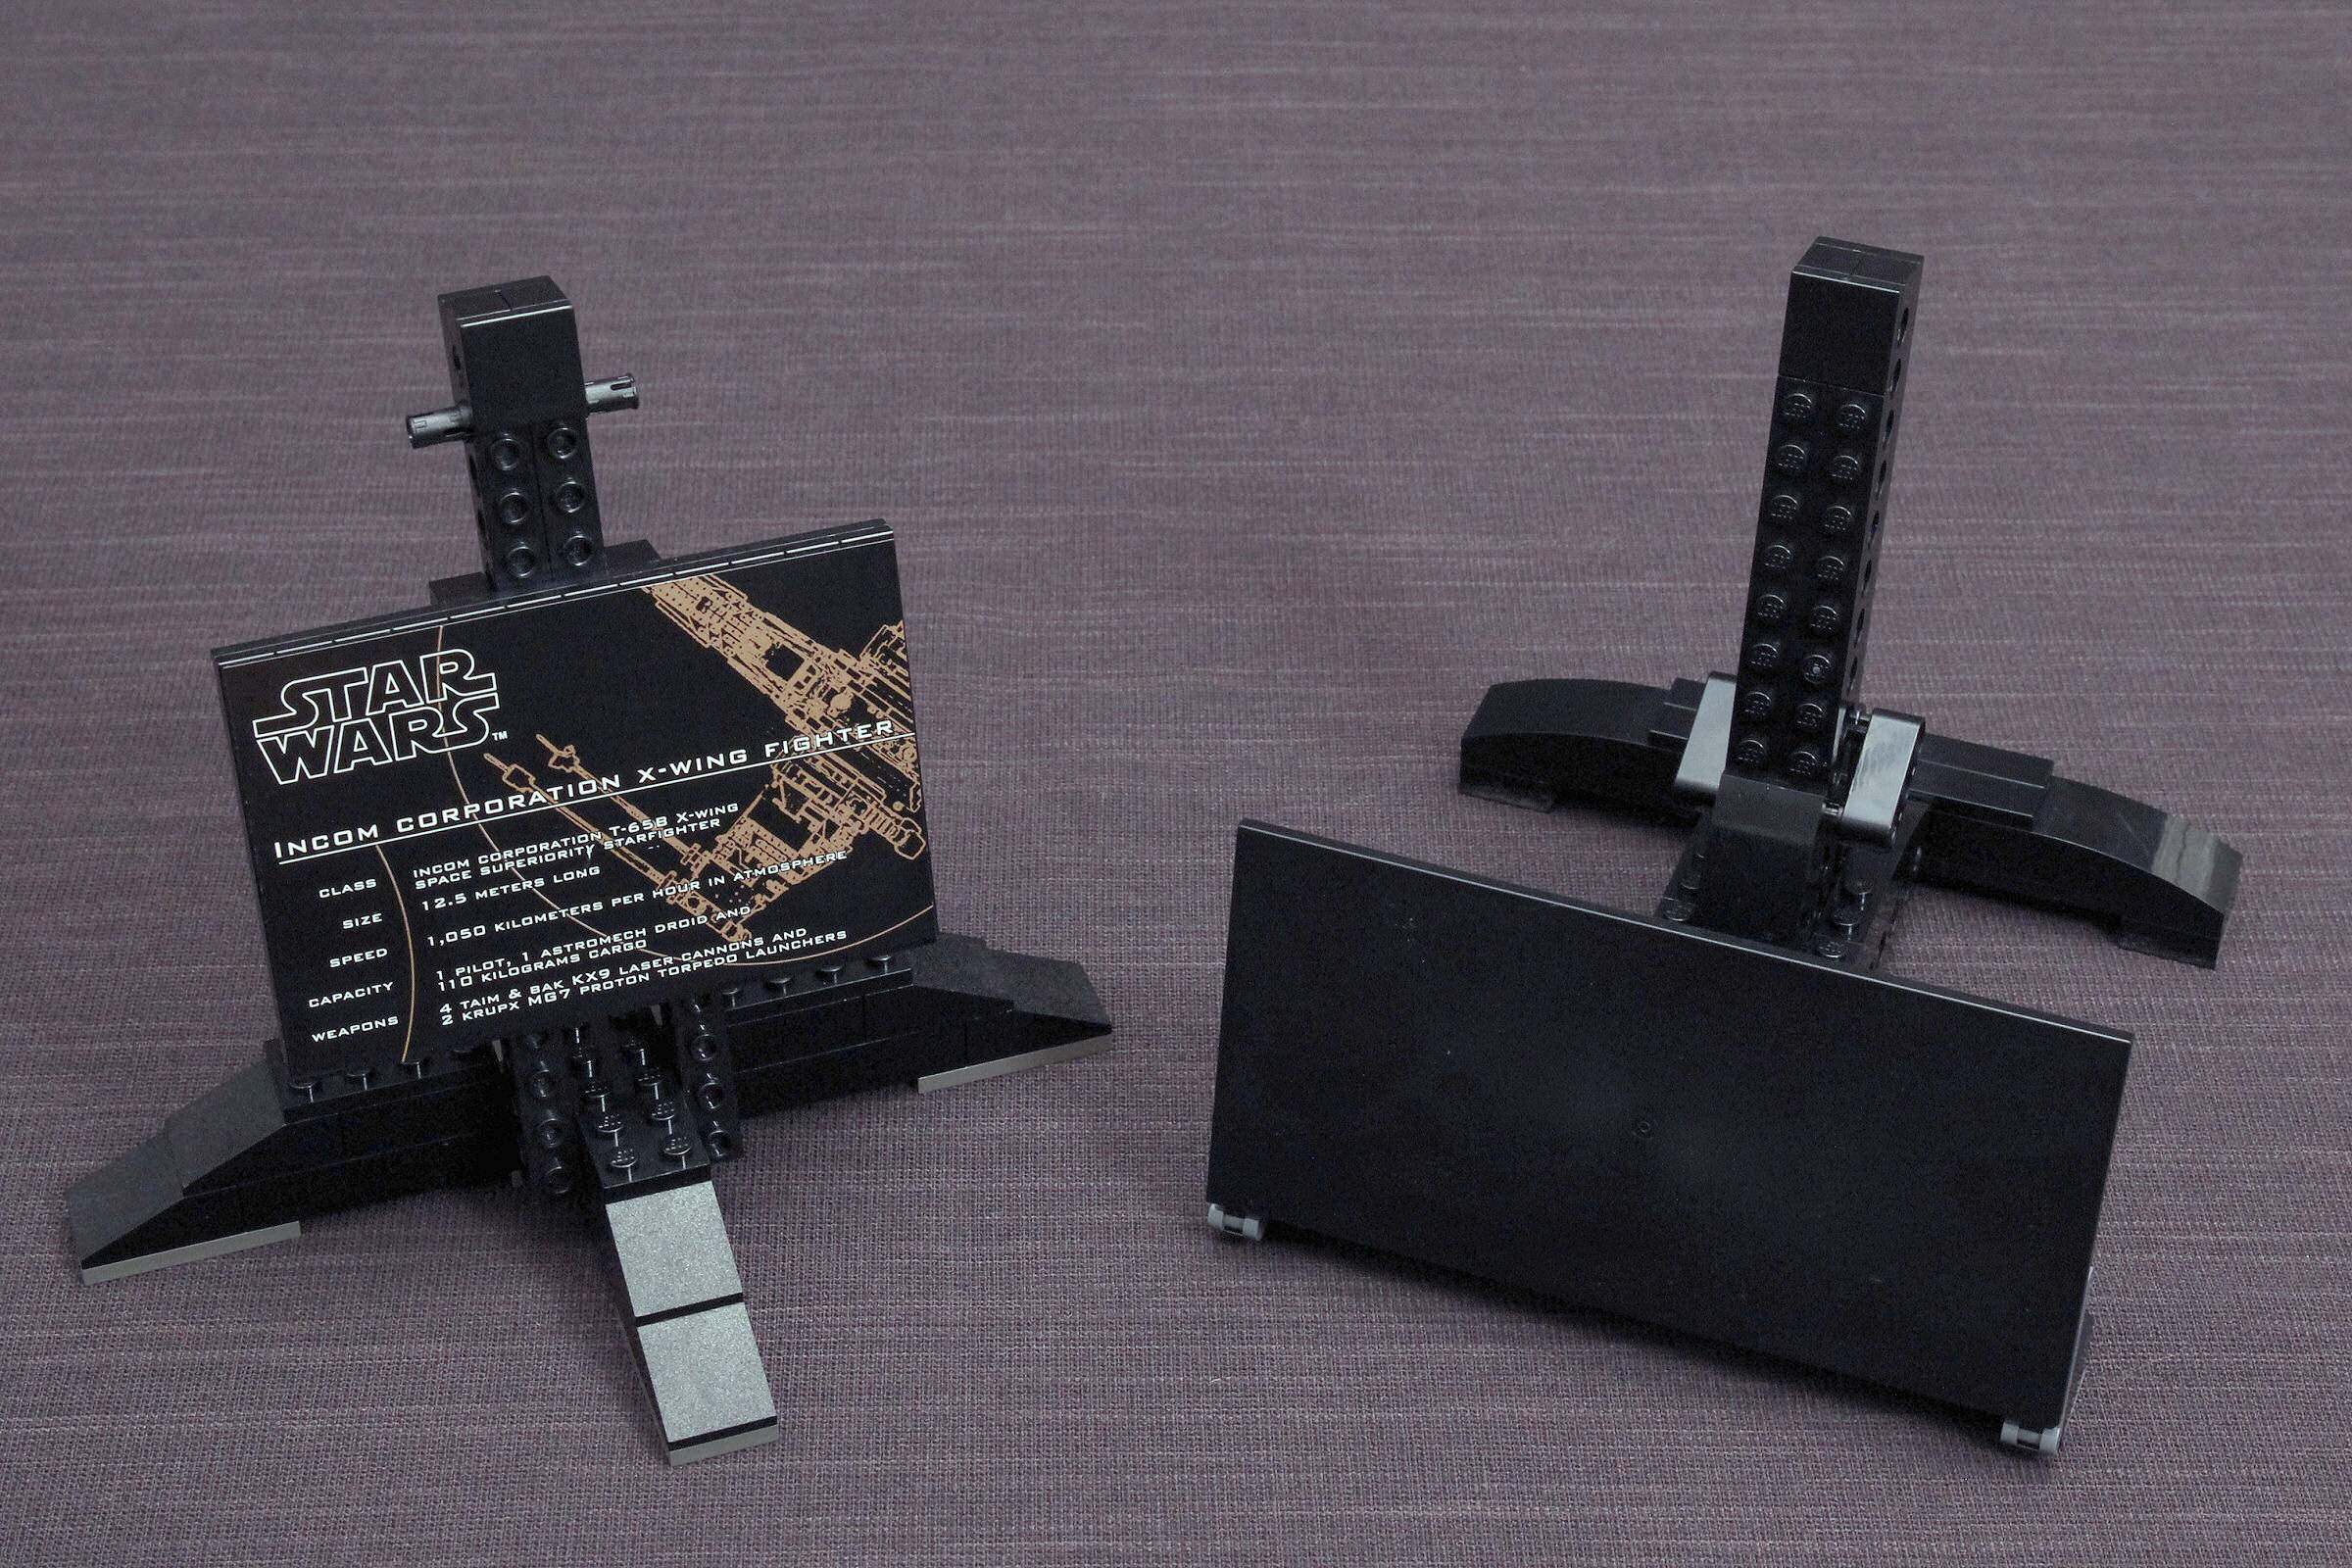
The stands are both pretty simple. The old with a cross shaped footprint, the new with an H. The datasheet sticker will be bigger and fill a single 8×16 tile instead of an array of 12 1x8s.
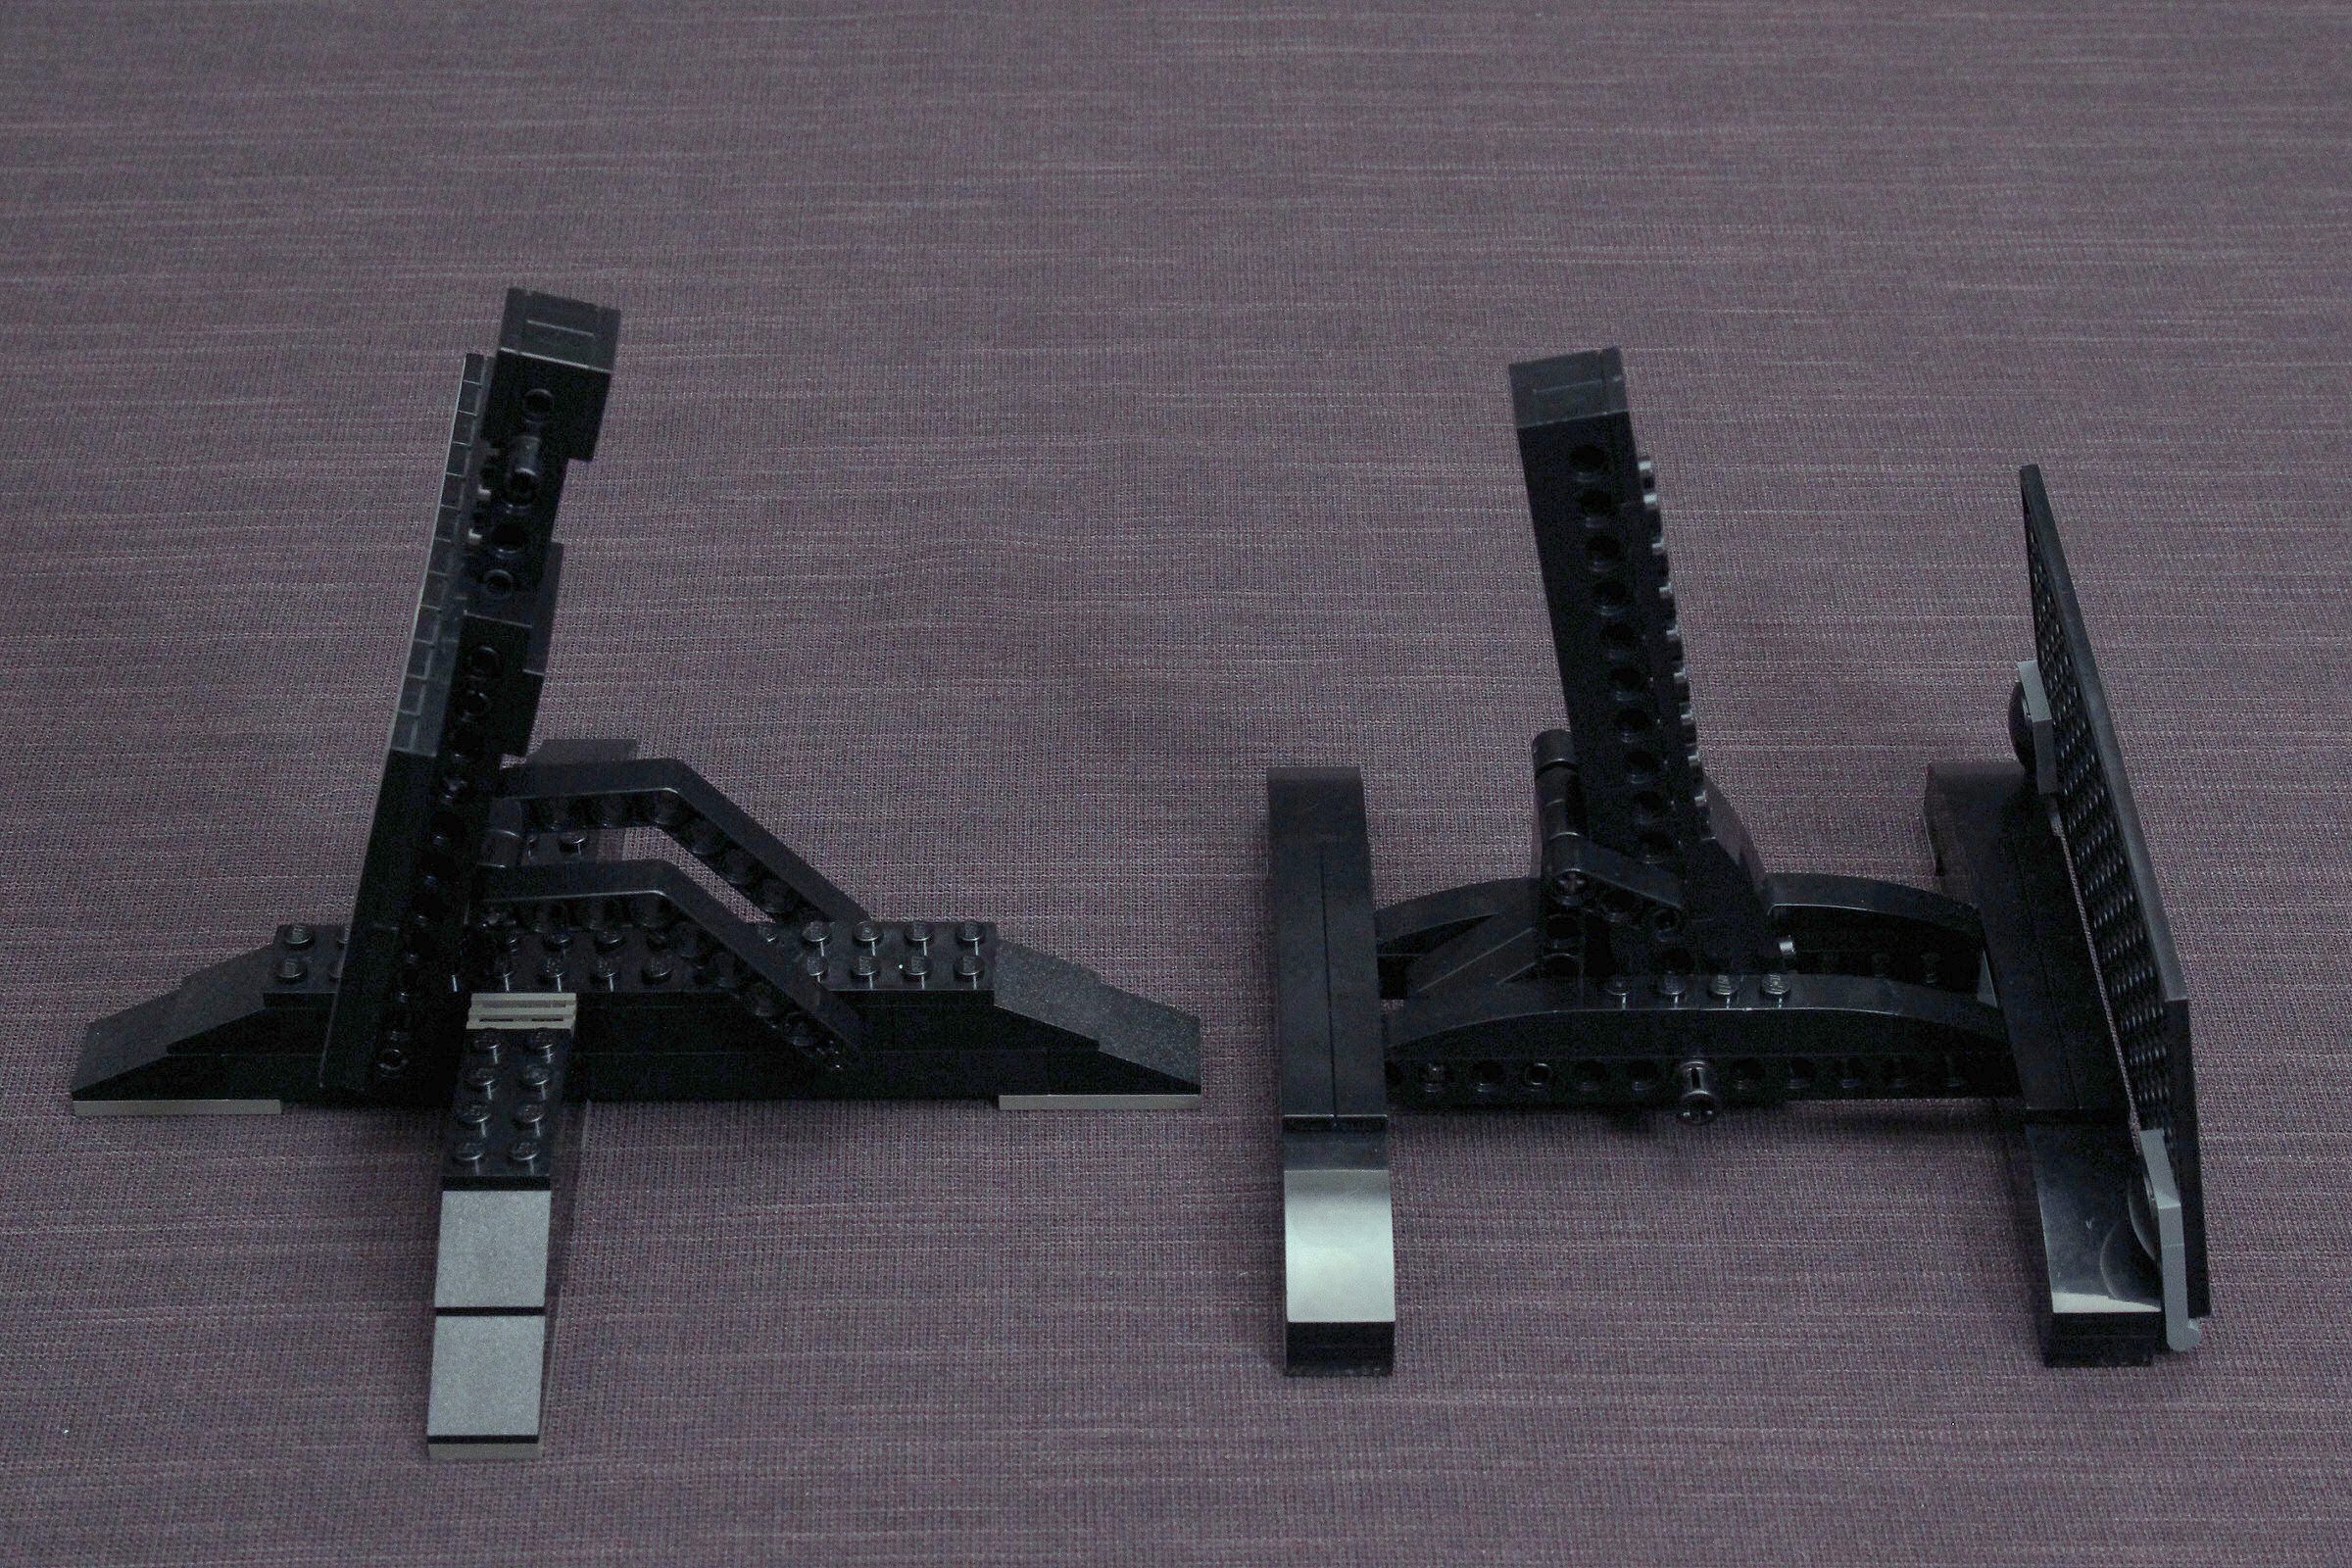
Both are meant to be displayed with the model leaning back, but the old one will also hold it’s position fairly well with the model level. This is more thanks to the square receiving port in the model being closer to it’s center of gravity than in the new version. You can reverse the new stand 180° and the model will be almost level, but you’ll need to switch the card to the opposite side if you want to display it that way. Or you could add some weight into the front end of the fuselage to bring the center of gravity forward. The stand is the last sub-unit to build in both sets, so all that’s left is the final assembly.


Unfortunately I was not given the complete sticker sheets for the new model, so it will seem a little bare in comparison. But try not to let that bother you to much as I go through the details on the two now that the ships are complete.
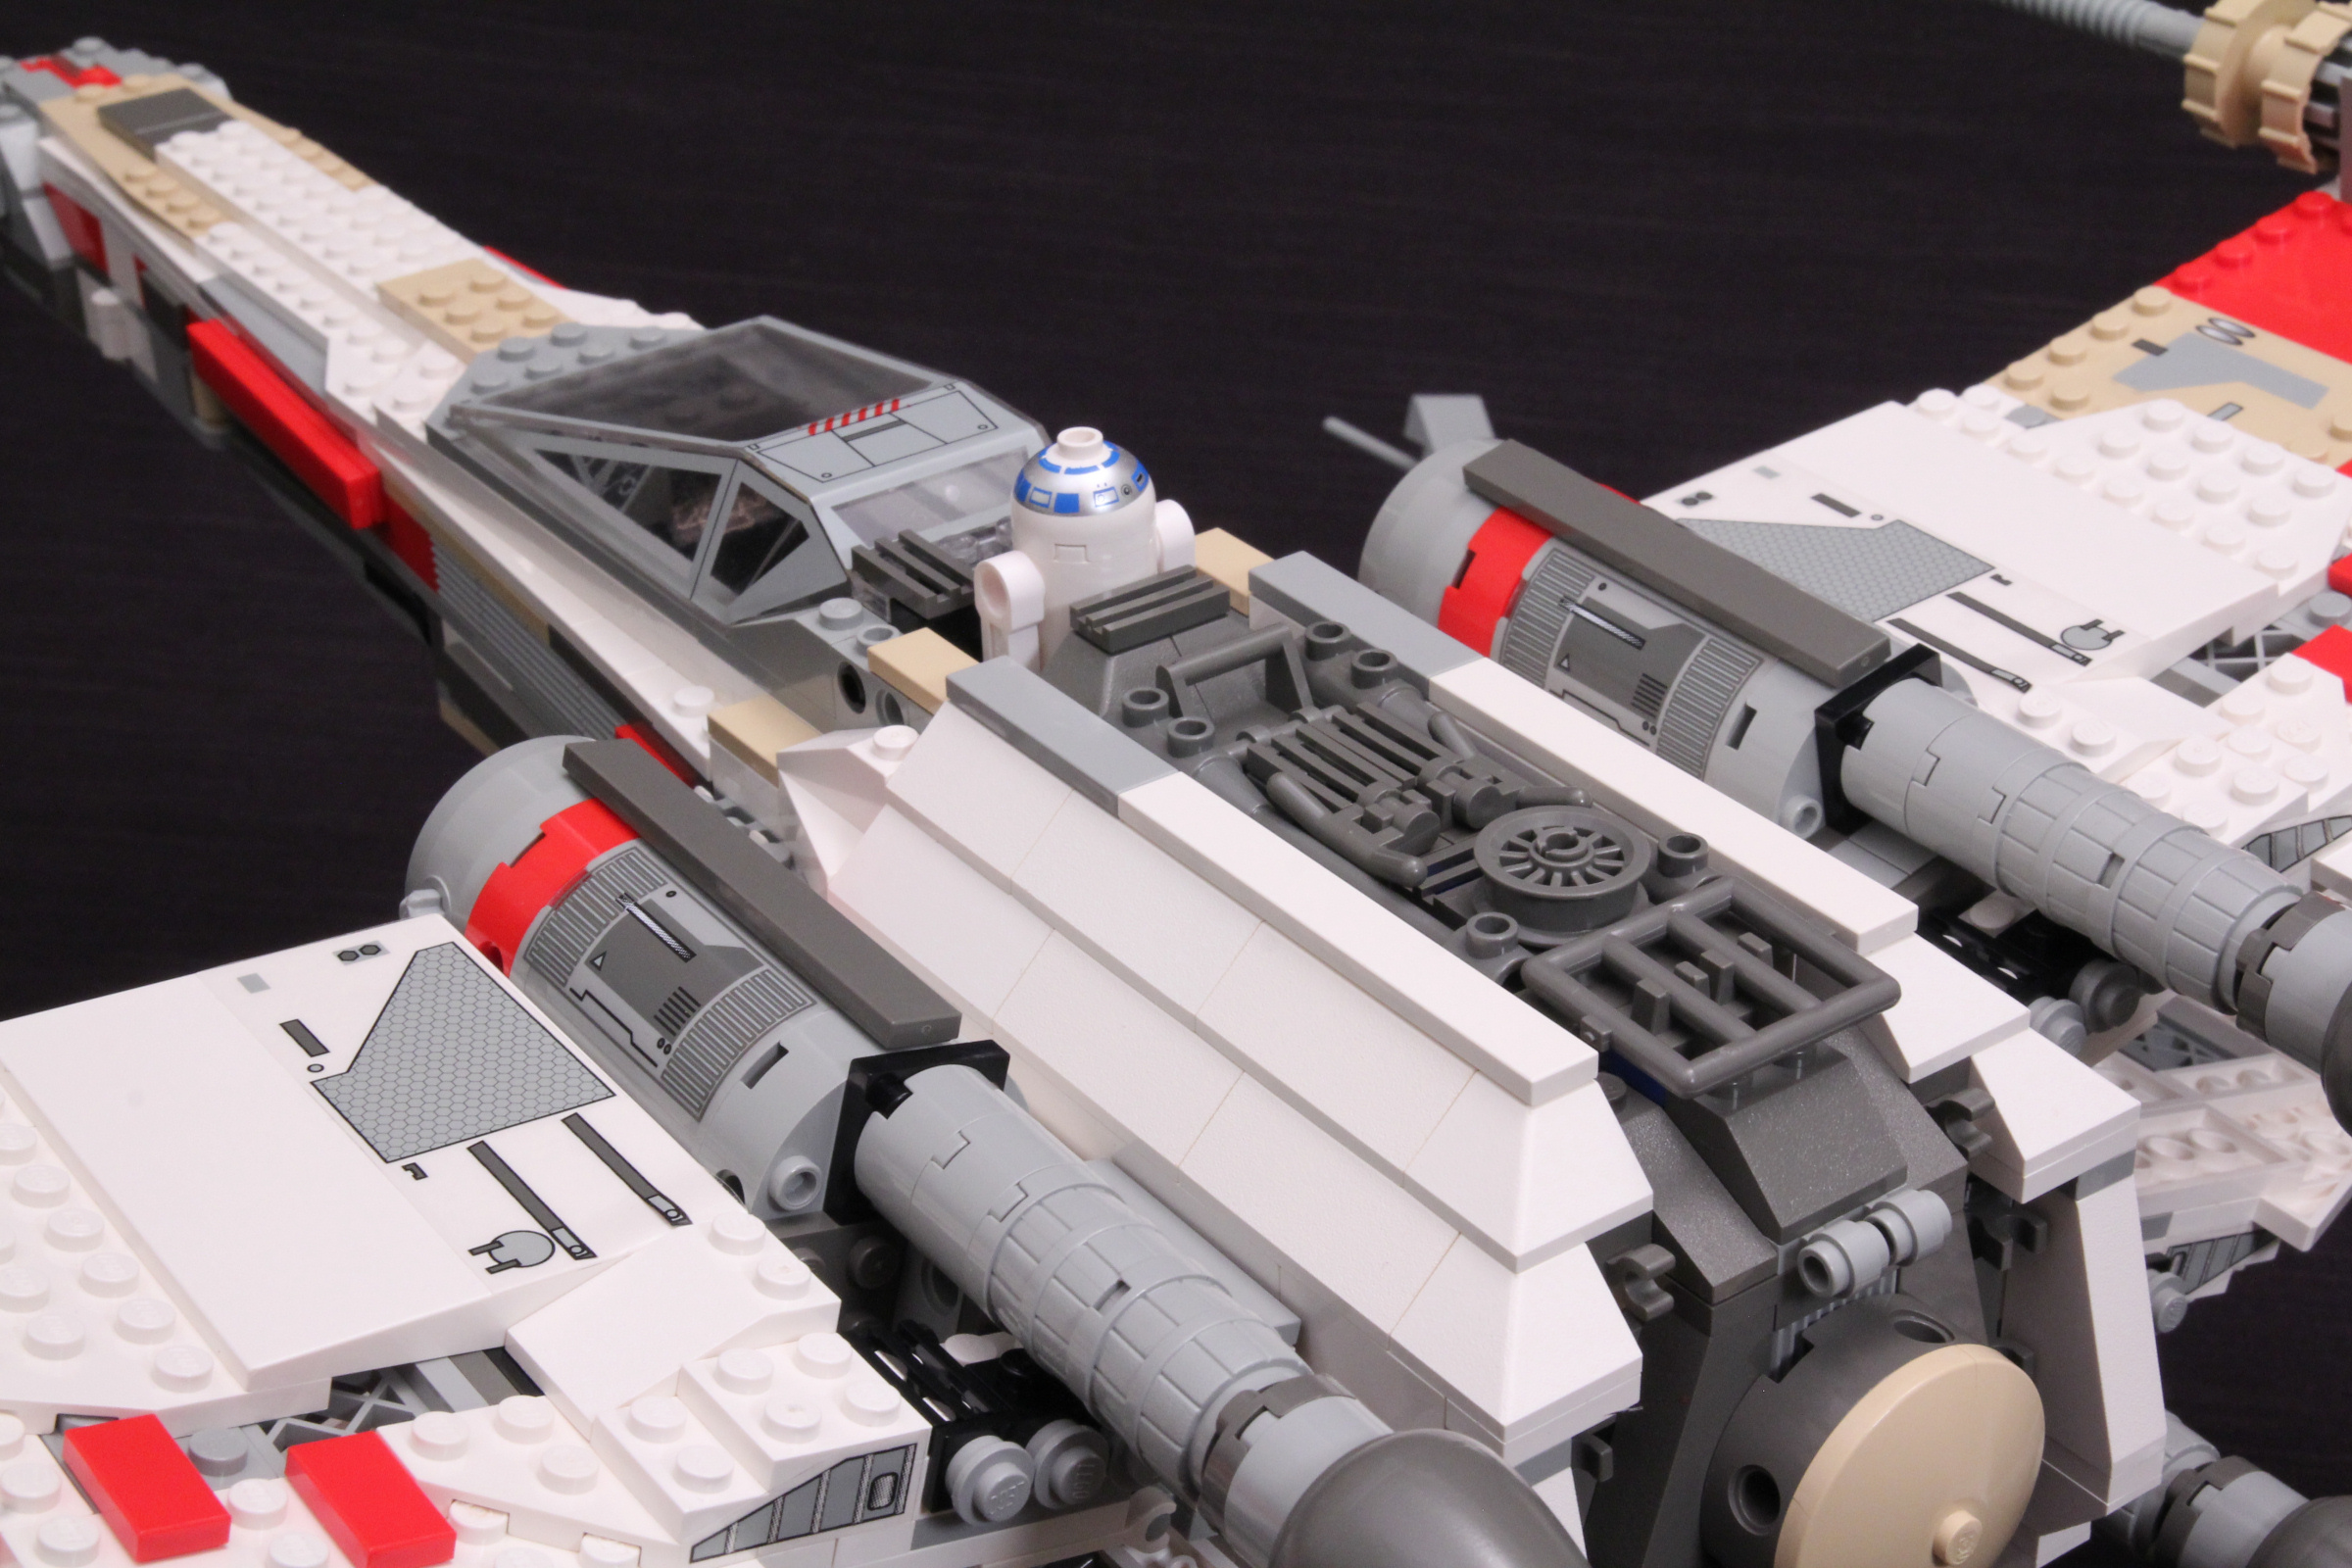
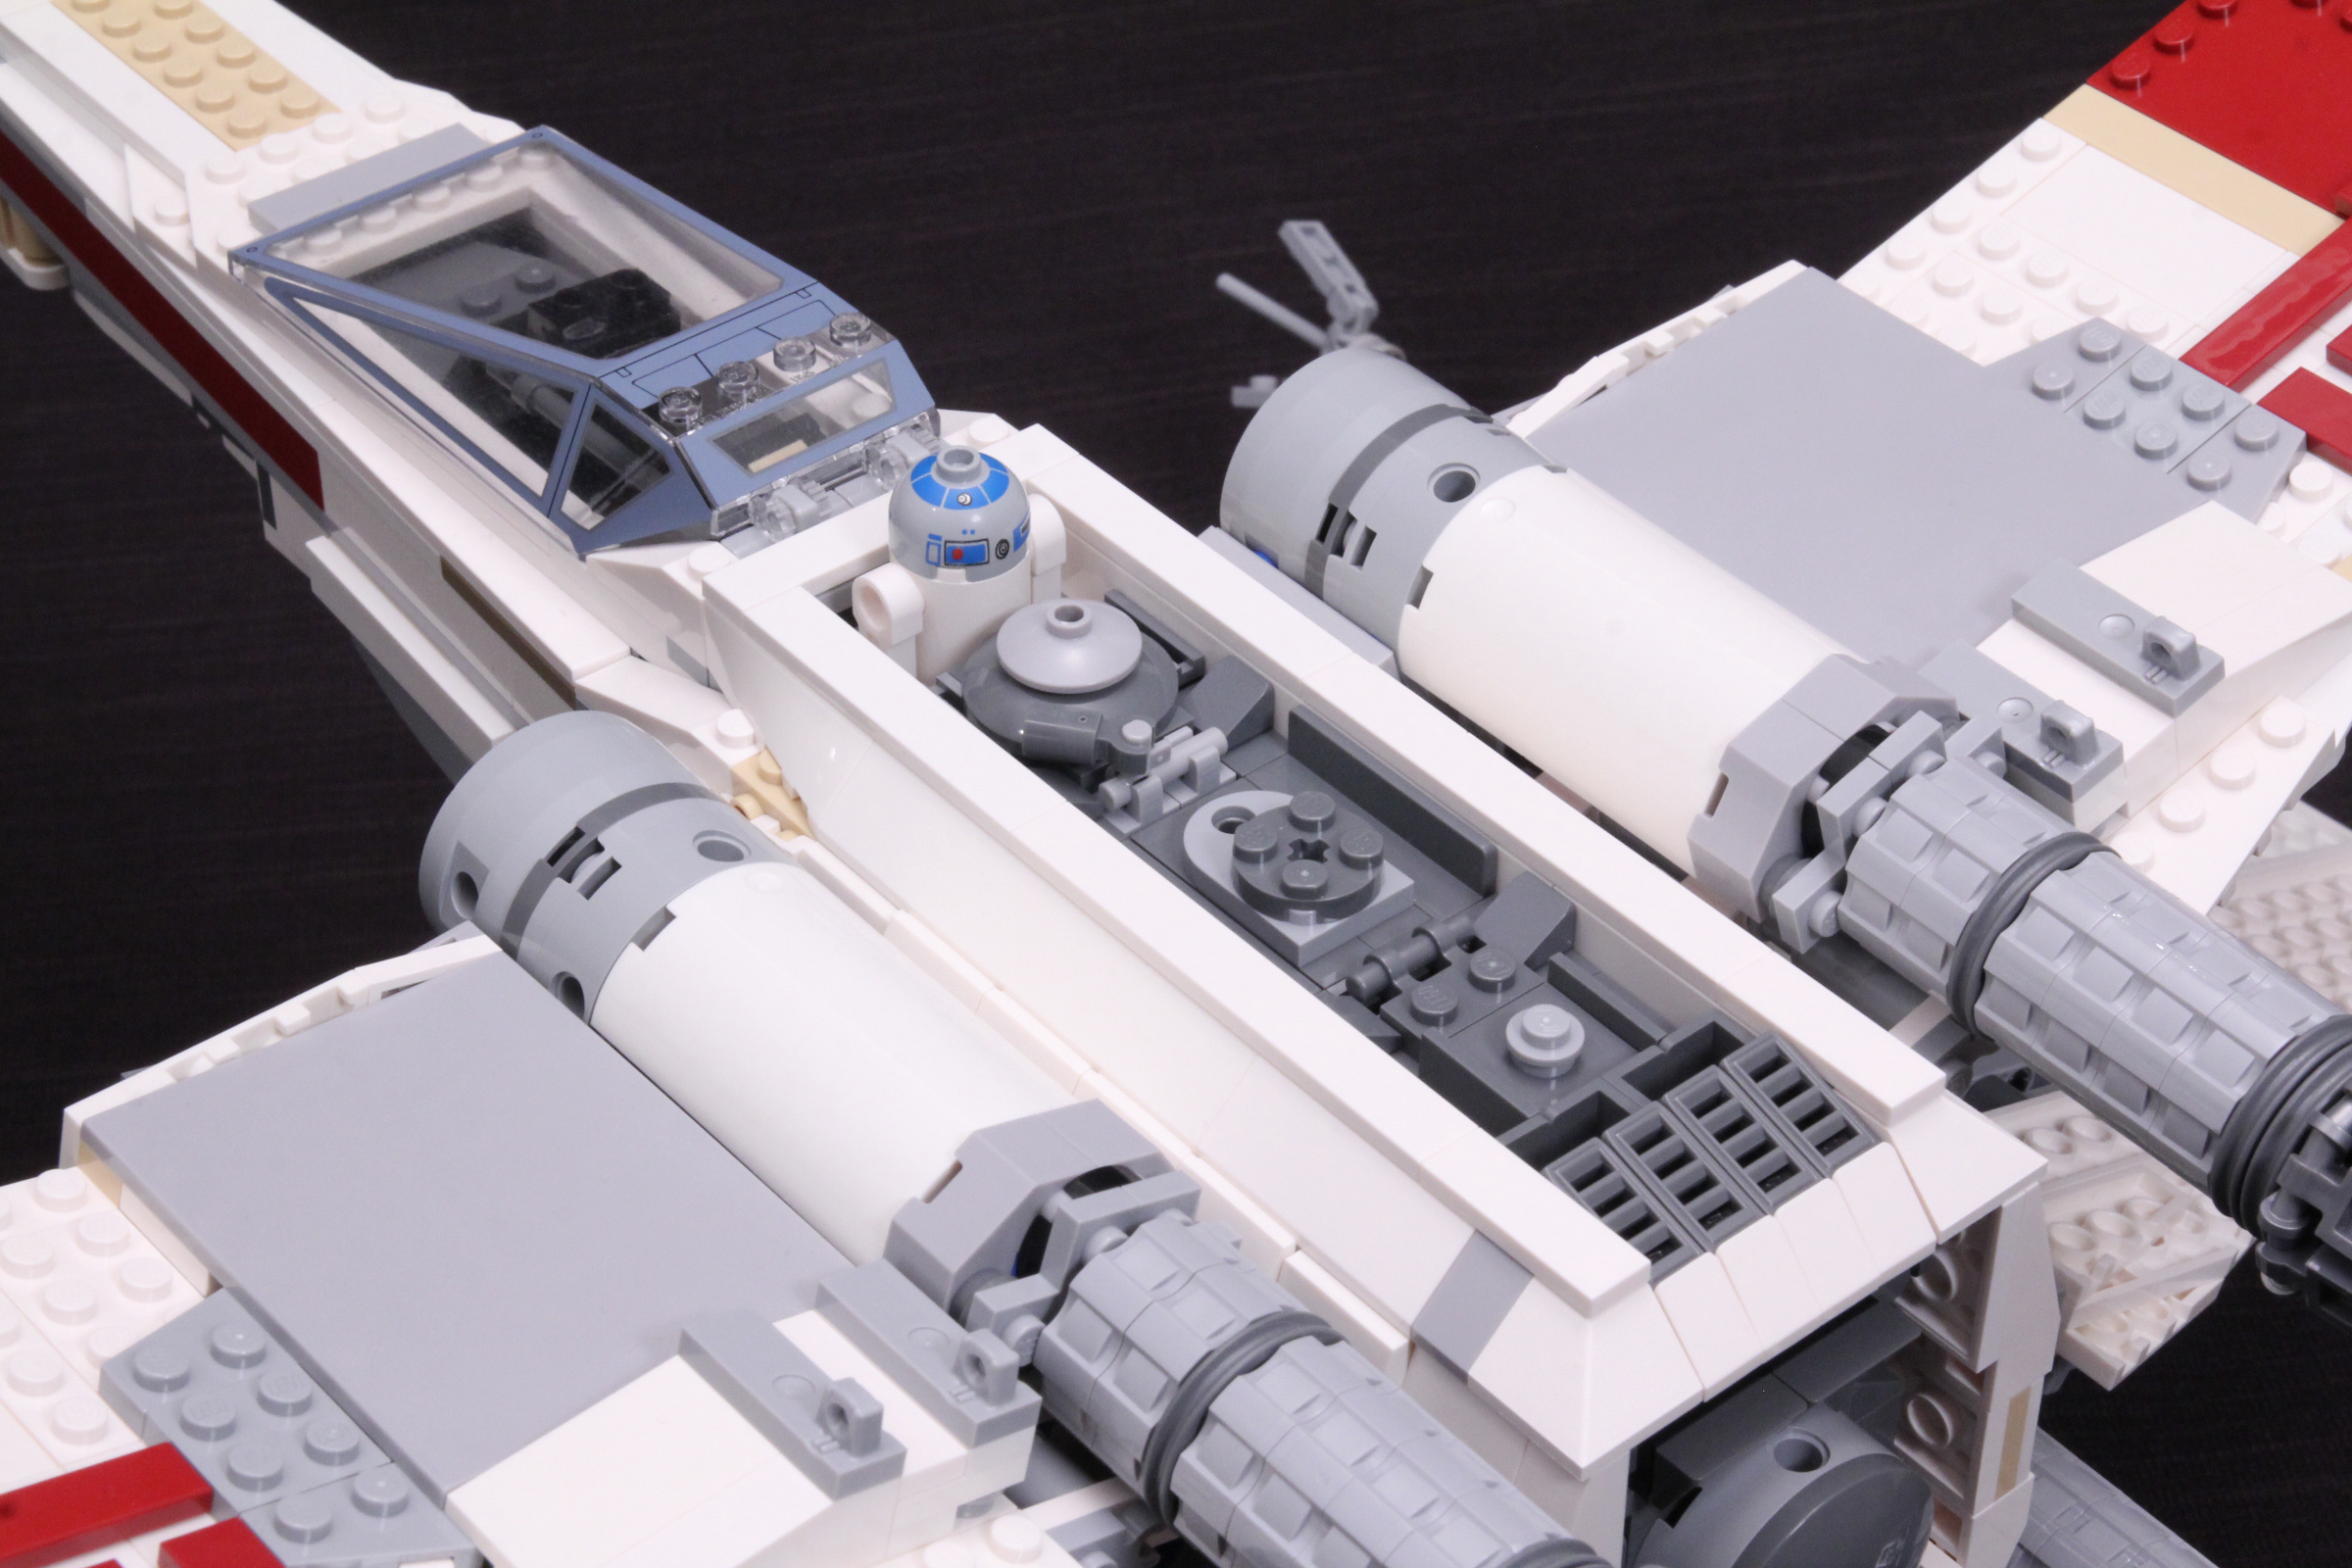
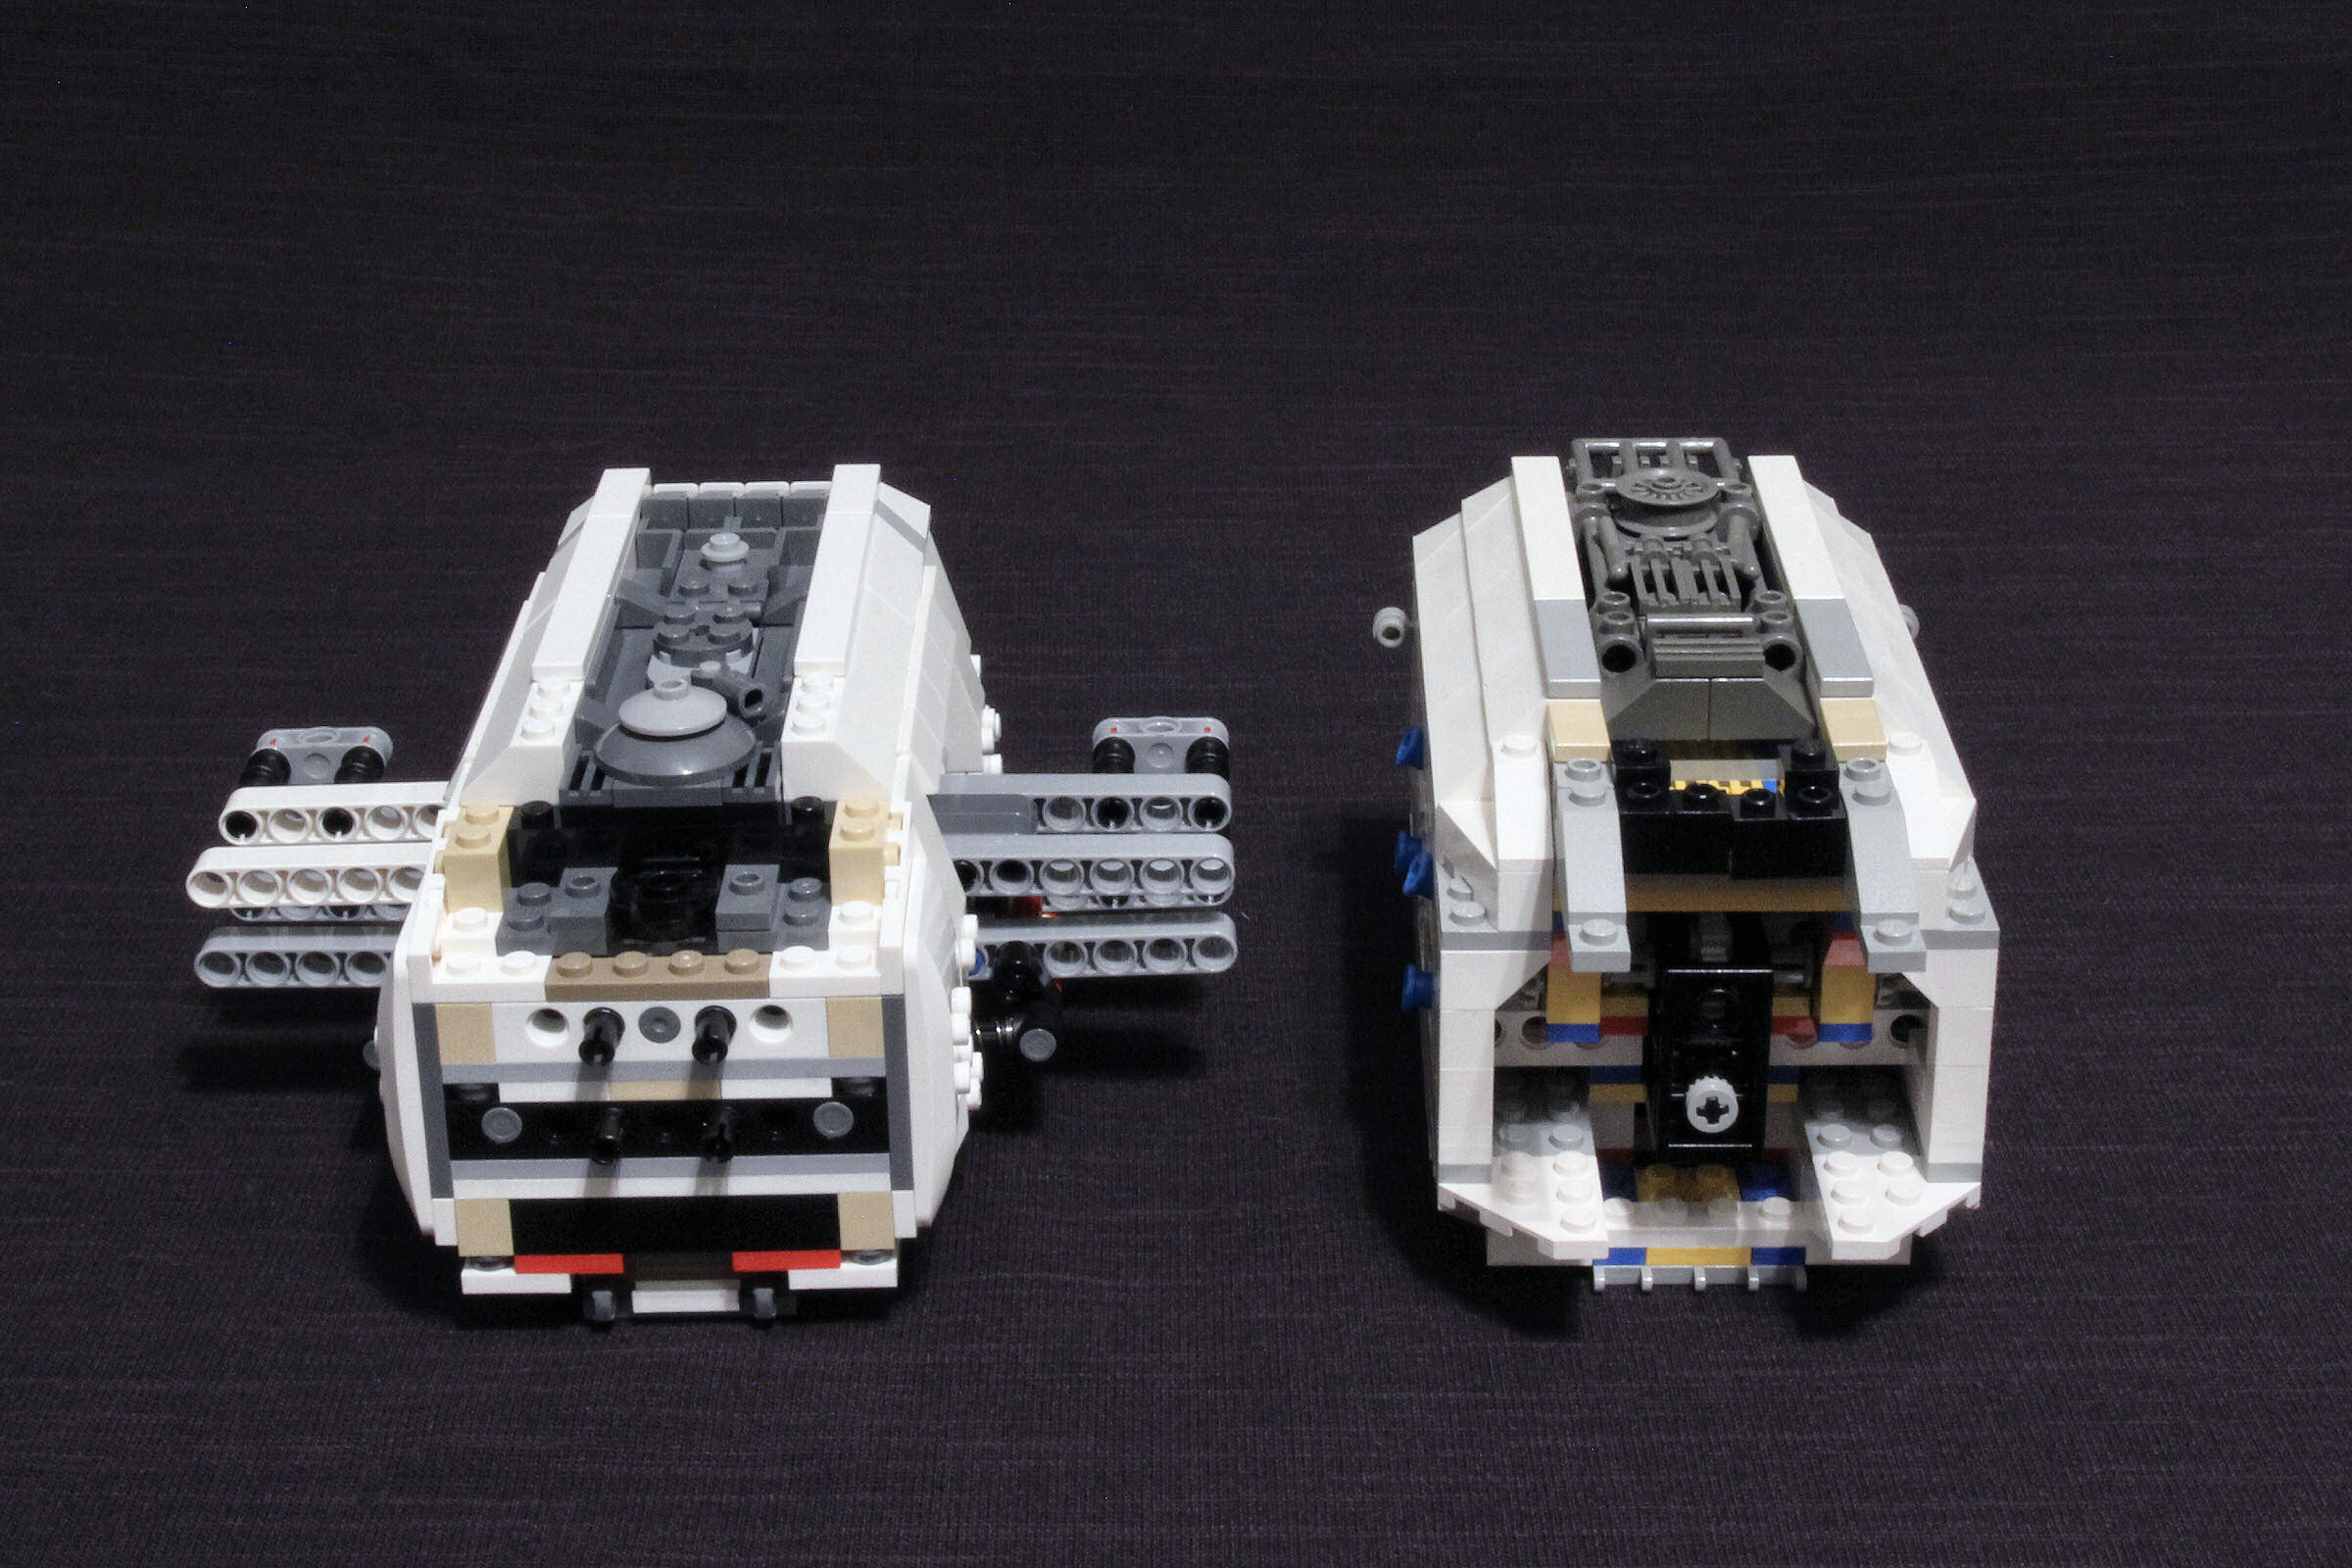
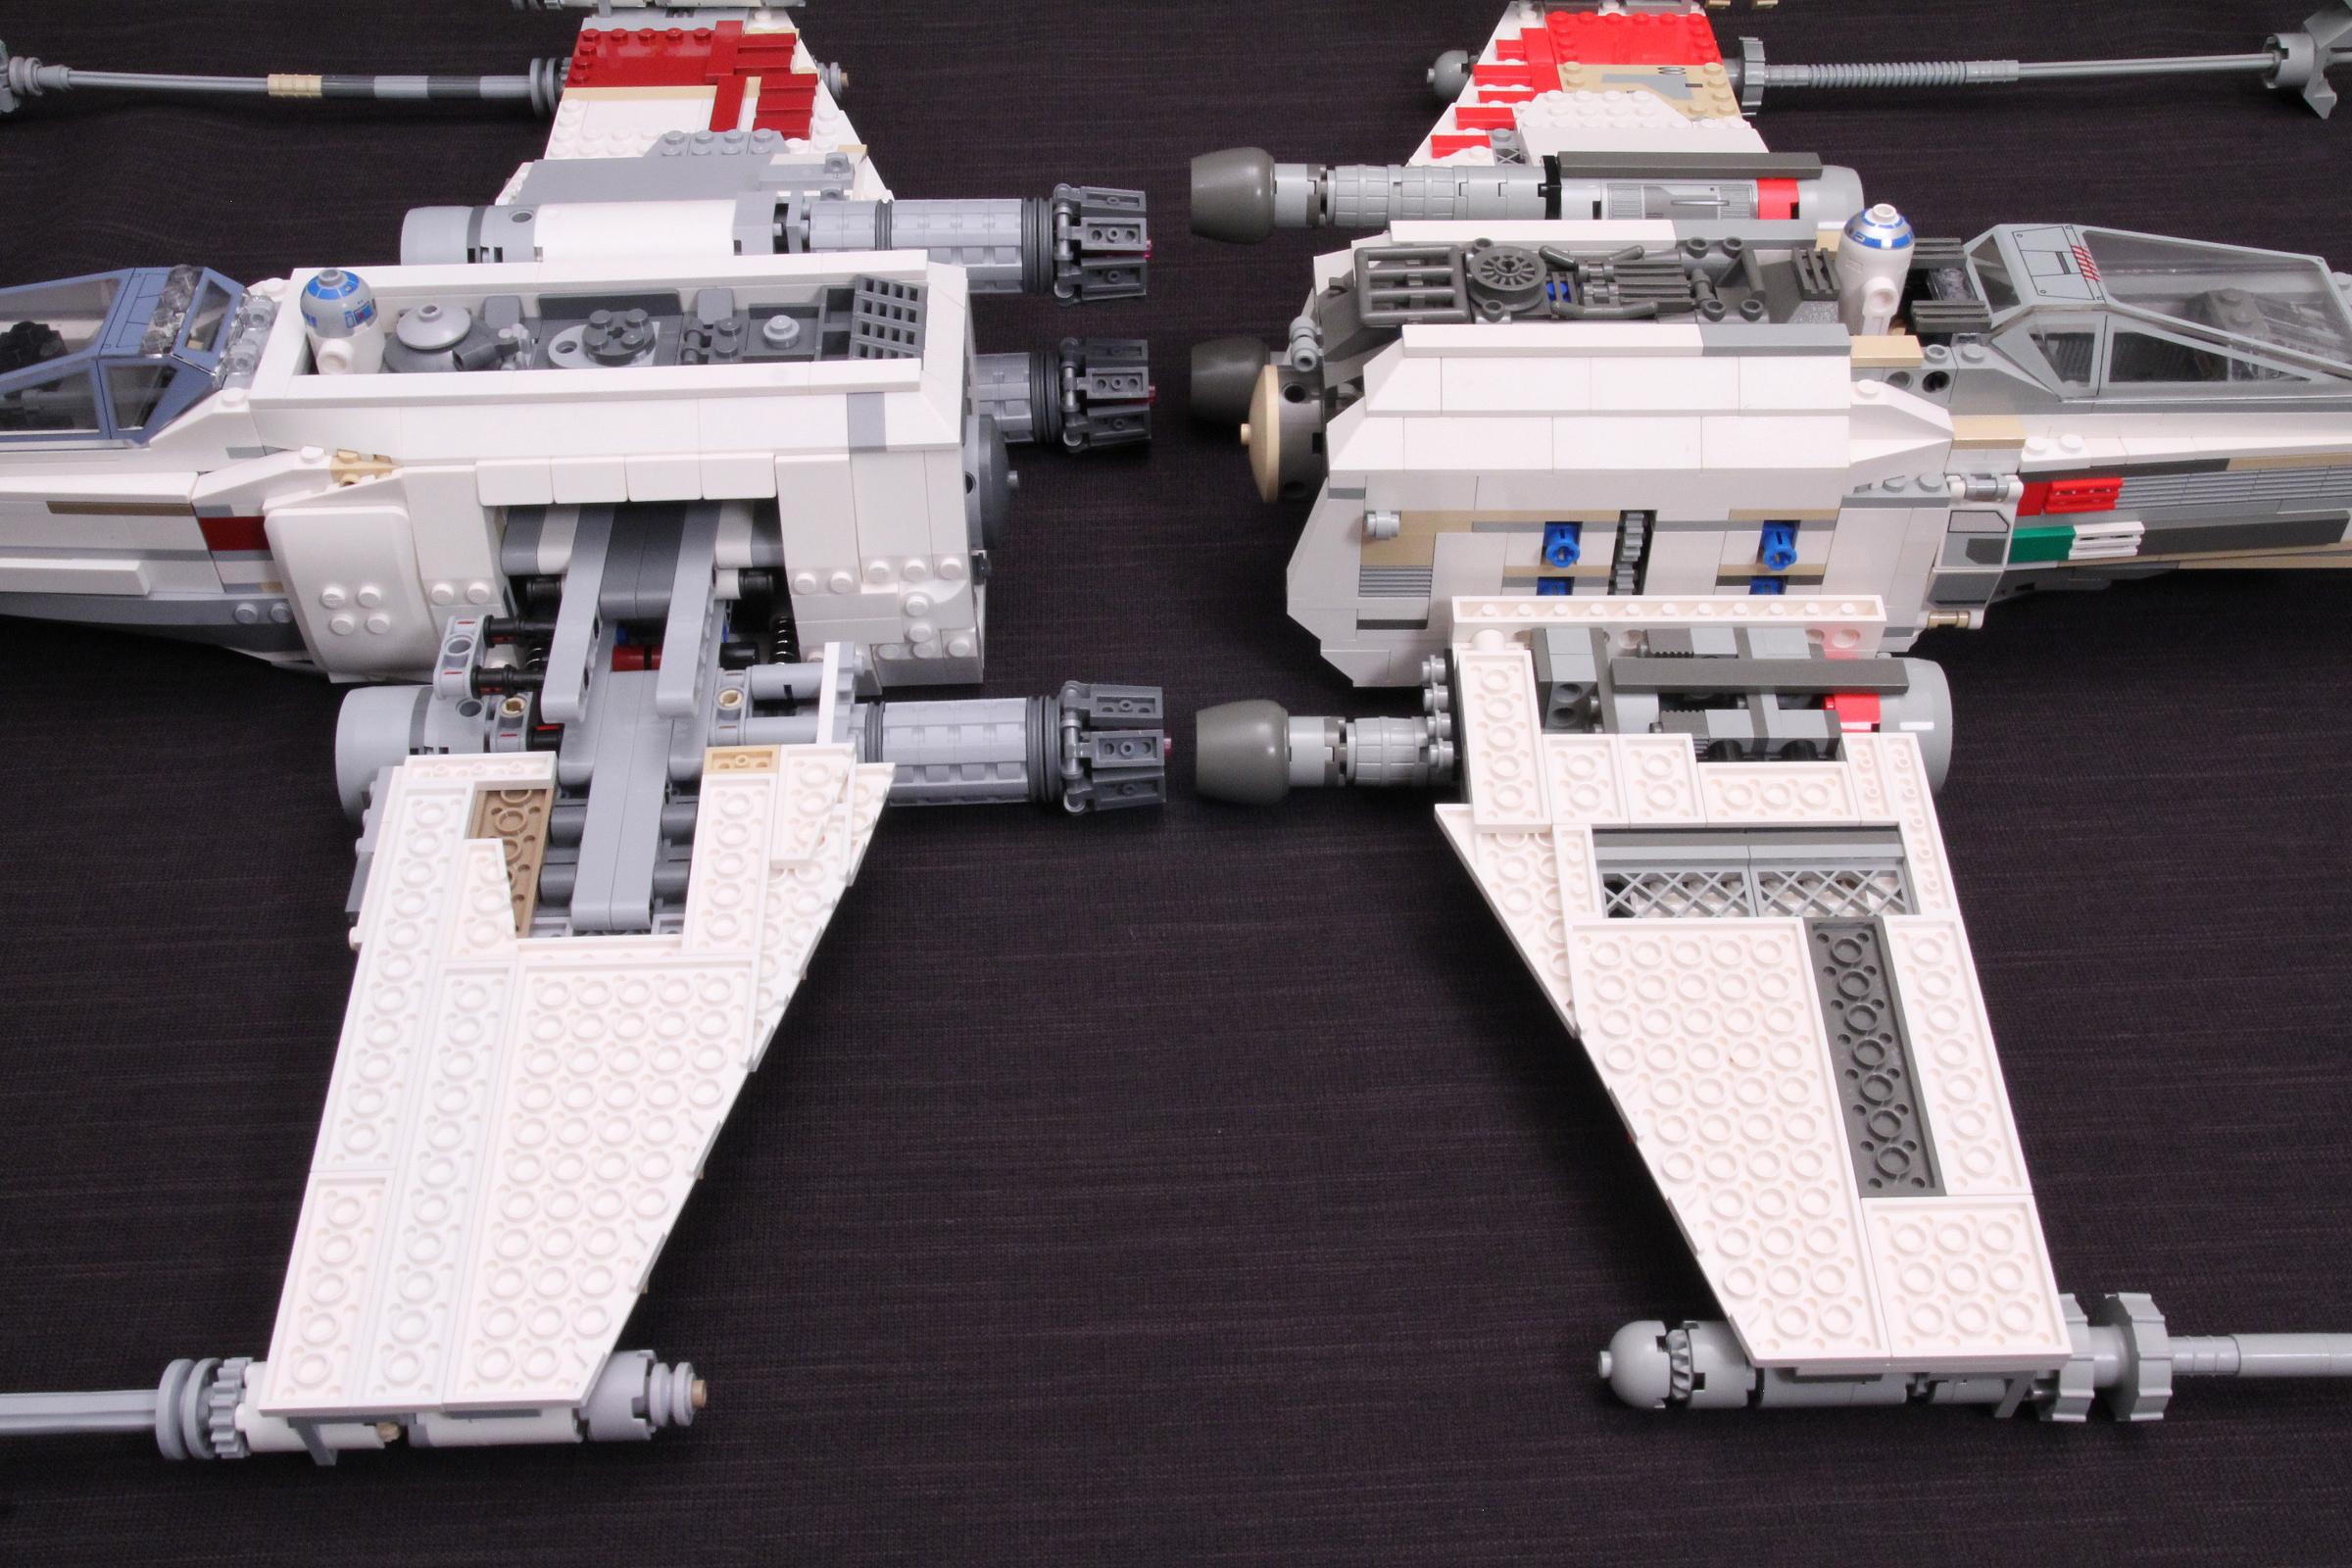
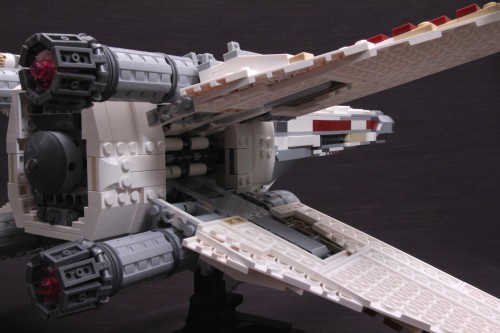
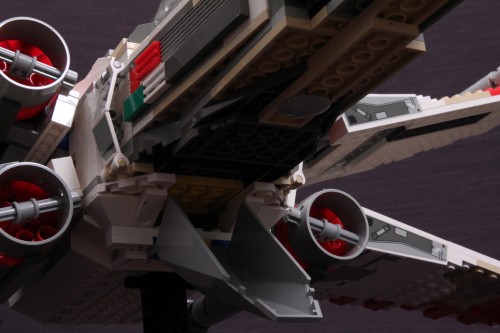
I mentioned the greeblies on top earlier but here you can see them a bit better. The old style is really busy but looks pretty good, although it sticks up above the rim in several places. R2 sits quite high in the droid socket too. The new model is a bit more sparse, but everything is tucked into the frame very nicely and R2 is less exposed. I would have liked a little bit more in there. Maybe even a mere rod or two across the sides where the old shooter parts used to be. The engine connections seem more natural at least, the original seemed to be tacked on and forgotten about but the new blends very well at the size change. Bother are properly offset, something that I wasn’t so sure about when I first saw the redesign.
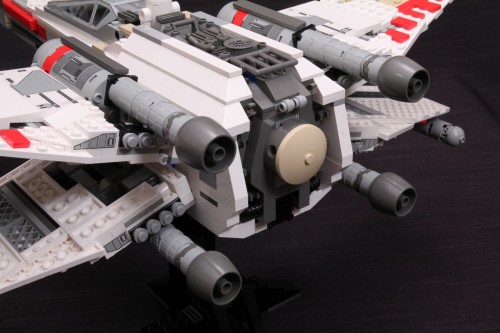
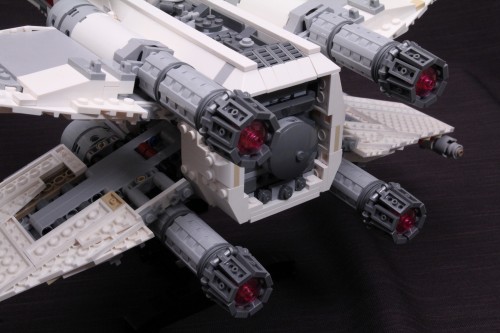
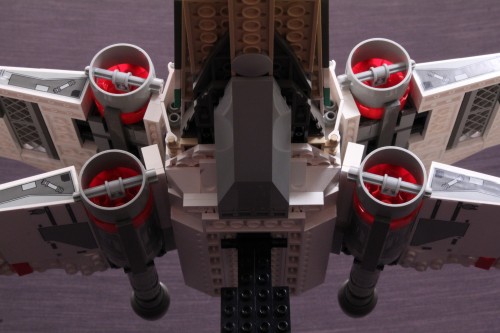
Taking a look at the rear you can see again just how much larger the new exhaust nozzles are compared to the old. The Scala vases were a perfect shape for the tips, but they were too small so the whole end shrunk to match them. I was worried about how stable the octagon clip setup would be but it turns out the flaps rest nicely against the transparent pink bits simulating the engine glow. The new flat back to the fuselage still doesn’t seem right and the inset details aren’t quite as nice as they used to be. At least the knob blends in better.
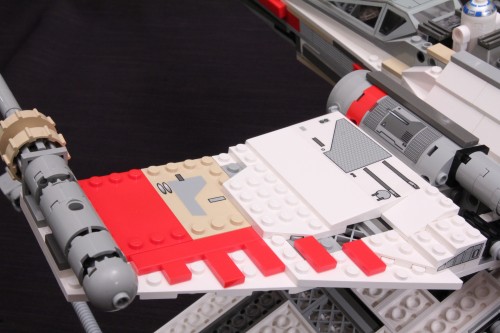
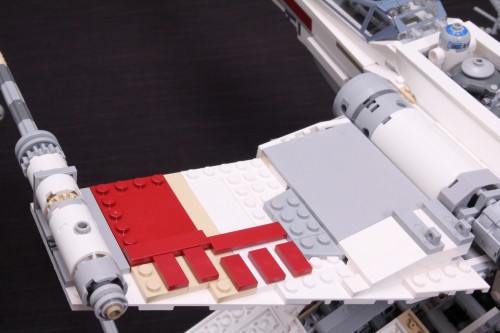
The wing markings have tightened up with half stud offsets and less tan throughout, and I consider the the change from red to dark red an improvement. I don’t like that the tiles are raised now but it’s a trade off I can deal with. From this view I’d say the large grey slope would probably look better as white, but I’m sure the sticker will help dress it up as with the original.
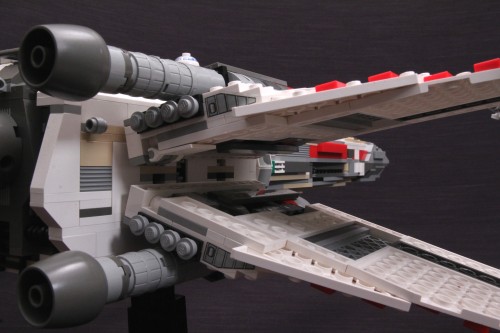
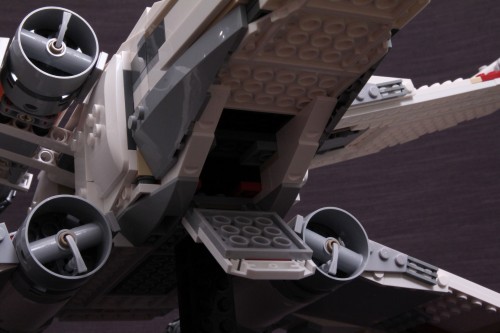
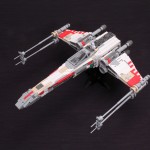
One of the drawbacks to the new wing mechanism is a much larger space between the wings when they’re spread out. You can adjust them to any angle you like at least, but it’s only at the full spread that the rotating bit inside makes a nice vertical wall and the engines rest snug to the body.

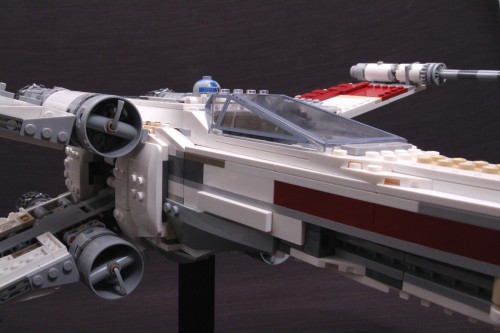
One more issue I noticed with the old model is the canopy would not close completely. I rebuilt the section several times to see if I just wasn’t pressing things together tightly enough, but noting seemed to solve it. I’m betting that was part of the reason they decided to add the click hinges to the new version. Meanwhile, the engine intakes are as undersized as ever. The T shape in them is perfect and the lack of red round part was was a very wise choice, and if you don’t go looking for screenshots to compare you can probably convince yourself these actually look good. To me, they’re just good enough. Sadly I don’t think there are any five-stud cylinder elements that could solve the problem quickly. I’m sure someone out there will come up with a solution because this is one of the reoccurring complaints I’ve noticed for both sets.

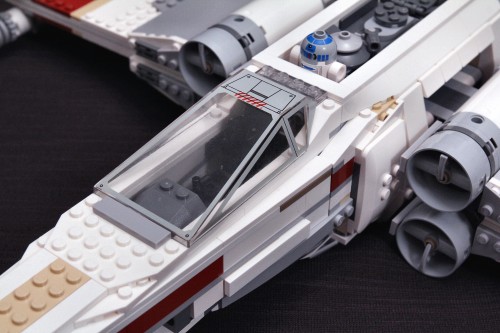
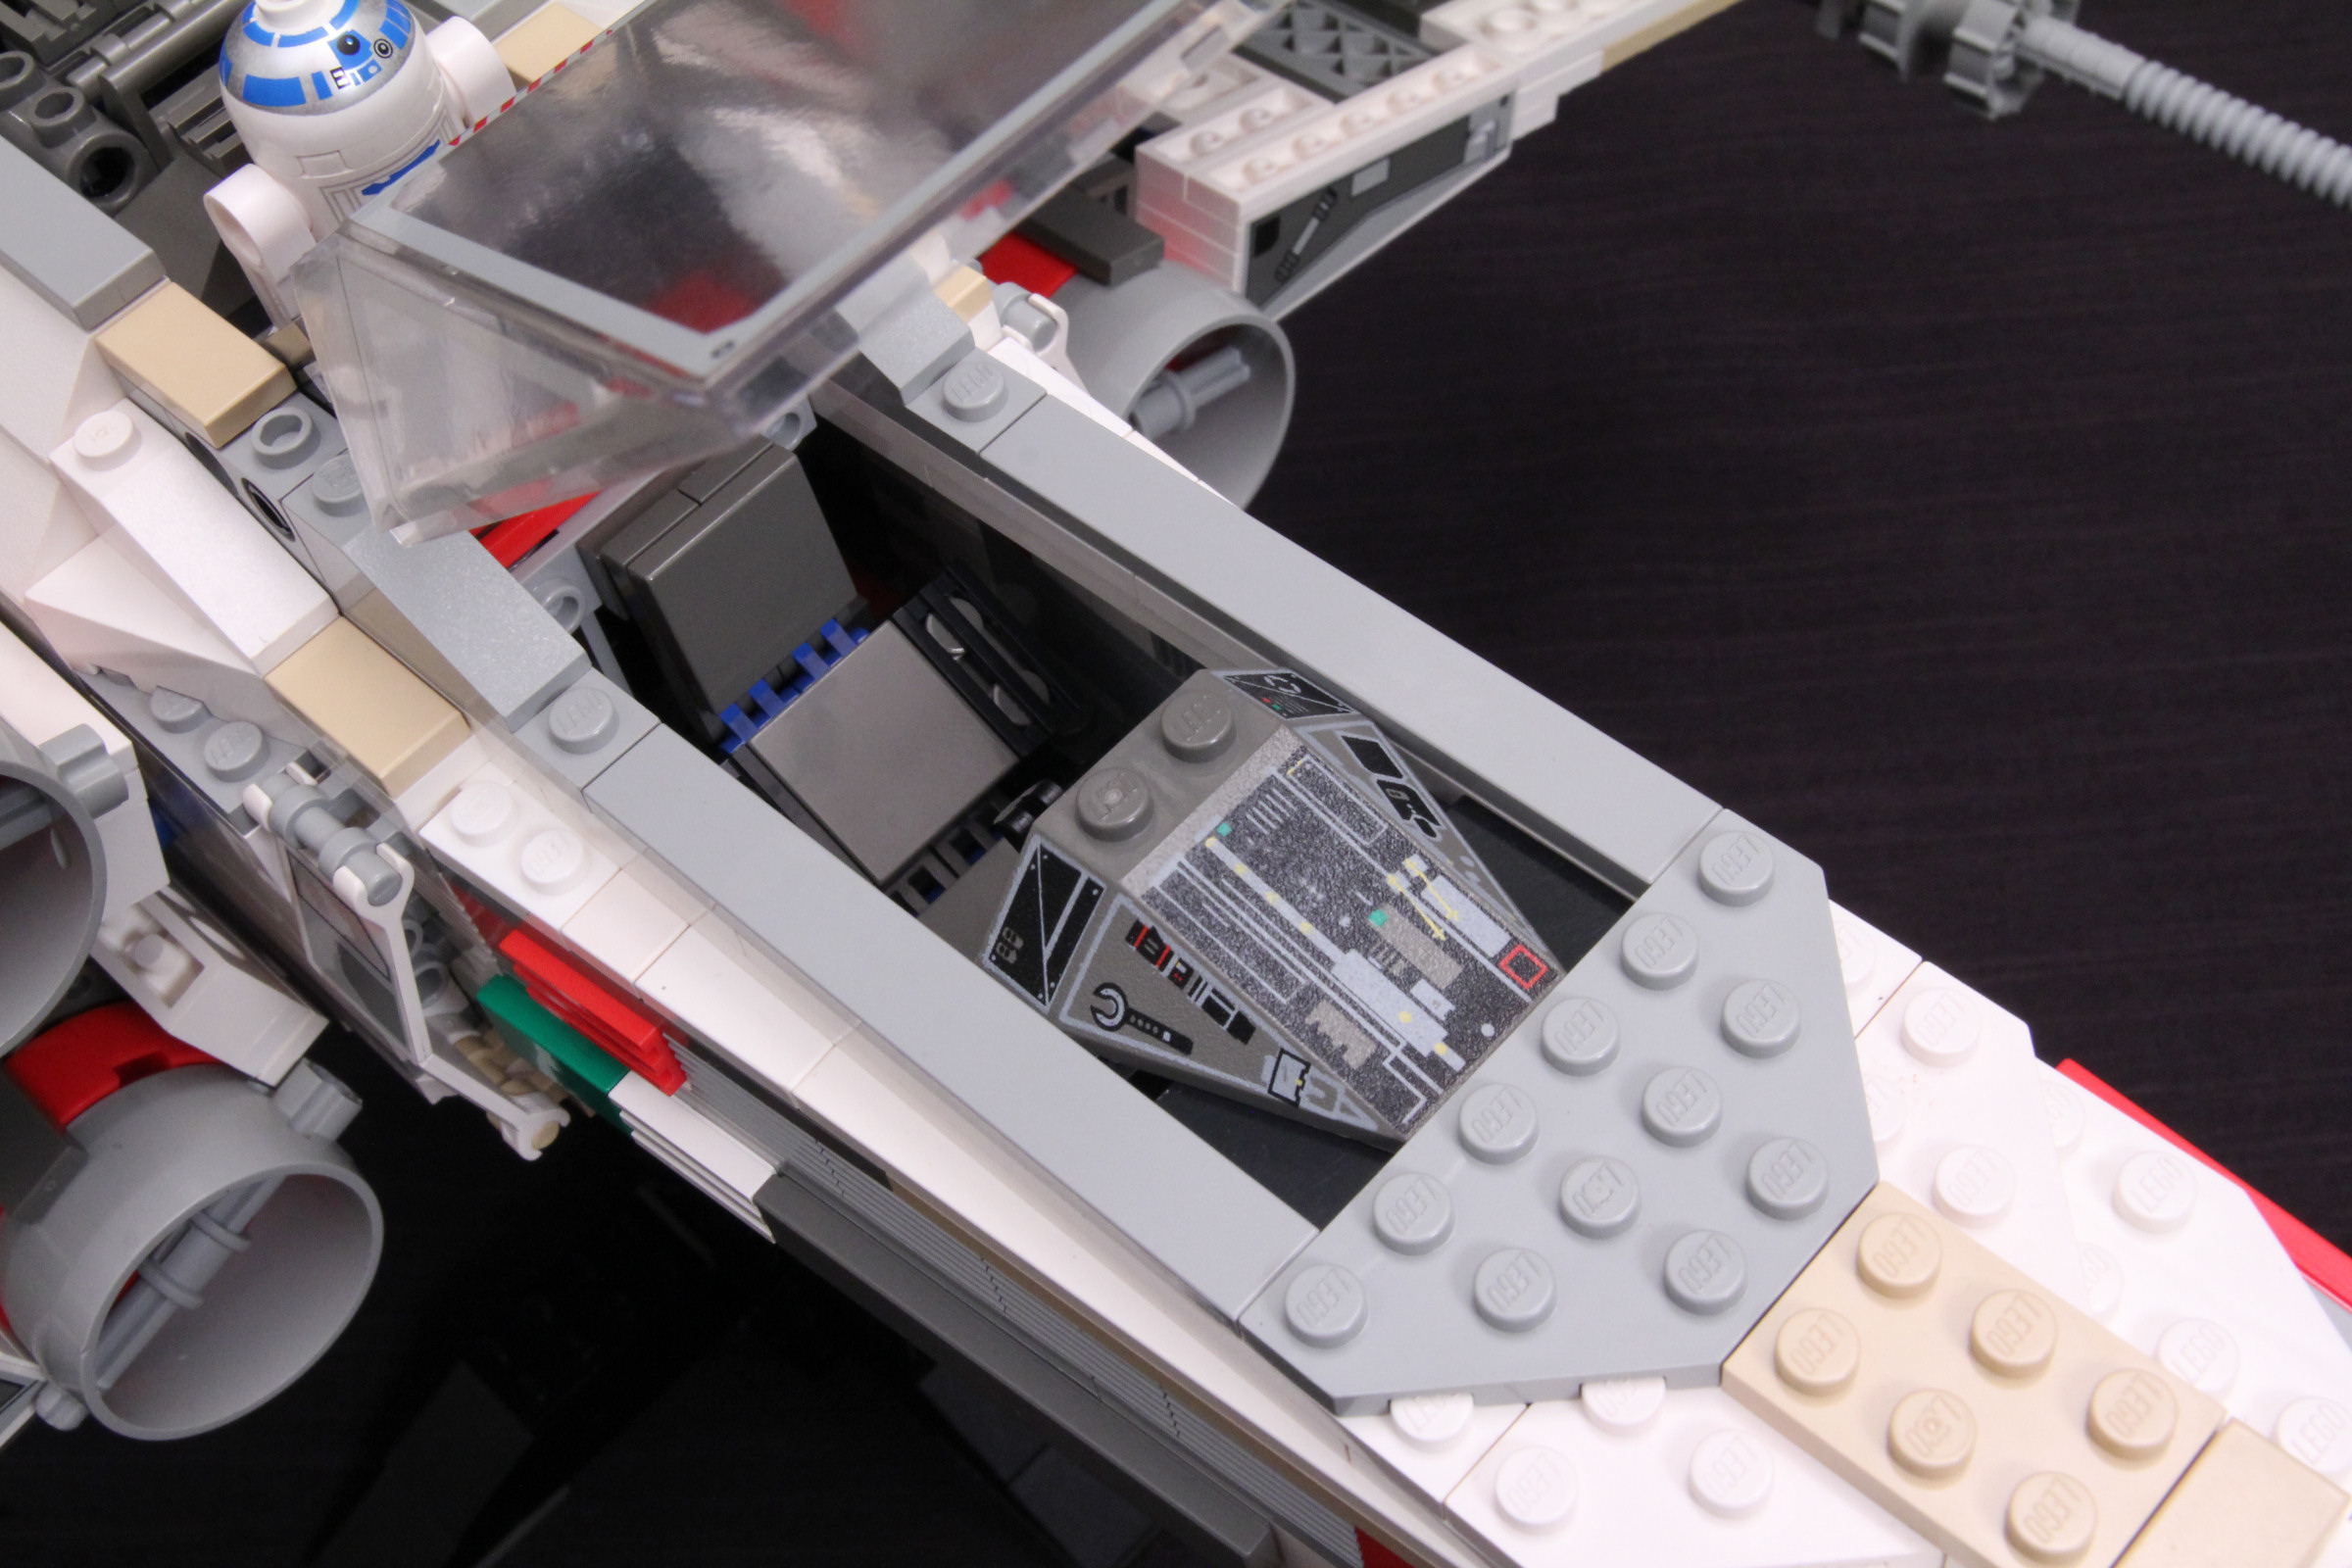
Looking into the cockpits you’ll be disappointed to find the trench run printed slope has been replaced with a generic console design. I’m not sure but I think that might have been switched to a sticker, to be added to the huge targeting computer that I had to remove to take the pic above.
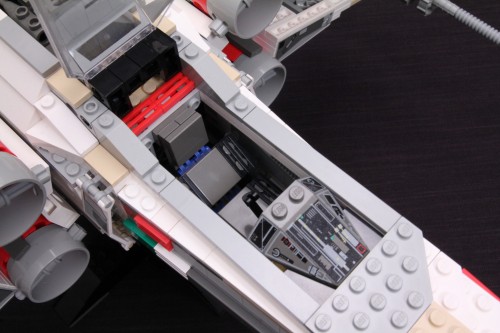
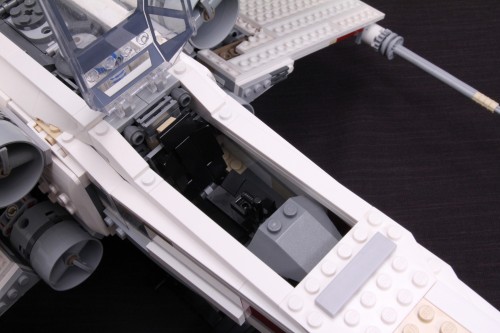
The old seat was a bit roomier, and had a simpler joystick too. Kind of hard to get in to with R2 in the way though, the canopy doesn’t open too far unless you pull him out. That’s no longer an issue with the new model. Oh, and that fancy printed slope over the controls has been changed to a sticker too, not simply omitted.

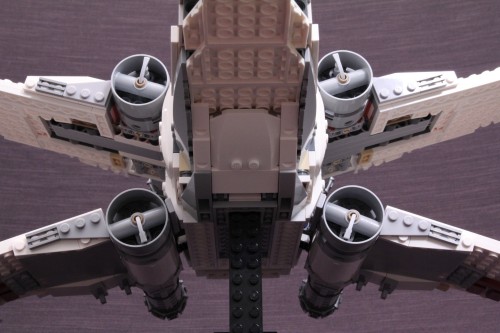
Taking a peek from below and the smoothness of the new one stands out once again. The proton torpedo tubes have inexplicably lost their cone tips, but the design is basically the same. They’re just shorter and sunk in slightly farther now.
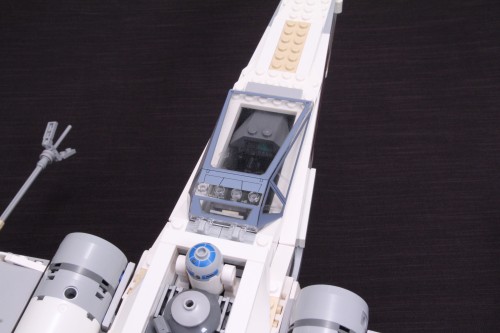
The storage unit is on almost every X-wing model Lego has made but I can’t seem to remember it being used in the films ever. The old one was a poorly integrated inverted canopy. Looks OK from the side but head on it’s much to narrow. The new hinged part blends much better.
You don’t have quite as much storage space now, but honestly, what would you be putting in there on this model? There are no loose accessories to worry about. Strikes me as an odd feature but at least it was improved.
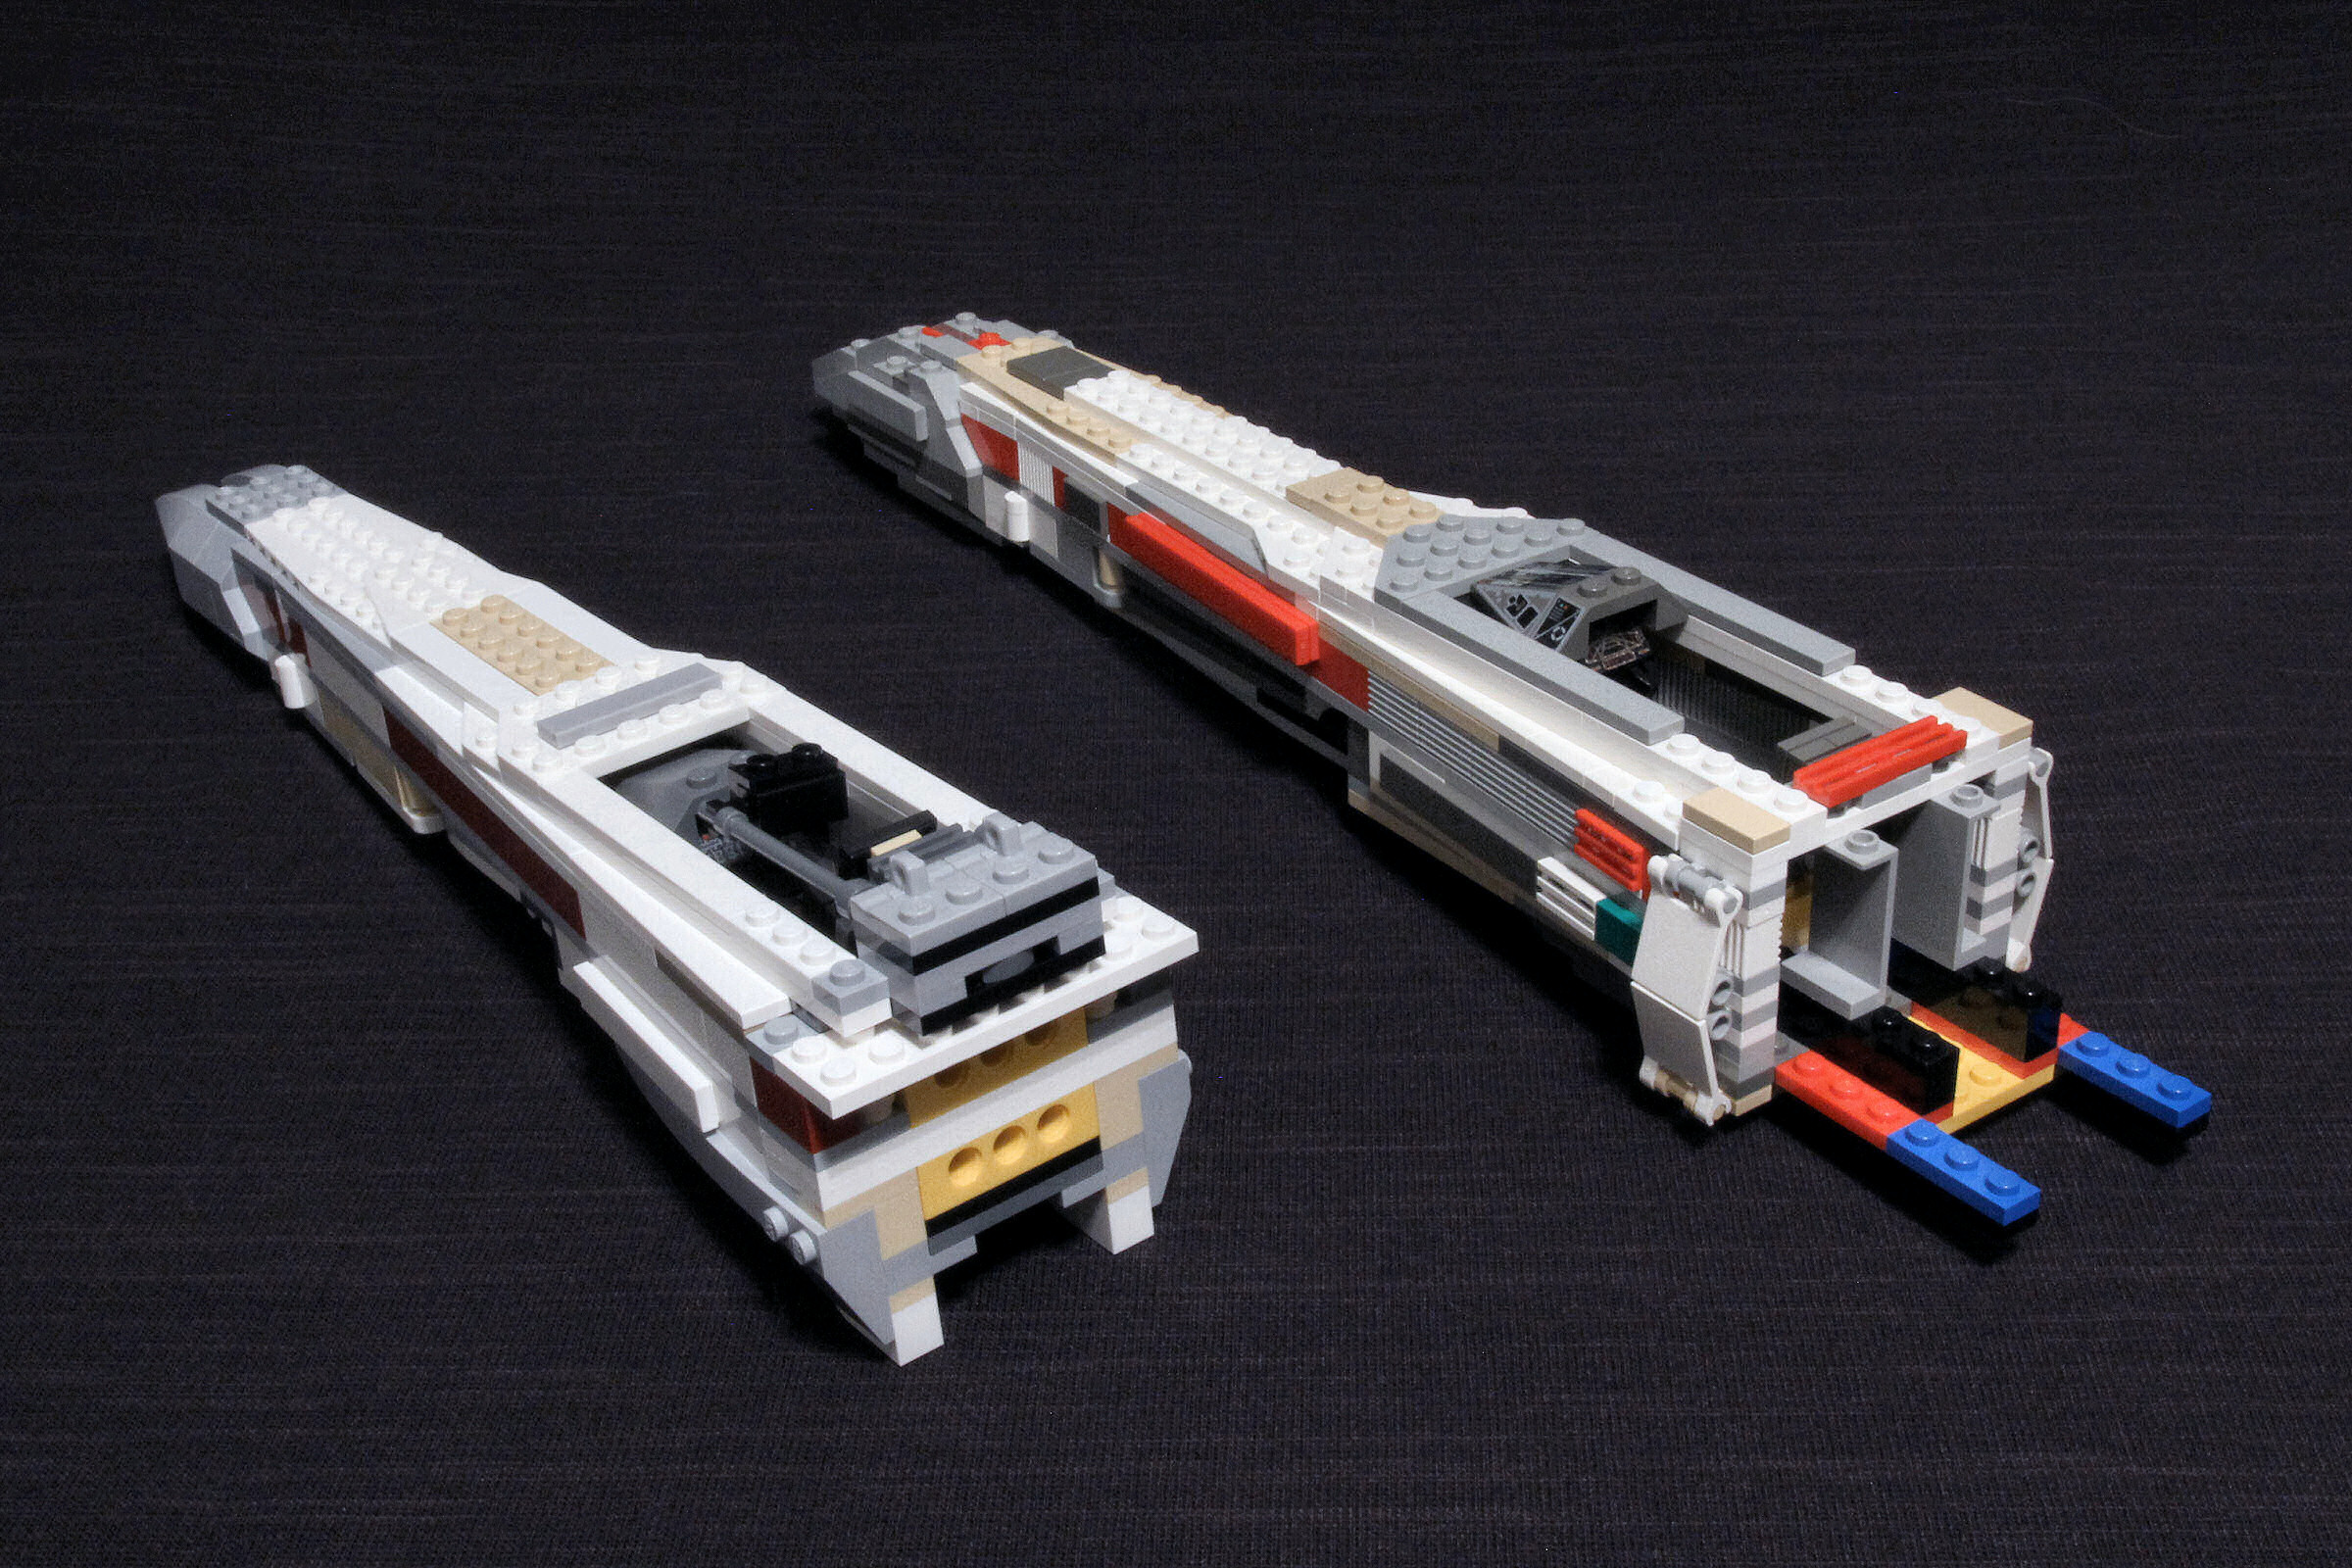
I originally wanted to try swapping the wings from one to the other but the construction didn’t really make that as straight forward as I’d expected. But that’s a good thing, because the old wing system completely sucked. I pulled the wings off the side so I could compare the overall sizes.
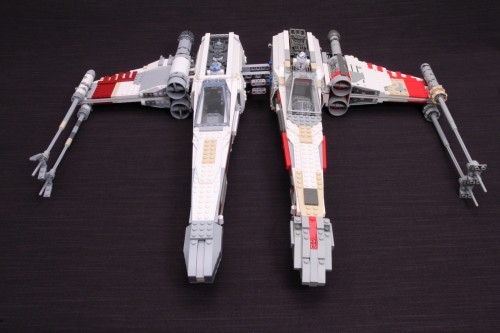
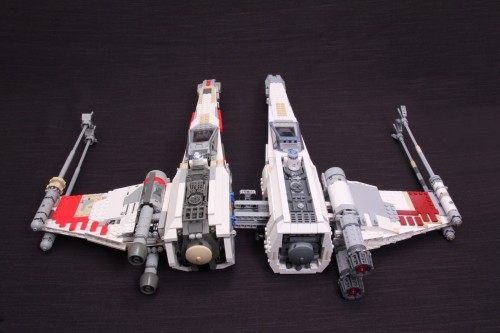
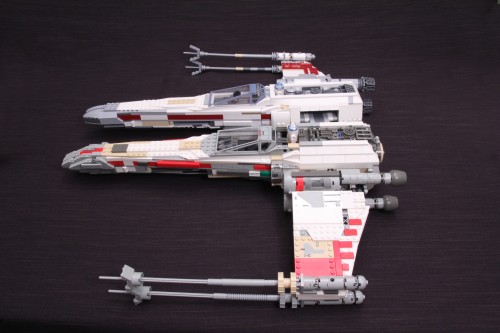
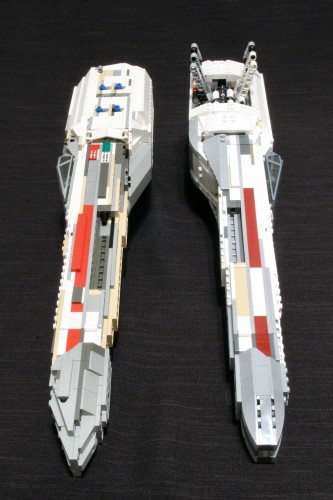
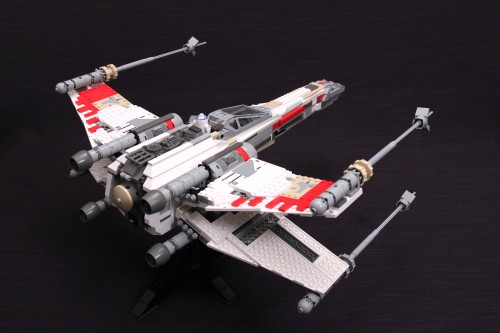
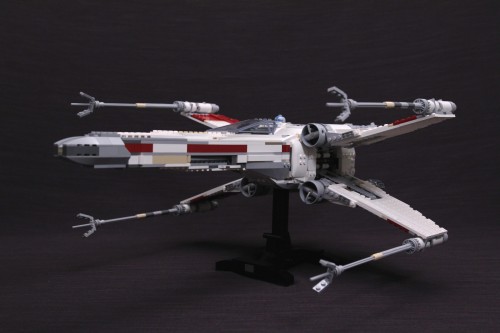
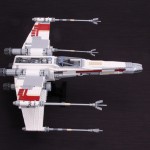
Reminds me of your Ugly Fighter contest from years ago. You can easily see how close these are to each other. It’s basically the same size. The only real changes are proportions in a few places. The new canopy is longer as noted earlier, but it sits farther forward now too. The new nose is smaller and smoother. The body is sleeker everywhere. Engines are pulled in closer to the fuselage and all in all it looks like a much tighter build. And it is. The new ship is surprisingly solid. I can’t count how many times the old model fell apart while doing this review, just by picking it up and moving it around. I accidentally dropped the new model on the table and it only lost the bottom exhaust nozzles. Definitely swooshable now.
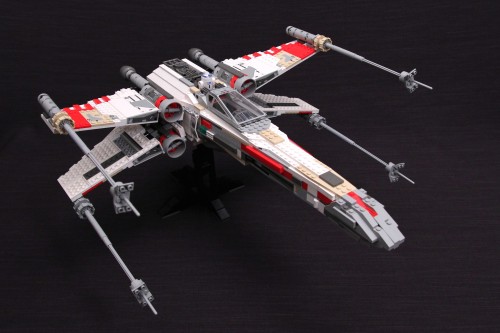
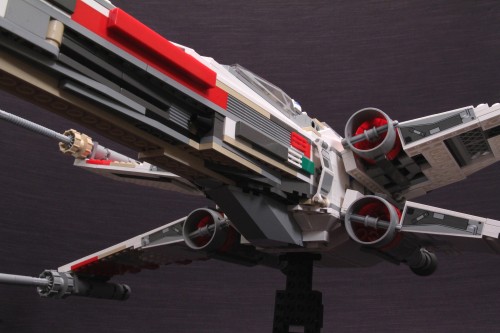
This shot made me notice how much cooler the new one looks once complete. Don’t get me wrong, the old model certainly doesn’t look bad. Just a little dated. Rough color blocking and very angular. The nose is the worst offender but just look at the wings. The new one has a kind of flow to it. The grey at the engine intakes swoops back across the wing into the red markings and forward again at the edges and out to the cannon tips. I don’t know if that was intentional or not, but I like it a lot. Now that I’ve seen it from this angle I don’t miss the details left out from the lack of stickers.
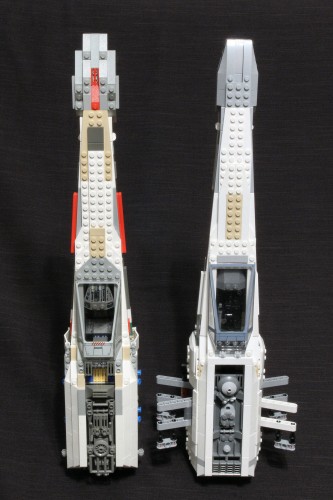
From below you get the same wing pattern, and no more tan under the cockpit. You can also see how much farther forward the stand fits in, which helps explain the poor weight distribution.
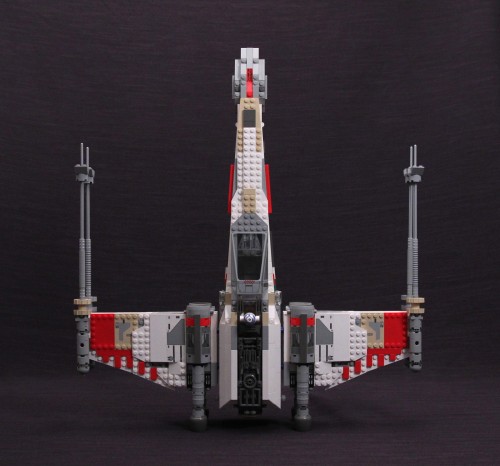
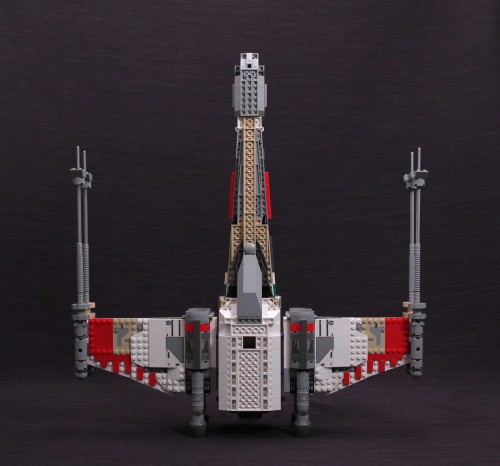
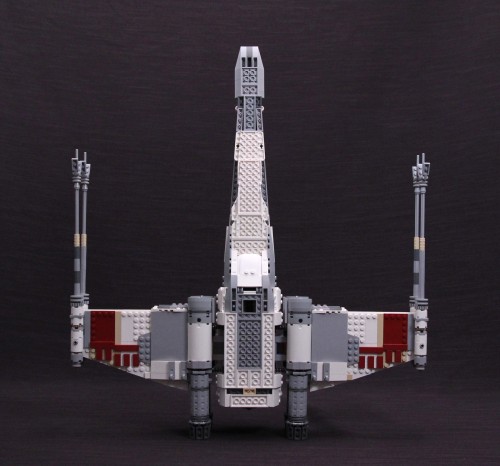
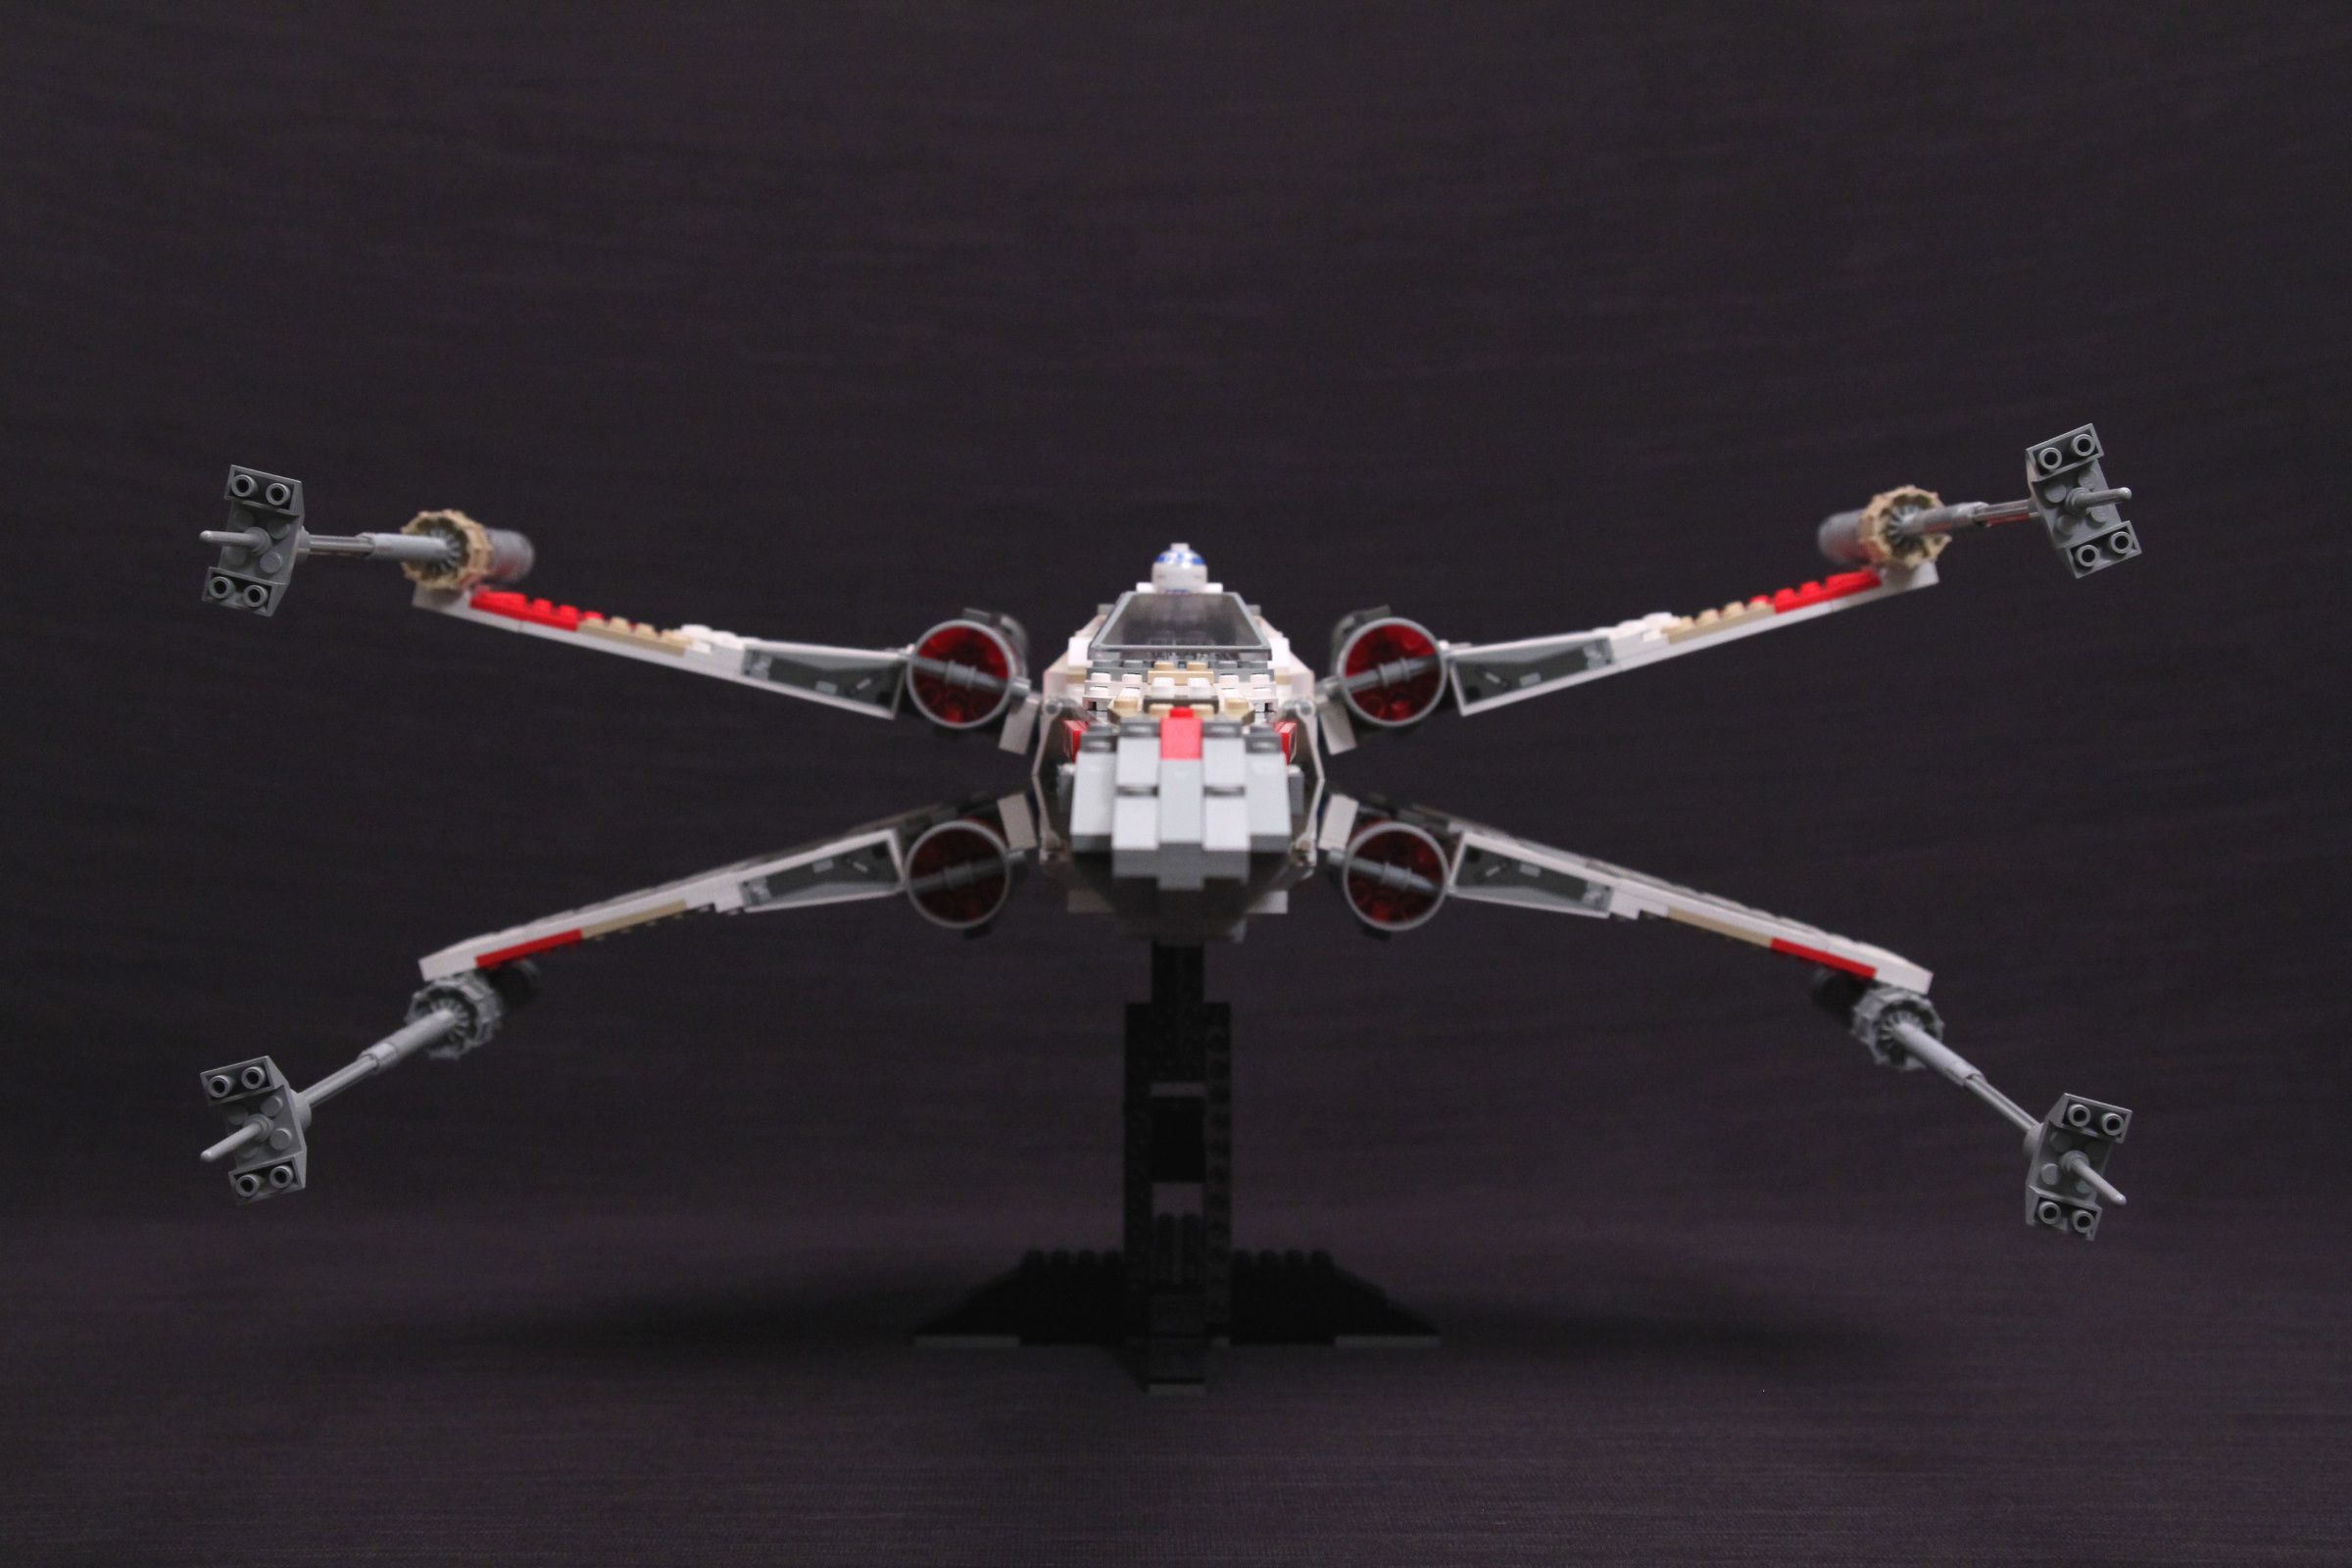
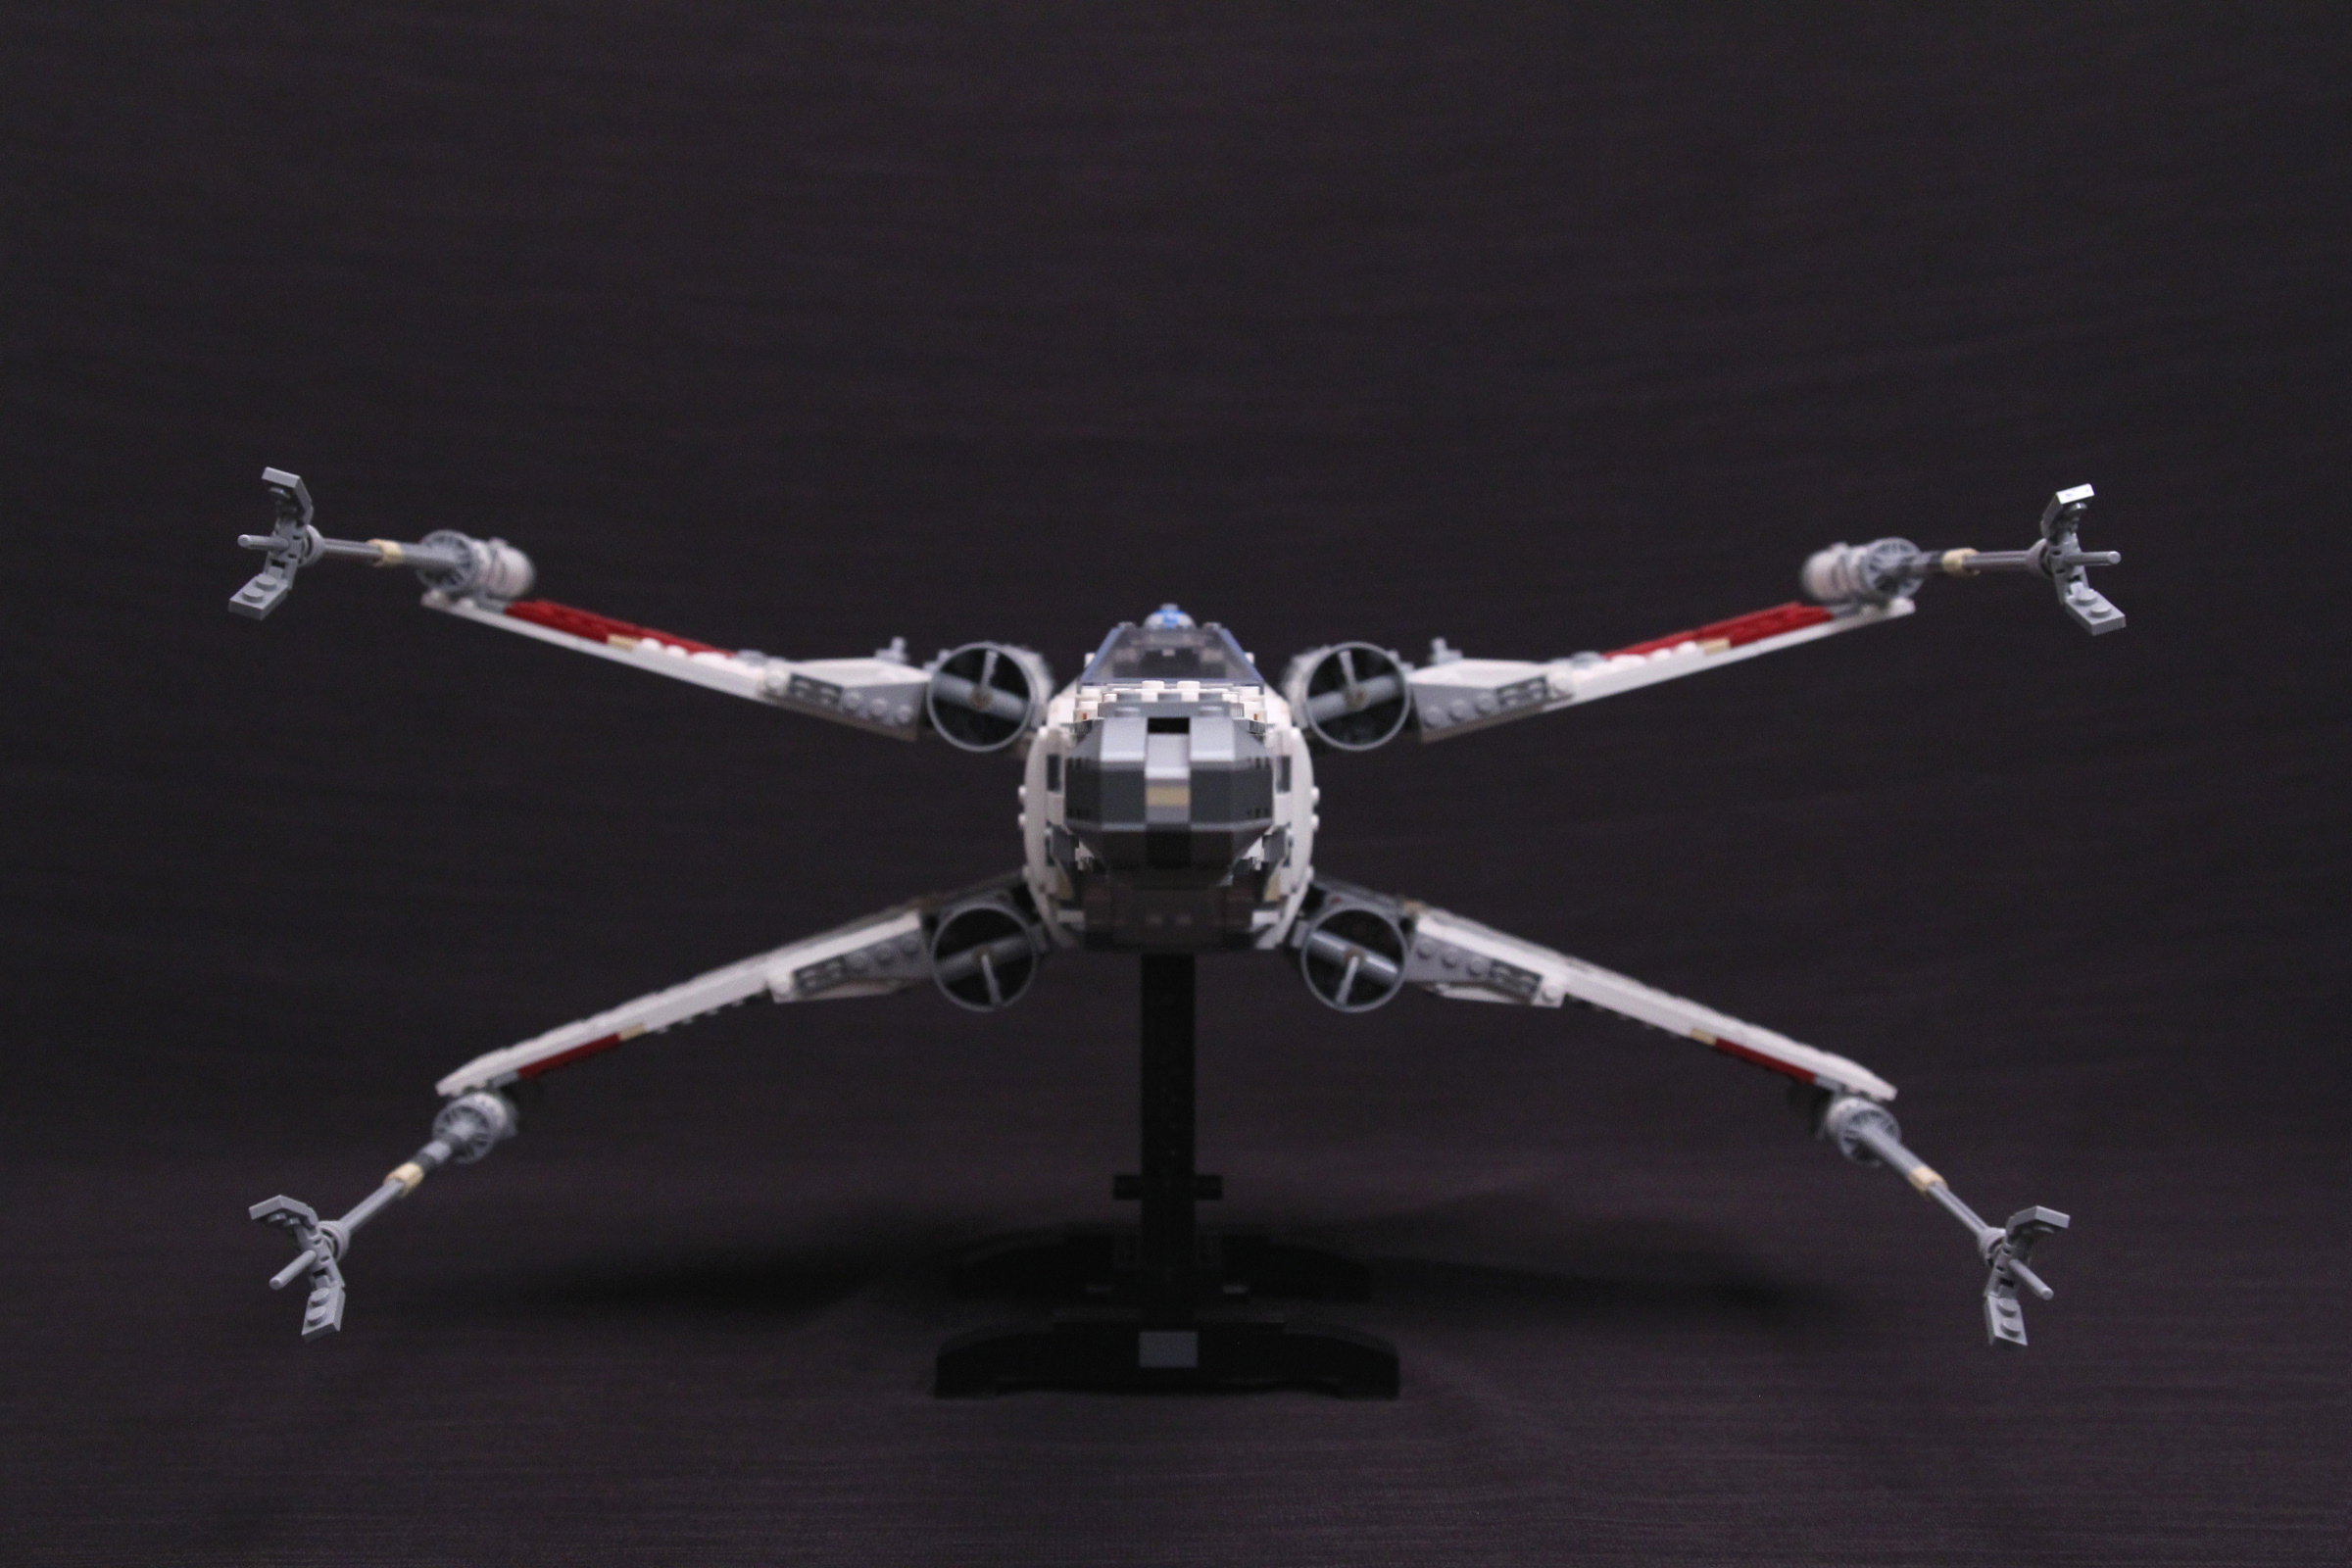
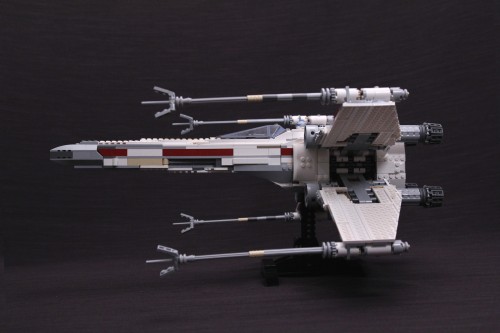
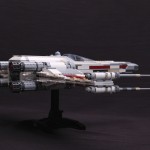
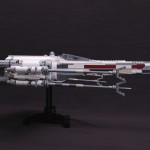
The last thing I need to address is the wing deflection. I could go on and on about the mechanism some more and how much better the new version is compared to the old, but the pictures speak for themselves.
Do the wings still droop? Yes. I think that’s unavoidable with something this size made from Lego. But the improvement is obvious with the wings together. It’s less of an issue with the wings expanded though.
 But like I mentioned above the old model has a tendency to fall apart far too easily, so it’s trading one problem for another. Apart from that complaint, I’d have to say that the profile of the old one looks better here. The gap between the wings on the new model is just too large, and the bottom set of wings end up much lower than they should be. Two steps forward, one step back. Unfortunately the wings aren’t the only things suffering from this problem either.

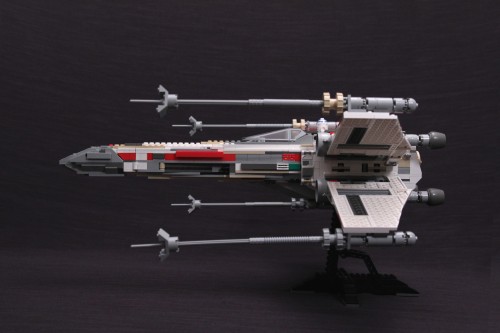
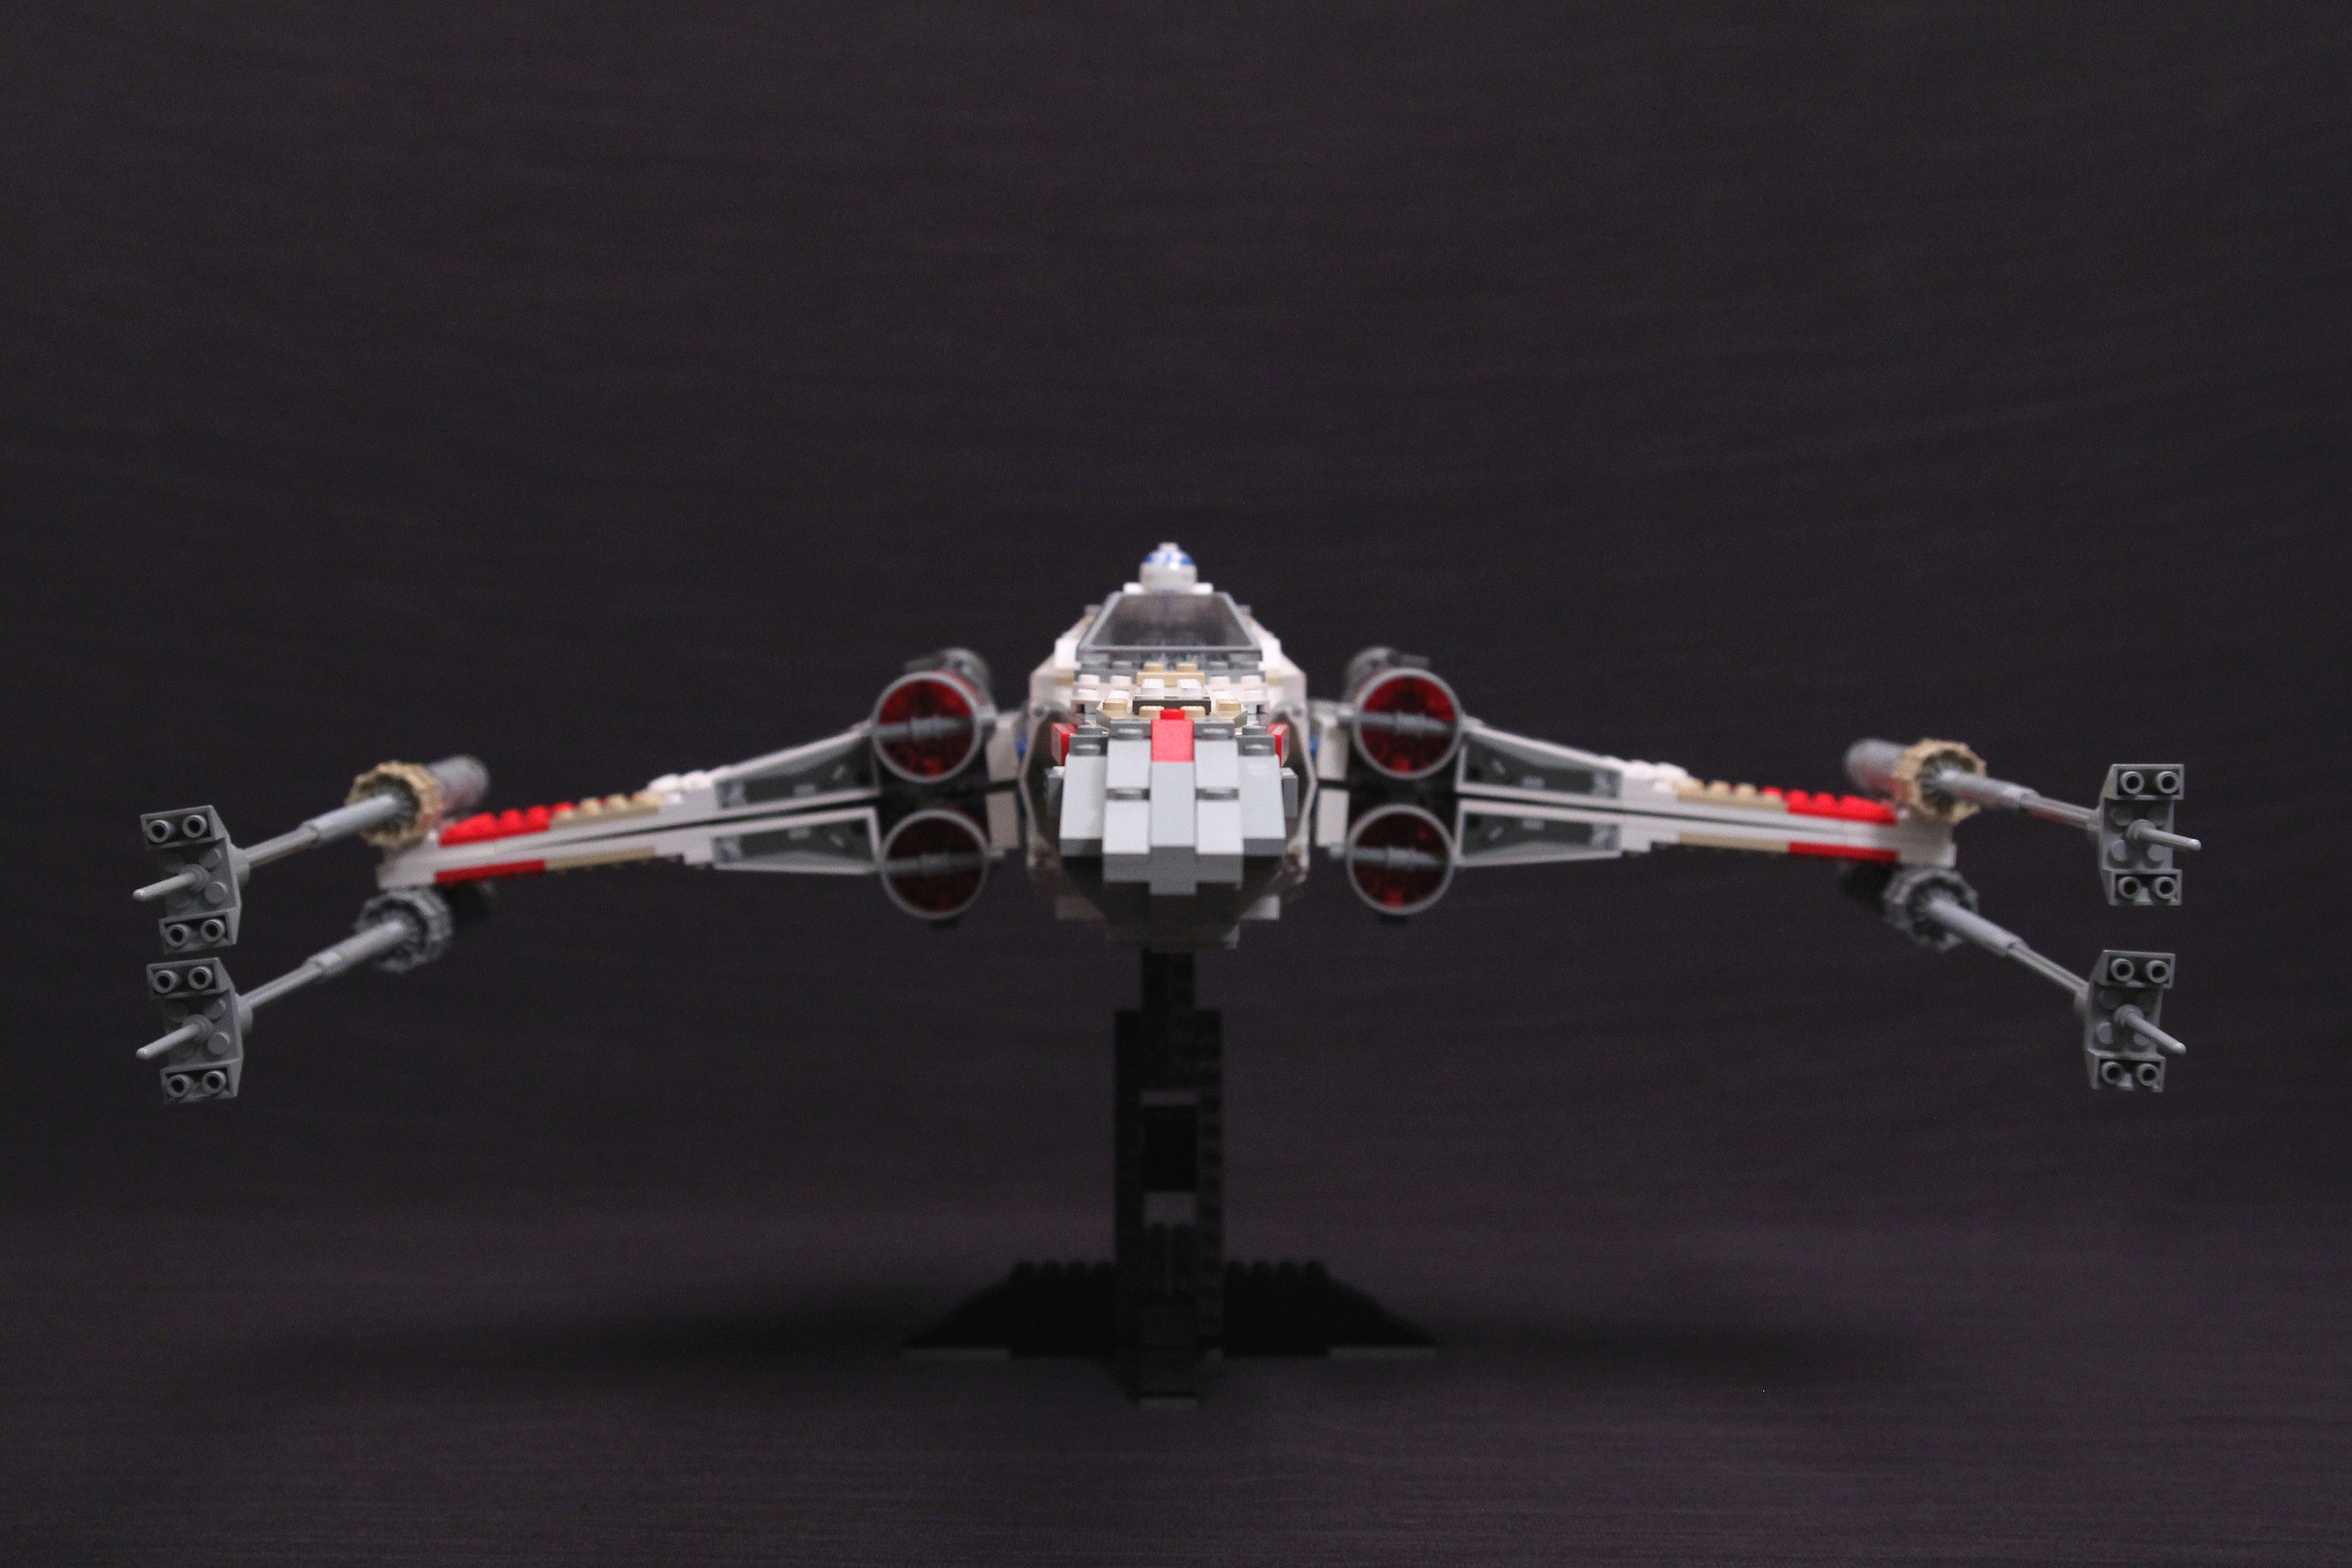
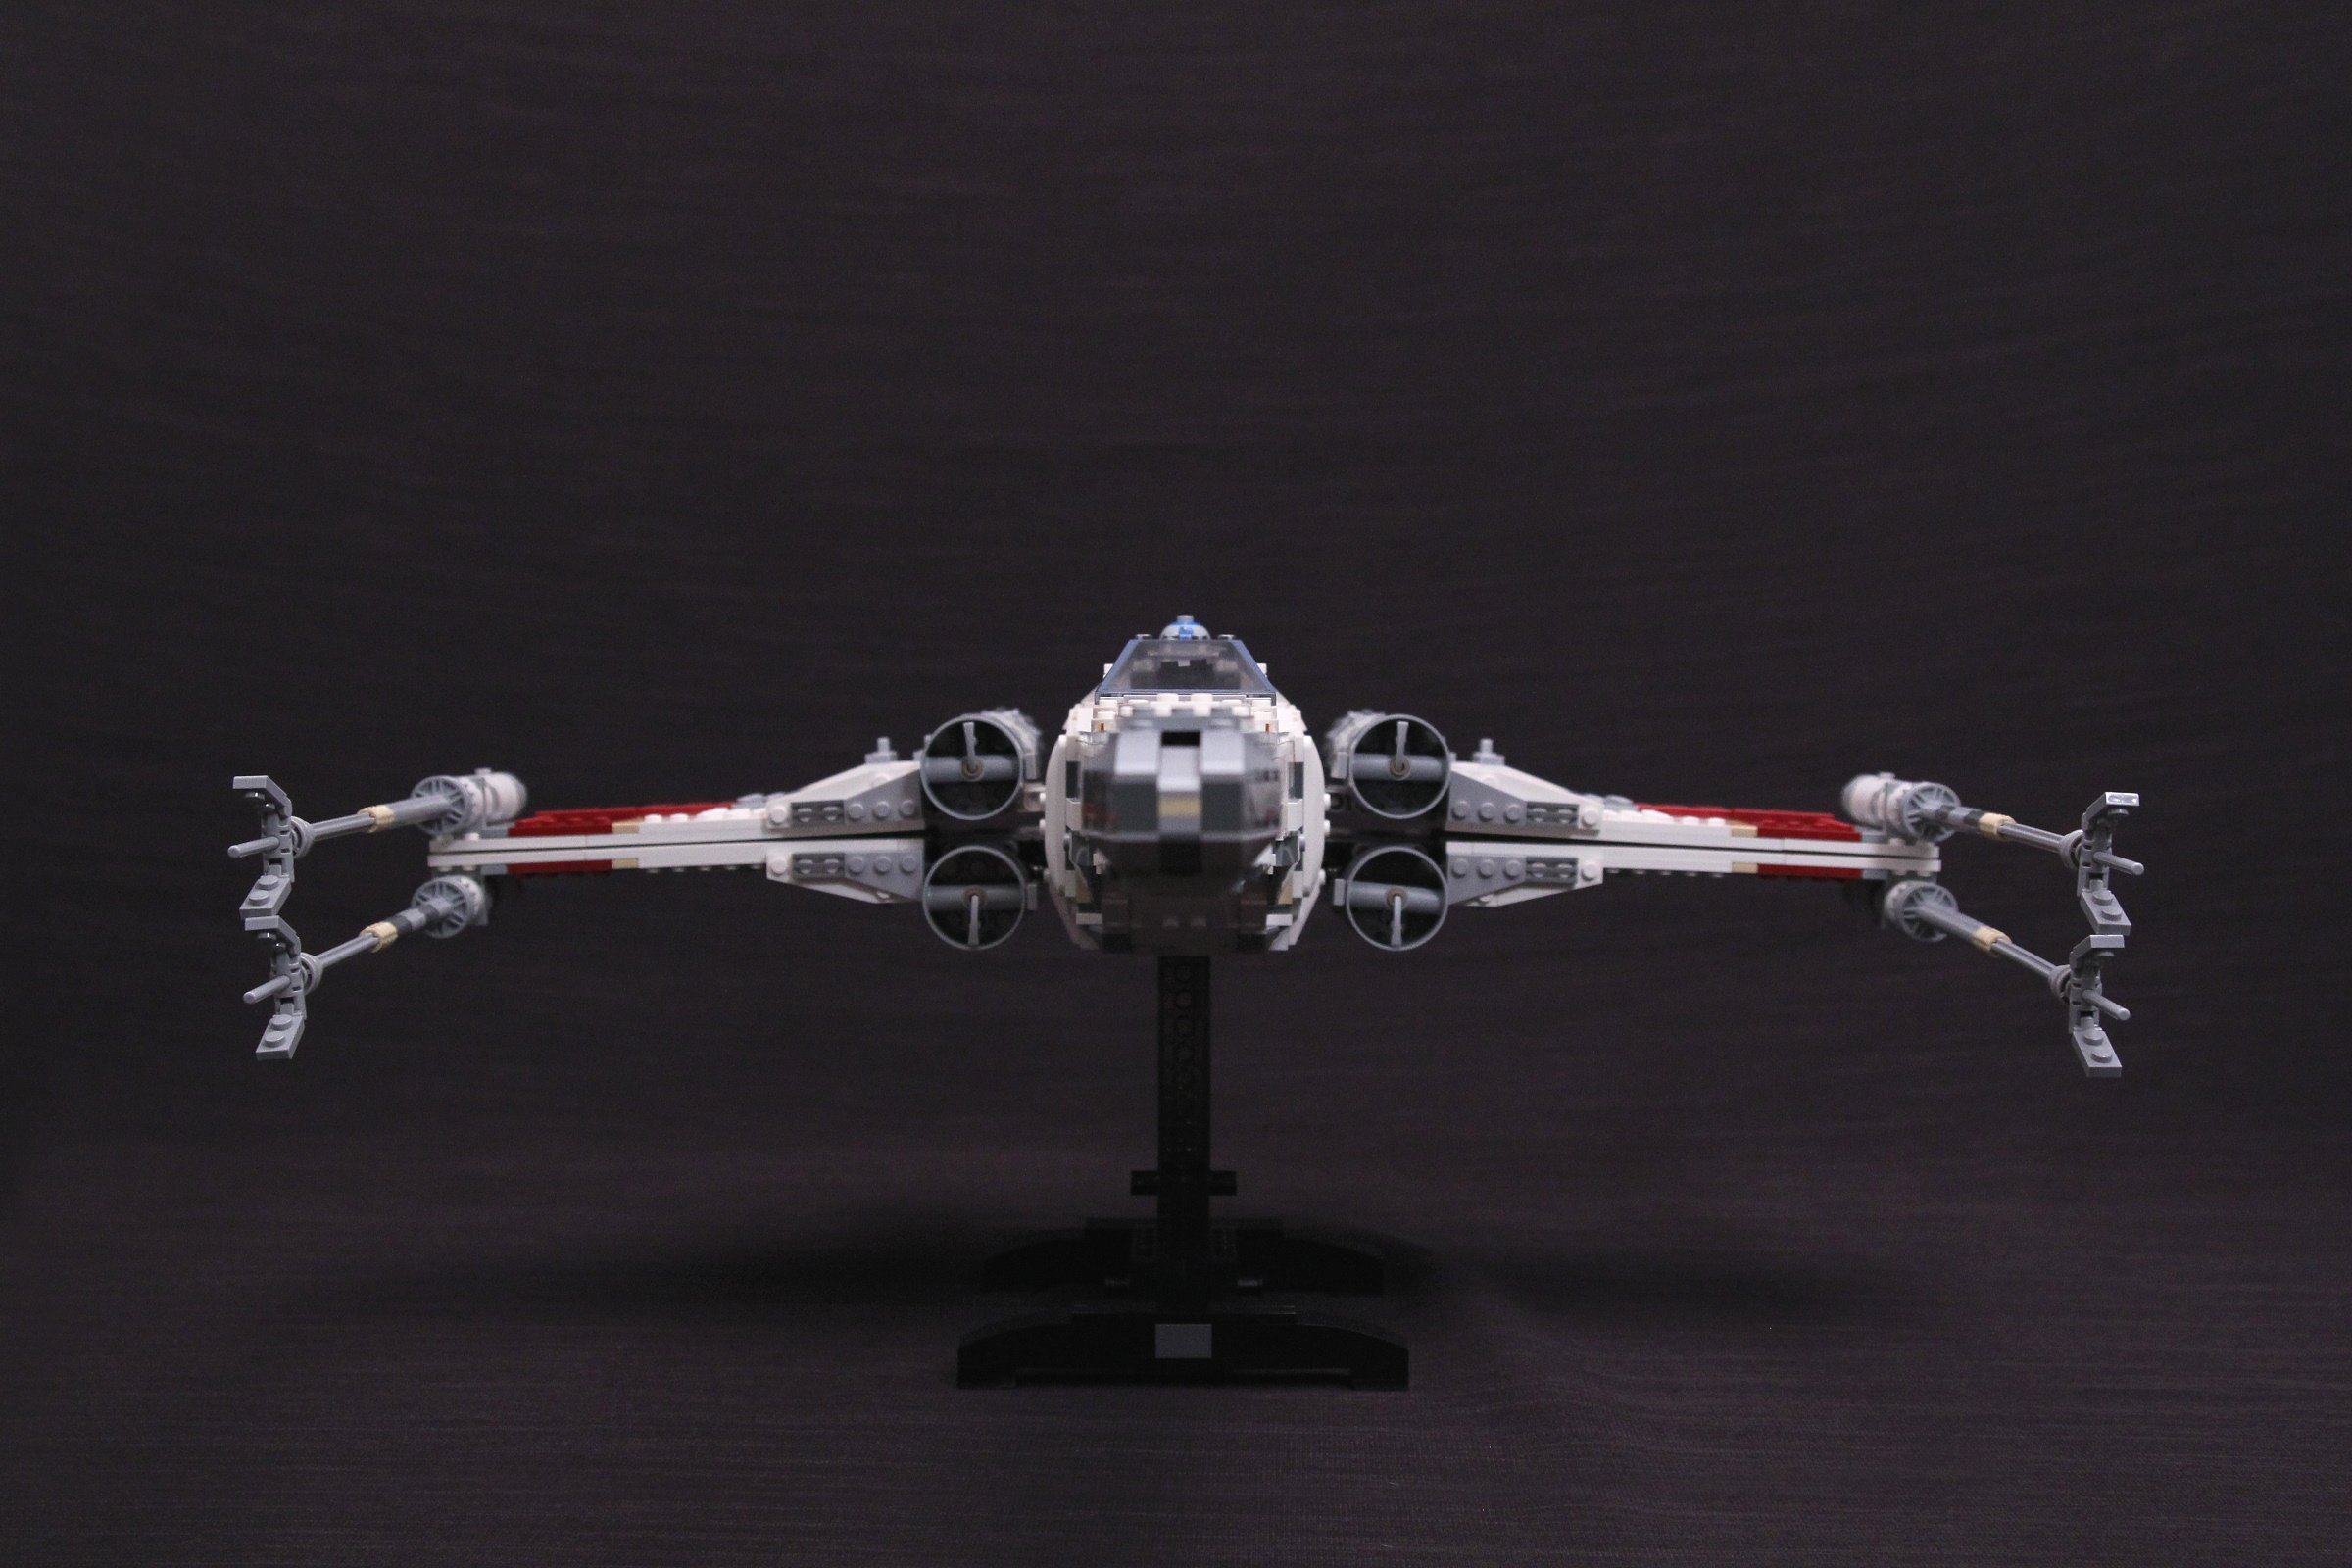
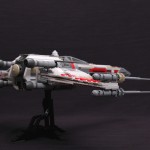
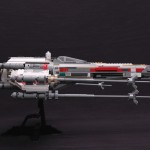
The cannon tips are just as bad, if not worse, on the new model. The lighter crescents should put less strain on the barrels but I think the additional connections to make the stripped portions are to blame for the loss of support. So that’s disappointing. You’ll notice again that the lower wings drop too low now. On the bright side, the sag really only stands out when you view them head on or directly from the side.

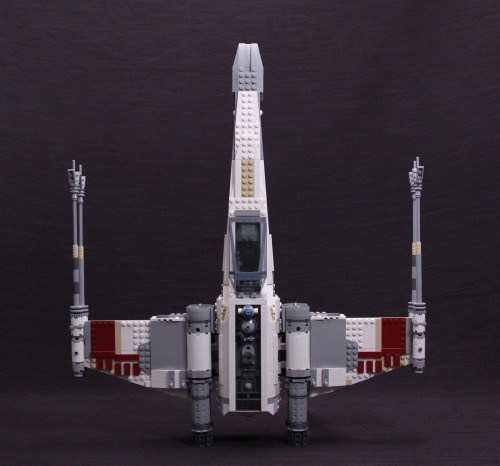
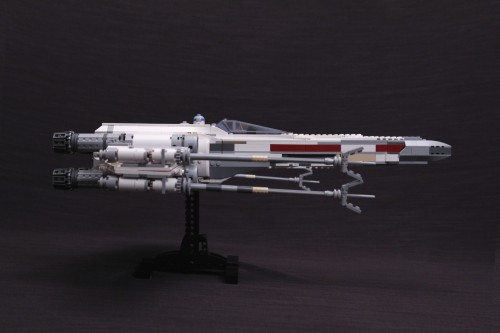
Both look quite nice in the standard attack position and leaning them back on their stands will help alleviate the issue even further. Theoretically. Time may wreak havoc on those axles eventually. In which case I’d recommend alternating the upper an lower cannons periodically, like the tires on your car. But who does that. Really.
In the end I can safely say that the new model is superior in most regards, although not without it’s own flaws. I don’t regret buying the original even at the inflated price I paid because I didn’t know there would be a better option down the line. Now that the updated version is here I wouldn’t even bother with the old one unless it was back down at the original $150 price point or better. It just doesn’t hold up. Figuratively or literally. For $50 more you do only get 259 more pieces, but as someone pointed out in the forum when you account for inflation from 2000 to 2013 you’re getting a better deal now. You also get a better looking ship and a far sturdier build. If you have more patience than me though, you might want to hold off until 2026 when the next version should be available… that should be sufficient time to address these lingering complaints. At the very least they might cave and throw in a printed canopy. But if that plan sounds unreasonable to you I would definitely recommend this set.
And finally, I’ll included full turn around shots of both models from head on and above and both opened and closed configurations, because who doesn’t like copious amounts of photos at the end of a long winded review?


10240 Red Five X-wing Starfighter goes on sale at LEGO Shop@Home on May 4th

